If you have made a custom Jar file that you do not want to share with public, then you may as well publish it to a private registry on Google Cloud Platform. You will be able to download and add the Jar file as a dependency to all your project like it’s normally done. Follow along with this article where we will go step-by-step on how to publish the maven Jar file to Google Artifact Registry (GAR).
Note: I have made a similar article for the NPM package too. Have a look.
Prerequisites!
- Must have a Google Cloud Platform account made
- Must have relevant rights/privileges given to the user for using GAR
- Must have Google Cloud SDK installed on your computer (Click here to Download)
Table of Content
- Creating a repository on Google Artifact Registry
- Create a Maven Jar File of your Project
- Configure Cloud SDK shell to link to your artifact registry
- Configure Authentication before publishing Maven Jar file
- How to add the deployed Jar file to other projects
STEP 1: Creating a Repository on Google Artifact Registry
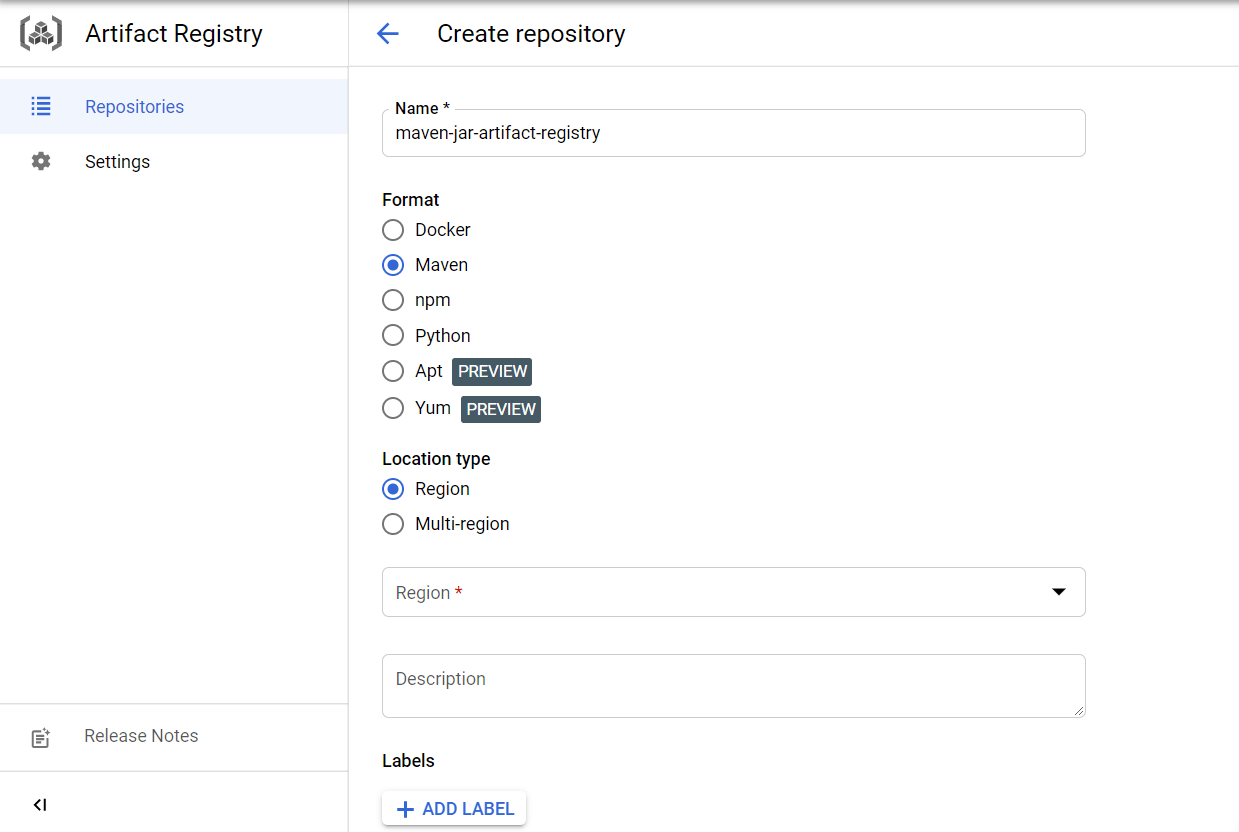
To begin with, to publish our maven jar file to Google Artifact Registry, we need to first create a repository there. So simply go to this link and click on the ‘Create Repository’ option at the top. https://console.cloud.google.com/artifacts. After clicking the create option, you will be taken to fill out some information about the repository you want to create. Take reference on the image below:
Afterward, click on Create button at the bottom of the page and your repository would be made. And this is how you would be creating a repository on the google cloud artifact registry.
STEP 2: Create Maven Jar File for your Project
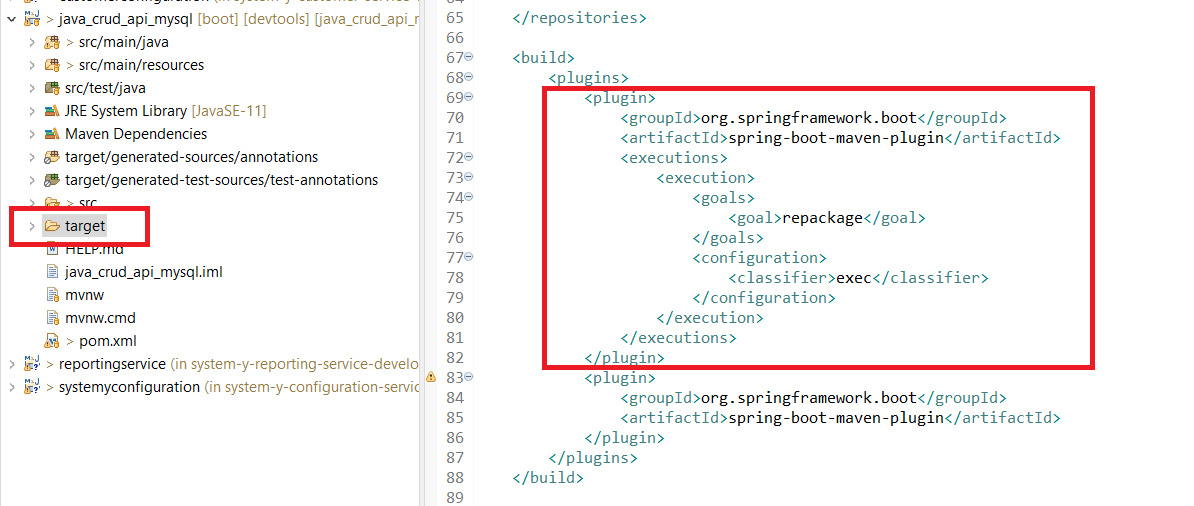
Add this plugin snippet into your POM.xml file
					<plugin>
<groupId>org.springframework.boot</groupId>
<artifactId>spring-boot-maven-plugin</artifactId>
<executions>
<execution>
<goals>
<goal>repackage</goal>
</goals>
<configuration>
<classifier>exec</classifier>
</configuration>
</execution>
</executions>
</plugin>
And then simply execute these 2 commands in the terminal. Make sure that you are standing inside the project root directory in your terminal.
For Unix/Linux:
					mvn clean
mvn package
For Windows:
					mvnw clean
mvnw package
This will create an executable Jar file in the ‘target’ directory inside your project folder. Check the image for reference
STEP 3: Configure Cloud SDK to Link to your Artifact Registry
Firstly, if it’s not already, then download and install the Google Cloud SDK shell. Here is the download link.
Afterward, open up Google Cloud SDK Shell and execute the following commands:
					gcloud auth login

gcloud init
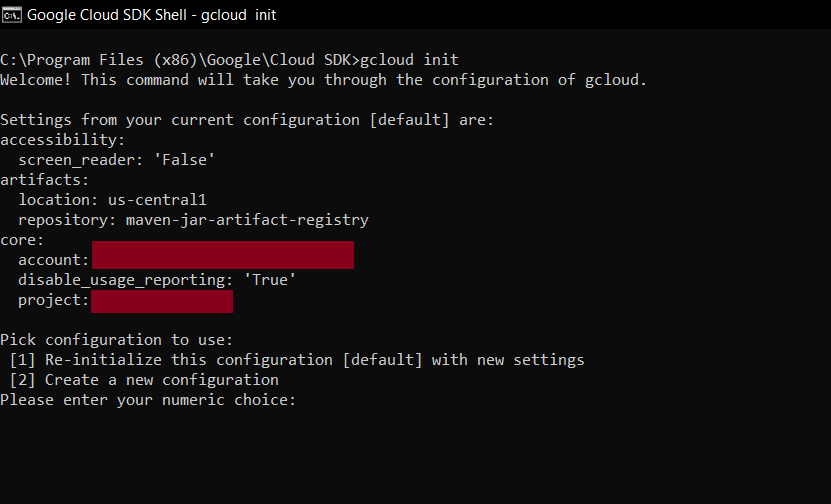
The first command will make you login into Google Cloud Platform to authenticate. The second command would then ask you a list of questions for your repository in the Google Artifact Registry. So that it knows where to target the repository. Take reference from the image below:
STEP 4: Configure Authentication before Publishing Maven Jar File
Lastly, we need to authenticate our project so that it can publish Mavel Jar File to Google Cloud Artifact. For that we need to open our repository that we created earlier in step 1. After that, you will see “Setup Instructions” option at the top bar, as shown in the image.
After clicking on it, a panel from the right side will show up where all the extension and other necessary details will be mentioned. You need to add all those accordingly to your POM.xml file to authenticate your project.
After you have added all the snippets in your POM.xml file, then we are ready to deploy the Jar file. Simply execute the following commands:
					mvn clean
mvn deploy
So, there we go. Now it starts its deployment and when you go back to your repository, it will show the Jar file being successfully uploaded on Google Cloud Artifact.
If you are wondering, ‘well what if I want to add this Jar file to my other projects. How would I do that?’
Let’s take a look at that too
STEP 5: How to Add Maven Jar File to Other Projects
This is a straightforward step. Nothing much to it once you’ve deployed the Jar file. Just Go to your maven repository and click on the Jar file that we just uploaded in step 4. In here, you will find another option at the top saying “Setup Instructions”.
When you click on that option, just like before, a panel will pop from the right side of the screen and show you few code snippets. You need to add those snippets to all the projects POM.xml file in which you want to add this Jar file. It will be added as a dependency. After you’ve added the code snippets to your POM.xml file, you need to add the dependency script too. So, click on the jar file shown in your repository named “0.0.1-SNAPSHOT” and click on the INSTALL tab. Under that tab, you’ll be shown the dependency snippet to add in your POM file.
Lastly, execute the following commands and you’re good to go. The jar file would get downloaded and installed on your project.
					mvn clean
mvn deploy
And that’s a wrap!
I hope this article helped you guys in understanding exactly how to publish Maven Jar file to Google Artifact Registry. And also, how to add these jar files to all other projects too. If you liked this article, then please hit the like button and leave a review at the bottom.
Have a great one!
Recent Comments
Categories
- Angular
- AWS
- Backend Development
- Big Data
- Cloud
- Database
- Deployment
- DevOps
- Docker
- Frontend Development
- GitHub
- Google Cloud Platform
- Installations
- Java
- JavaScript
- Linux
- MySQL
- Networking
- NodeJS
- Operating System
- Python
- Python Flask
- Report
- Security
- Server
- SpringBoot
- Subdomain
- TypeScript
- Uncategorized
- VSCode
- Webhosting
- WordPress
Search
Recent Post
Understanding Mutex, Semaphores, and the Producer-Consumer Problem
- 13 October, 2024
- 10 min read
Process scheduling algorithm – FIFO SJF RR
- 14 September, 2024
- 8 min read
How to Implement Multithreading in C Language
- 8 September, 2024
- 9 min read
