Welcome back developers!
This article is going to be quick and direct. We are going to see step-by-step on how to upload Maven packages to Nexus OSS 3. This is basically done so that you can upload your Maven packages to a repository which can then be easily added to all your projects as a simple maven dependency. It’s a centralized location to safely store and download Maven packages. Let’s jump right in.
Prerequisites!
- SpringBoot Project should be up and running.
Table of Content
- Create Maven Jar File
- Download Nexus OSS 3
- How to install Nexus OSS 3
STEP 1: Create Maven Jar File to Upload to Nexus OSS 3
Creating a Maven Jar file is simple and straightforward. Firstly, add this plugin snippet into your POM.xml file
					<plugin>
<groupId>org.springframework.boot</groupId>
<artifactId>spring-boot-maven-plugin</artifactId>
<executions>
<execution>
<goals>
<goal>repackage</goal>
</goals>
<configuration>
<classifier>exec</classifier>
</configuration>
</execution>
</executions>
</plugin>
Afterward, whichever IDE you are using, simply open a terminal inside it and execute these 2 commands in it. Make sure that you are standing inside the project root directory in your terminal.
For Unix/Linux:
					mvn clean
mvn package
For Windows:
					mvnw clean
mvnw package
This will create an executable Maven Jar file in the “target” folder present in the root directory of your project.
For a more detailed guide, check out this article.
STEP 2: Download Nexus OSS 3
First, we need to download the tool. Here is the download link. But you would be required to sign up first. Once you’ve signed up and have downloaded the zip file. You need to extract it inside a folder. The zip file would container 2 additional folders.
- “sonatype-work”
- “nexus-3.34.0-01”
That’s it. Now let’s see how you will install and run this tool so that we can see how to upload maven packages to Nexus OSS 3.
STEP 3: How to install Nexus OSS 3
Afterwards, we need to install the tool on our computer locally. Although you could also follow the same procedure on a server as well.
Open up a terminal. I like to use gitbash but cmd is equally okay. Using a terminal or cmd, go to folder “nexus-3.34.0-01” and then inside this folder, go to “bin” folder. So, your path would be “nexus-3.34.0-01/bin”. Once you are inside the bin folder, you need to run the following command:
For Unix/Linux:
./nexus run
For Windows cmd:
nexus.exe /run
This will run the installation process and it will also run the service after it’s done installing. You would be able to use the Nexus service on your browser on port 8080 by default.
Changing Default Port (Optional)
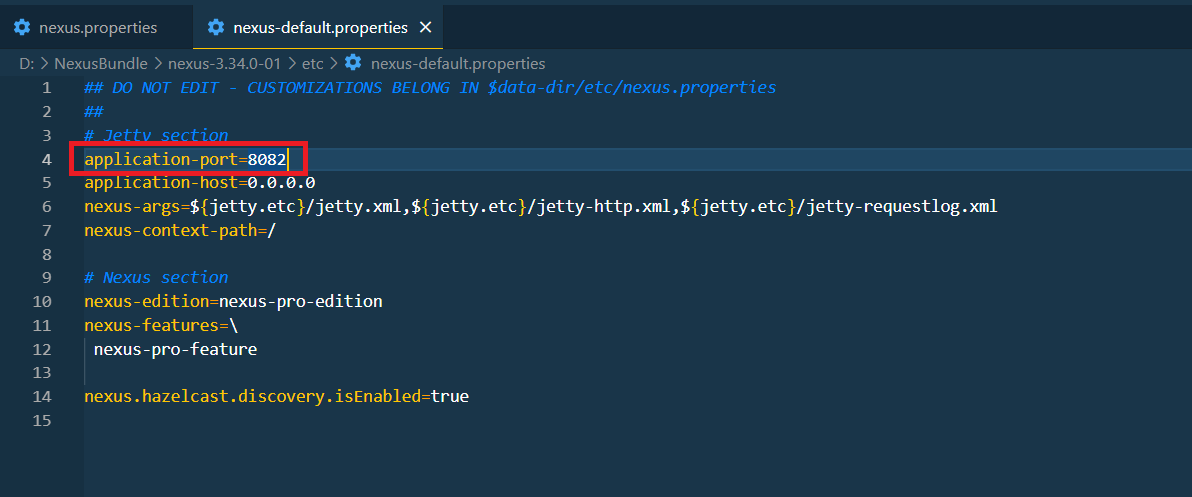
Although if you want, you can also change the default port number on the “nexus-default” file. You can find this file in the “etc” folder in the same directory “nexus-3.34.0-01/etc”. Take reference from the image below:
STEP 4: Upload Maven Packages to Nexus OSS 3
Once the installation process is completed, you can now open a browser and go to this URL: http://localhost:8080
Of course, if you have changed the port number as I have, the URL would be different accordingly. For me, the port I have set is 8082 as shown in the above image as well. Nexus homepage would load up like so:
Signing Up
Here you need to click on “Sign In”. By default, the username is “admin”, and it will tell you the path of a file which contains the password. This password which you will find in the file in the mentioned path will only be a 1-time password. As soon as you log in, you will be prompted to change your password. After which the home page would be filled with more options for you to explore as shown below:
Uploading Maven Jar Package to Nexus OSS 3
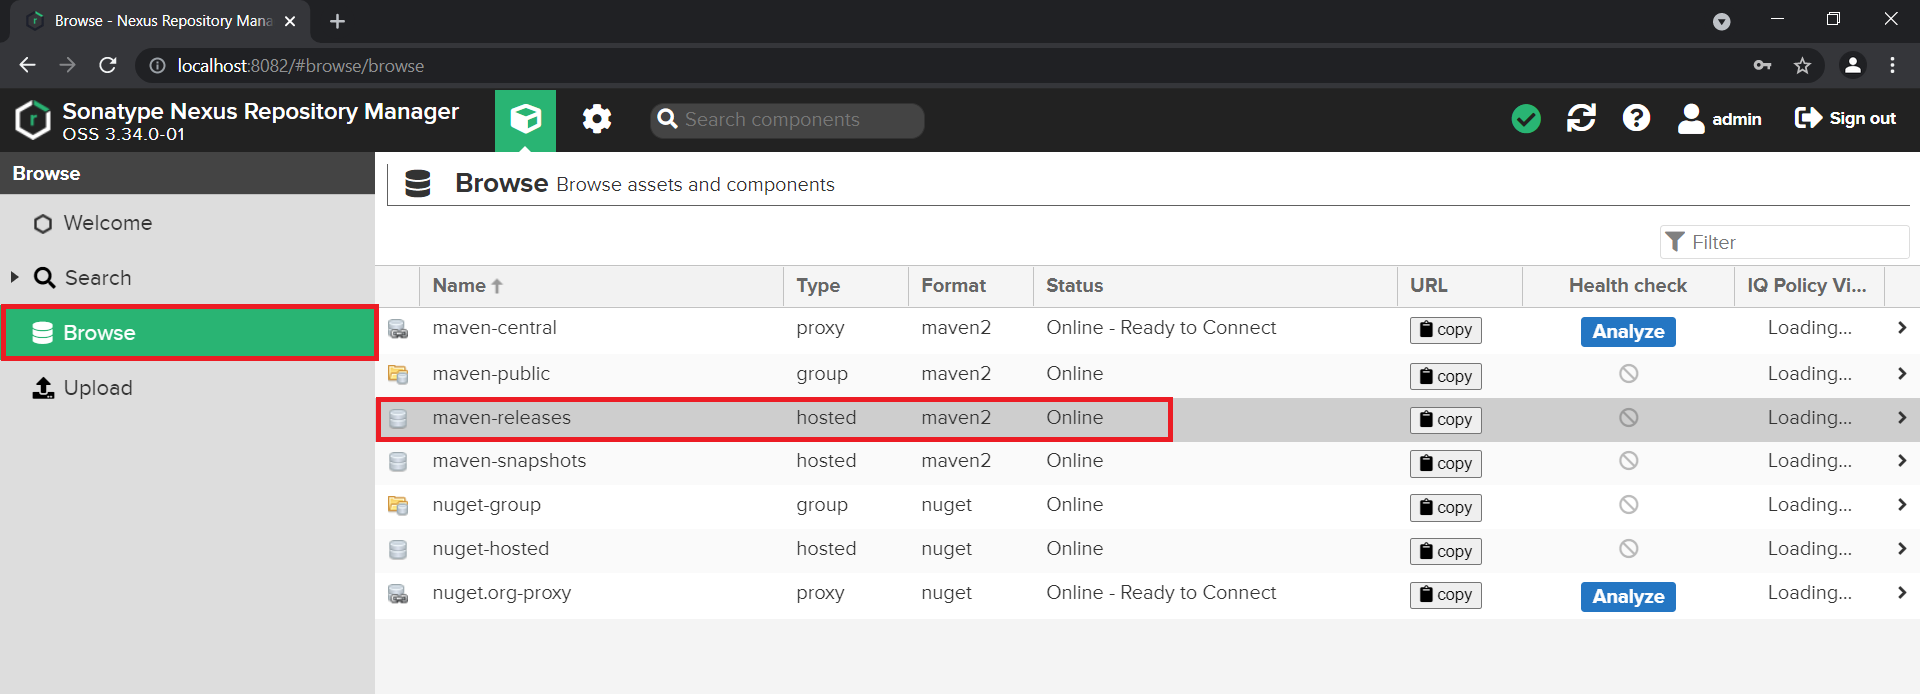
Afterward, click on the Browse option on the left panel and select the “maven-release” repository. This is the repository where we will be publishing our maven packages in the Nexus environment.
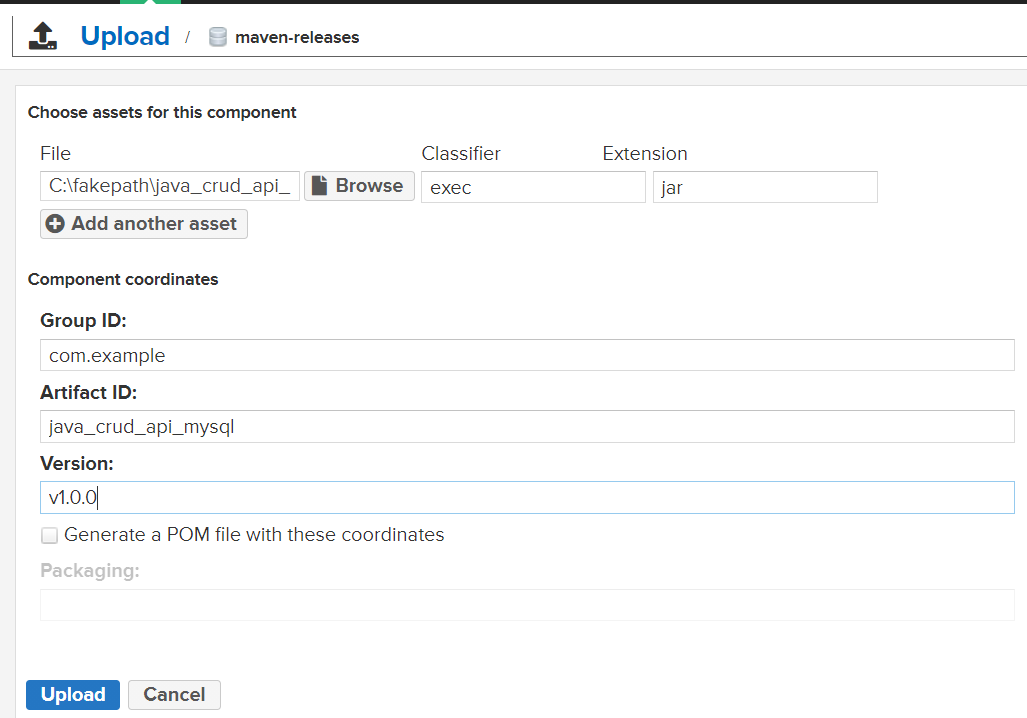
Next, you will click on the Upload button on the top bar. Hence, this will take you to fill out all information about the nature of the package you want to publish to Nexus. Since we are here to publish a Maven Jar file, I filled it something as shown in the image below:
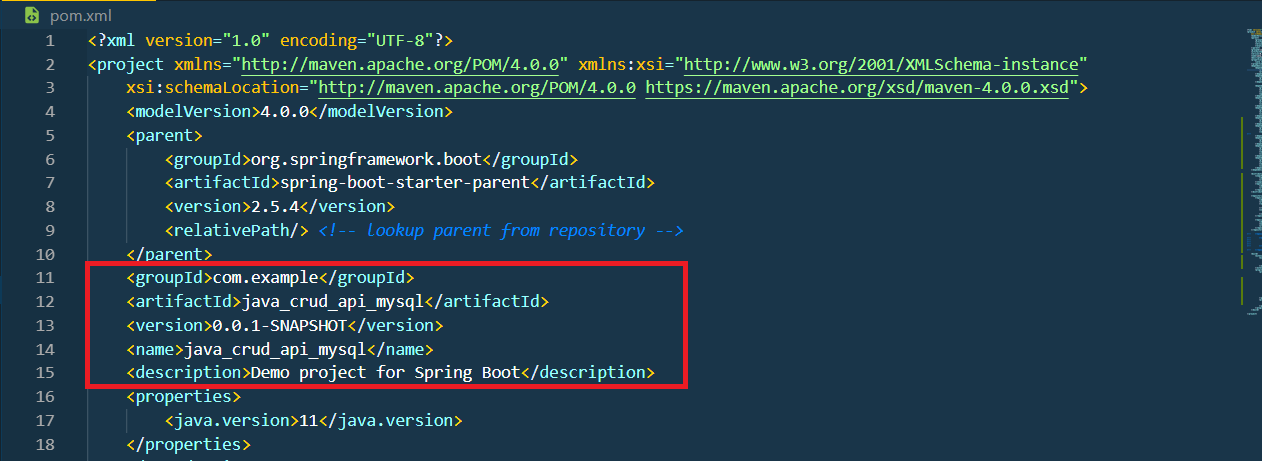
in the first row browse to the location of the jar file inside the project that you fill in STEP 1. Then in order to fill in the rest of the information open up the POM.XML file of the project itself. At the beginning of this POM file, there will be a <parent> script tag. Just underneath it you will find written the ‘Group ID’ and the ‘Artifact ID’. Just copy those and fill them here in the fields as shown in the image below. However, do give it a different version number.
STEP 5: Download Maven Packages from Nexus
Go to the ‘Search’ bar on the left panel. Here you will see the listing of all the packages you have uploaded to Nexus OSS 3. Choose the one that you want to download and click on it. Take reference from the image below:
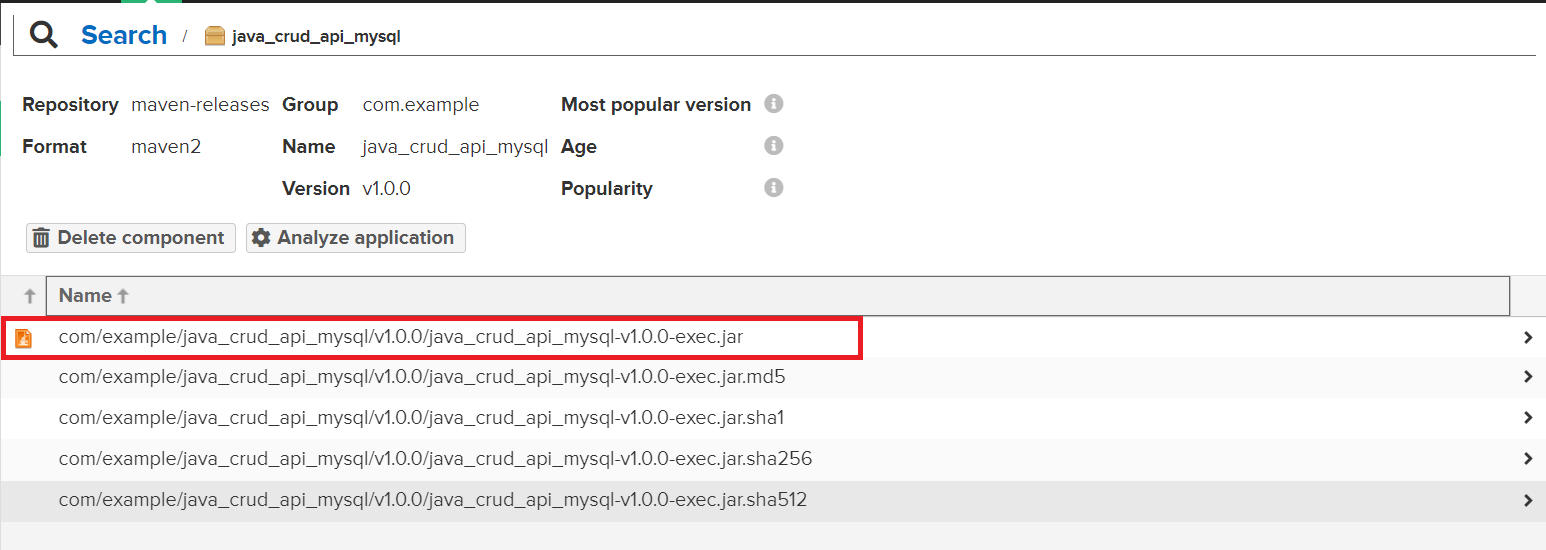
Then you will select the Jar file as shown in the image below:
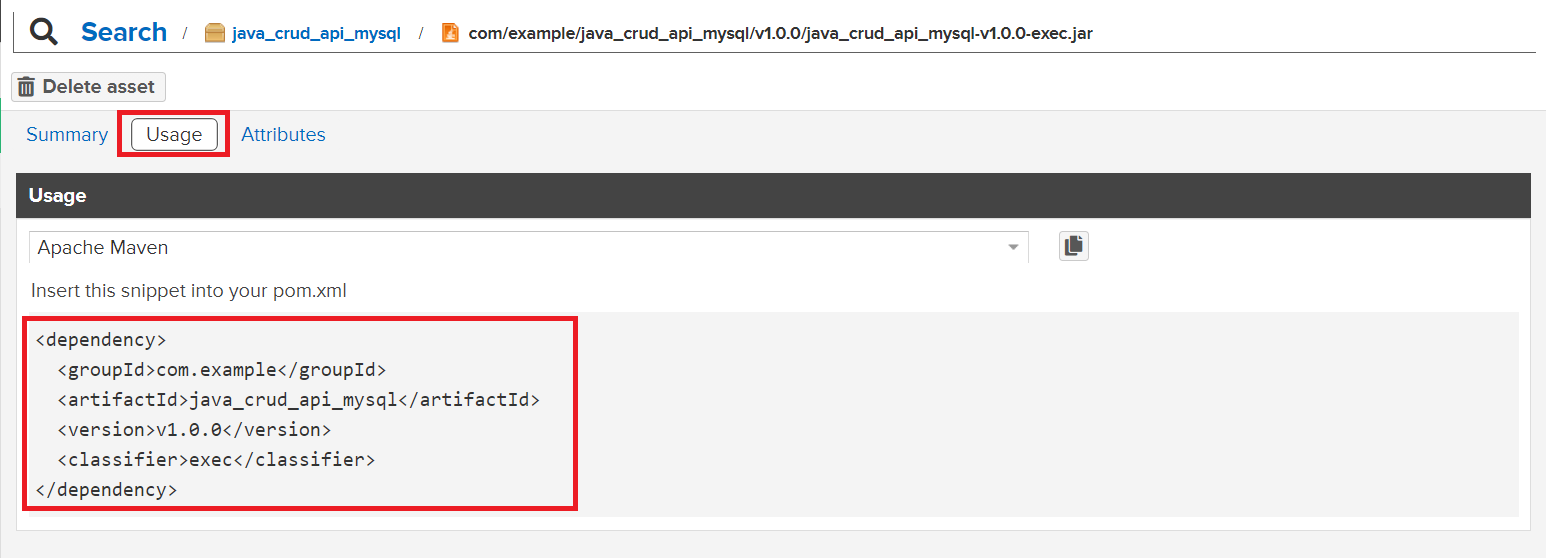
Then click on the Usage tab. This will show you the dependency code snippet which you need to add to your POM.xml file in your project. After adding this dependency, build your project and the Jar file would be integrated with your project.
And that’s a wrap!
I hope you found this article helpful and now you know how to upload maven packages to Nexus OSS 3. If so, then please like this article and leave a comment below.
Have a great one!
Recent Comments
Categories
- Angular
- AWS
- Backend Development
- Big Data
- Cloud
- Database
- Deployment
- DevOps
- Docker
- Frontend Development
- GitHub
- Google Cloud Platform
- Installations
- Java
- JavaScript
- Linux
- MySQL
- Networking
- NodeJS
- Operating System
- Python
- Python Flask
- Report
- Security
- Server
- SpringBoot
- Subdomain
- TypeScript
- Uncategorized
- VSCode
- Webhosting
- WordPress
Search
Recent Post
Understanding Mutex, Semaphores, and the Producer-Consumer Problem
- 13 October, 2024
- 10 min read
Process scheduling algorithm – FIFO SJF RR
- 14 September, 2024
- 8 min read
How to Implement Multithreading in C Language
- 8 September, 2024
- 9 min read
