Welcome developers! In this spring boot security tutorial, we are going to learn how to implement Java SpringBoot security using JWT token. I have already made a blog for implementing basic SpringBoot security. In this article, we will improve that Java security level by implementing a JWT security token handler. First, let’s go through the basics of what exactly it is.
What is JWT Authorization?
JWT stands for Jason web token. It is used for securing REST APIs at the back-end services. It is an open standard used to share security information between a client and a server.
How does JWT Security Work?
Implementing the JWT security token consists of two parts. In the first part, a post request is sent to the backend service and that request will contain a username and a password in its request body. That username and password will be used for spring boot JWT auth. Only after successful authentication, will it create an encrypted JWT security token.
In the next part, the client will now use that JWT security token in all of its HTTP requests to the API services. The backend service will first intercept each HTTP call to check for the valid JWT security token. If everything is good then it will let it reach the API endpoint.
Table of Content
- Create a Springboot Project with Spring Initializr
- Create a basic Java Springboot API
- Adding JWT SpringBoot Security Dependencies
- Creating Models for JWT Authentication in Springboot
- Spring Boot JWT Authenticating Incoming User Details
- Creating JWT Utilities in Springboot
- Making JWT Authentication Endpoint in Springboot
- Creating JWT Filter for incoming HTTP Requests
- Adding Security Configurations for JWT in Springboot
- Testing with Postman
- Conclusion
- GitHub Repository for JWT in Springboot
JWT SpringBoot: Create a Java Spring Boot Application
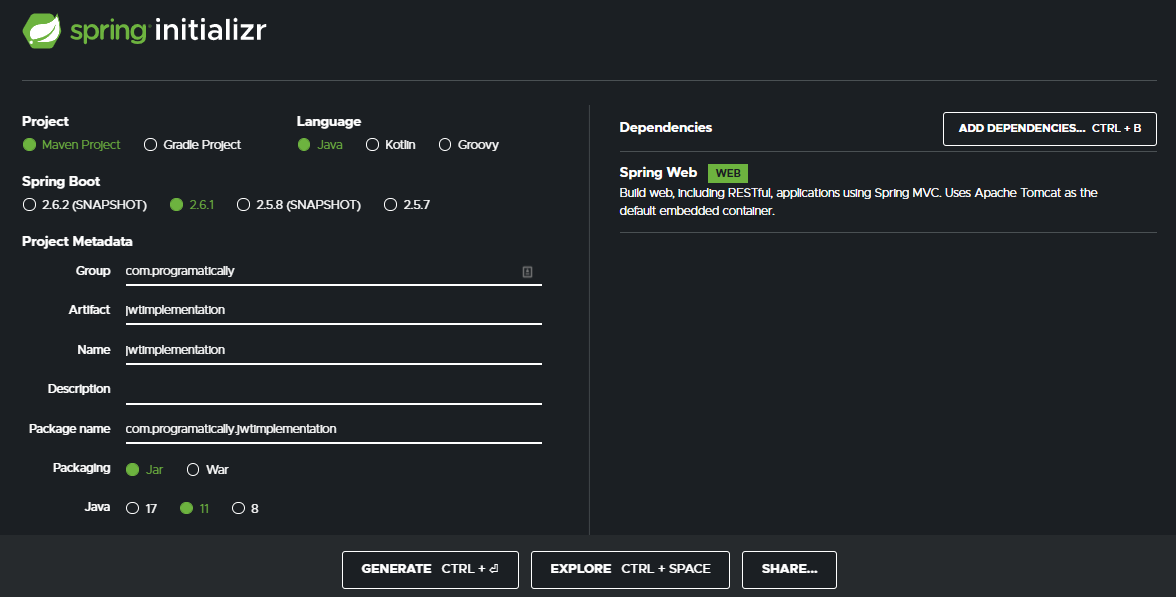
To create a java spring boot application, first head over to Spring Initializr and follow the instructions as shown in the below picture. Lastly, click on the generate button to download the java springboot application.
JWT SpringBoot: Create a basic Java Springboot API
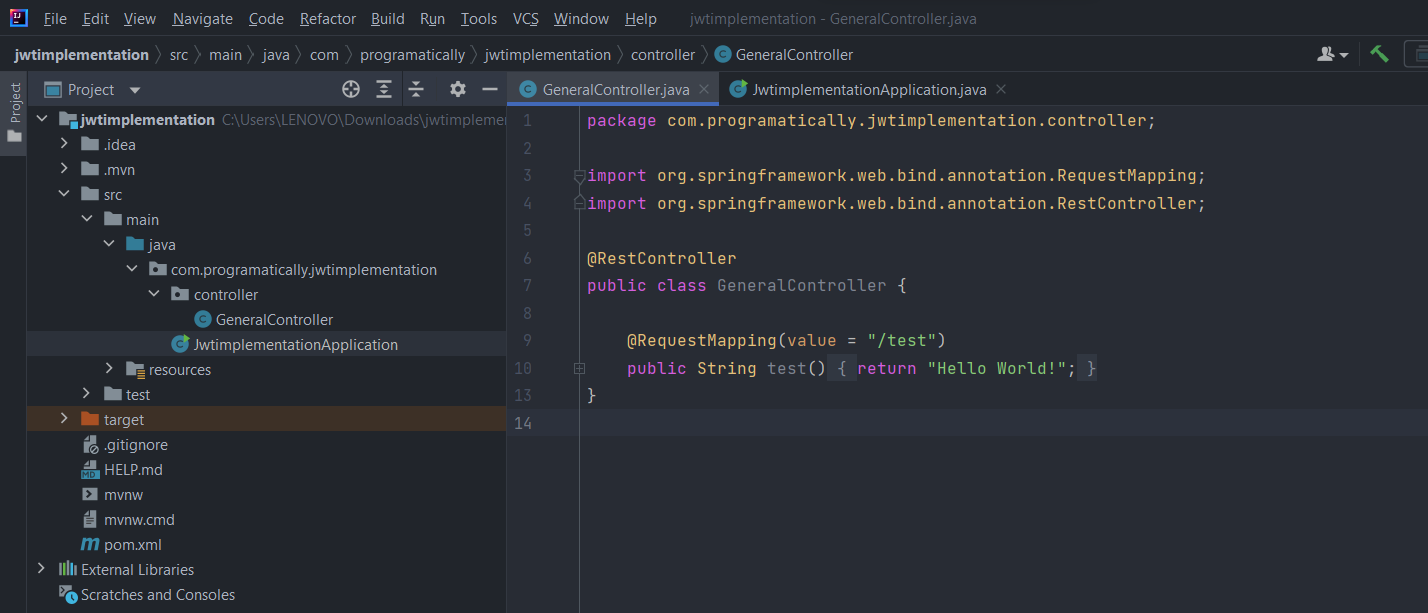
Now that we have created our java spring boot application, open it up in a text editor like VS Code. To start off, we are going to create a basic API in Java SpringBoot that will only return us “Hello World” string.
Create a package named “Controller” in your main package and then create a Java class inside it named “GeneralController”. See the image below for reference.
Now let’s run the project and check on our browser for output as shown below.
Java SpringBoot: Adding JWT SpringBoot Security Dependencies
To create JWT security token handler for authentication, we need to add the following JWT dependencies in the pom.xml file.
					<dependency>
    <groupId>org.springframework.boot</groupId>
    <artifactId>spring-boot-starter-security</artifactId>
</dependency>

<dependency>
    <groupId>io.jsonwebtoken</groupId>
    <artifactId>jjwt</artifactId>
    <version>0.9.1</version>
</dependency>

<dependency>
    <groupId>javax.xml.bind</groupId>
    <artifactId>jaxb-api</artifactId>
    <version>2.3.1</version>
</dependency>
JWT Security Token: Creating Models for spring boot JWT Auth
Next, we need to create model classes. Therefore, create a package called “model” and create a Java class called “AuthenticationRequest”. This is used when the user first sends the HTTP request to retrieve the JWT security token. The incoming request body would contain the username and password which are parsed into this model class. Add the following code inside it:
					package com.programatically.jwtimplementation.model;

public class AuthenticationRequest {

    private String username;
    private String password;

    public AuthenticationRequest(){}
    public AuthenticationRequest(String username, String password) {
        this.username = username;
        this.password = password;
    }

    public String getUsername() {
        return username;
    }

    public void setUsername(String username) {
        this.username = username;
    }

    public String getPassword() {
        return password;
    }

    public void setPassword(String password) {
        this.password = password;
    }

}
Create another model class called “AuthenticationResponse”. This model class is used after the authentication is done and successful. It will be used to send the JWT security token back to the user as a response. Add the following code inside it:
					package com.programatically.jwtimplementation.model;

public class AuthenticationResponse {
    private final String jwt;

    public AuthenticationResponse(String jwt) {
        this.jwt = jwt;
    }

    public String getJwt() {
        return jwt;
    }
}
Spring Boot JWT Authenticating Incoming User Details
To perform Spring Boot JWT auth, create a package called “service”. Then inside it, create a Java class called “MyUserDetailsService”. MyUserDetailsService implements the Spring Boot Security UserDetailsService interface. It will be used when the user sends the HTTP request containing the username and password in the request body. Which will then be authenticated using the method “loadUserByUsername” in this service class.
Note: For authentication, I have hard-coded the user details i.e. “admin“ and “password”. You should implement it in a way that the user details are fetched from the database.
Copy the following code Inside this class:
					package com.programatically.jwtimplementation.service;

import org.springframework.security.core.userdetails.User;
import org.springframework.security.core.userdetails.UserDetails;
import org.springframework.security.core.userdetails.UserDetailsService;
import org.springframework.security.core.userdetails.UsernameNotFoundException;
import org.springframework.stereotype.Service;
import java.util.ArrayList;

@Service

public class MyUserDetailsService implements UserDetailsService {
    @Override
    public UserDetails loadUserByUsername(String userName) throws UsernameNotFoundException {
        if ("admin".equals(userName)) {
            return new User("admin", "programatically", new ArrayList<>());
        } else {
            throw new UsernameNotFoundException("User not found with username: " + userName);
        }
    }
}
Spring Boot Security Config: Creating JWT SpringBoot Utilities
To perform all SpringBoot security tasks, we need to create a JWT utility class. The utility class is responsible for performing JWT operations like creation and validation. Therefore, create a package called “util” and create a java class inside it called “JwtUtils”. Add the following code inside it:
					package com.programatically.jwtimplementation.util;

import io.jsonwebtoken.Claims;
import io.jsonwebtoken.Jwts;
import io.jsonwebtoken.SignatureAlgorithm;
import org.springframework.security.core.userdetails.UserDetails;
import org.springframework.stereotype.Service;
import java.util.Date;
import java.util.HashMap;
import java.util.Map;
import java.util.function.Function;

@Service
public class JwtUtil {

    //  SHUOLD RETRIEVE THIS SECRET KEY FROM DATABASE OR OTHER SECURE SOURCES. DO NOT HARD CODE THIS LIKE I HAVE IN REAL PROJECT
    private String SECRET_KEY = "programatically";

    public String extractUsername(String token) {
        return extractClaim(token, Claims::getSubject);
    }

    public Date extractExpiration(String token) {
        return extractClaim(token, Claims::getExpiration);
    }

    public <T> T extractClaim(String token, Function<Claims, T> claimsResolver) {
        final Claims claims = extractAllClaims(token);
        return claimsResolver.apply(claims);
    }

    private Claims extractAllClaims(String token) {
        return Jwts.parser().setSigningKey(SECRET_KEY).parseClaimsJws(token).getBody();
    }

    private Boolean isTokenExpired(String token) {
        return extractExpiration(token).before(new Date());
    }

    public String generateToken(UserDetails userDetails) {
        Map<String, Object> claims = new HashMap<>();
        return createToken(claims, userDetails.getUsername());
    }

    private String createToken(Map<String, Object> claims, String subject) {
        return Jwts.builder().setClaims(claims).setSubject(subject).setIssuedAt(new Date(System.currentTimeMillis()))
                .setExpiration(new Date(System.currentTimeMillis() + 1000 * 60 * 60 * 10))
                .signWith(SignatureAlgorithm.HS256, SECRET_KEY).compact();
    }

    public Boolean validateToken(String token, UserDetails userDetails) {
        final String username = extractUsername(token);
        return (username.equals(userDetails.getUsername()) && !isTokenExpired(token));
    }
}
SpringBoot Security: Making JWT Authentication Endpoint
Another step in implementing SpringBoot Security, we need to add an API endpoint. Add the following code in the “GeneralController” class:
					package com.programatically.jwtimplementation.controller;

import com.programatically.jwtimplementation.model.AuthenticationRequest;
import com.programatically.jwtimplementation.model.AuthenticationResponse;
import com.programatically.jwtimplementation.service.MyUserDetailsService;
import com.programatically.jwtimplementation.util.JwtUtil;
import org.springframework.beans.factory.annotation.Autowired;
import org.springframework.http.ResponseEntity;
import org.springframework.security.authentication.AuthenticationManager;
import org.springframework.security.authentication.BadCredentialsException;
import org.springframework.security.authentication.UsernamePasswordAuthenticationToken;
import org.springframework.security.core.userdetails.UserDetails;
import org.springframework.web.bind.annotation.RequestBody;
import org.springframework.web.bind.annotation.RequestMapping;
import org.springframework.web.bind.annotation.RequestMethod;
import org.springframework.web.bind.annotation.RestController;

@RestController
public class GeneralController {

    @Autowired
    private AuthenticationManager authenticationManager;

    @Autowired
    private JwtUtil jwtTokenUtil;

    @Autowired
    private MyUserDetailsService userDetailsService;


    @RequestMapping(value = "/test")
    public String test(){
        return "Hello World!";
    }

    @RequestMapping(value = "/authenticate", method = RequestMethod.POST)
    public ResponseEntity<?> createAuthenticationToken(@RequestBody AuthenticationRequest authenticationRequest) throws Exception {

        try{
            authenticationManager.authenticate(
                    new UsernamePasswordAuthenticationToken(authenticationRequest.getUsername(), authenticationRequest.getPassword())
            );
        } catch (BadCredentialsException e){
            throw new Exception("Incorrect username or password", e);
        }
        final UserDetails userDetails = userDetailsService
                .loadUserByUsername(authenticationRequest.getUsername());

        final String jwt = jwtTokenUtil.generateToken(userDetails);
        return ResponseEntity.ok(new AuthenticationResponse(jwt));
    }
}
SpringBoot Security: Creating JWT Filter for Incoming HTTP Requests
Afterward, we need to create a JWT filter class. Which will be responsible for intercepting all of the incoming HTTP requests. It will then confirm if the incoming request has a valid JWT security token in the header. If so, then it will allow the HTTP request to carry on otherwise it will reject the incoming call. Create a package called “util” and then create a Java class inside it called “JwtUtil”. Copy the following code inside it:
					package com.programatically.jwtimplementation.util;

import io.jsonwebtoken.Claims;
import io.jsonwebtoken.Jwts;
import io.jsonwebtoken.SignatureAlgorithm;
import org.springframework.security.core.userdetails.UserDetails;
import org.springframework.stereotype.Service;
import java.util.Date;
import java.util.HashMap;
import java.util.Map;
import java.util.function.Function;

@Service
public class JwtUtil {

//  SHUOLD RETRIEVE THIS SECRET KEY FROM DATABASE OR OTHER SECURE SOURCES. DO NOT HARD CODE THIS LIKE I HAVE IN YOUR JAVA SPRING BOOT APPLICATION
    private String SECRET_KEY = "programatically";

    public String extractUsername(String token) {
        return extractClaim(token, Claims::getSubject);
    }

    public Date extractExpiration(String token) {
        return extractClaim(token, Claims::getExpiration);
    }

    public <T> T extractClaim(String token, Function<Claims, T> claimsResolver) {
        final Claims claims = extractAllClaims(token);
        return claimsResolver.apply(claims);
    }
    private Claims extractAllClaims(String token) {
        return Jwts.parser().setSigningKey(SECRET_KEY).parseClaimsJws(token).getBody();
    }

    private Boolean isTokenExpired(String token) {
        return extractExpiration(token).before(new Date());
    }

    public String generateToken(UserDetails userDetails) {
        Map<String, Object> claims = new HashMap<>();
        return createToken(claims, userDetails.getUsername());
    }

    private String createToken(Map<String, Object> claims, String subject) {
        return Jwts.builder().setClaims(claims).setSubject(subject).setIssuedAt(new Date(System.currentTimeMillis()))
                .setExpiration(new Date(System.currentTimeMillis() + 1000 * 60 * 60 * 10))
                .signWith(SignatureAlgorithm.HS256, SECRET_KEY).compact();
    }

    public Boolean validateToken(String token, UserDetails userDetails) {
        final String username = extractUsername(token);
        return (username.equals(userDetails.getUsername()) && !isTokenExpired(token));
    }
}
Adding SpringBoot Security Configurations for JWT
Lastly, to wrap up our spring boot security tutorial, we need to add security configurations. This class extends the “WebSecurityConfigurerAdapter” a convenience class that allows customization to both WebSecurity and HttpSecurity. Create a package called “config” and inside it creates a Java class called “SecurityConfigurer”. Copy the following code inside it:
					package com.programatically.jwtimplementation.config;

import com.programatically.jwtimplementation.service.MyUserDetailsService;
import org.springframework.beans.factory.annotation.Autowired;
import org.springframework.context.annotation.Bean;
import org.springframework.security.authentication.AuthenticationManager;
import org.springframework.security.config.annotation.authentication.builders.AuthenticationManagerBuilder;
import org.springframework.security.config.annotation.web.builders.HttpSecurity;
import org.springframework.security.config.annotation.web.configuration.EnableWebSecurity;
import org.springframework.security.config.annotation.web.configuration.WebSecurityConfigurerAdapter;
import org.springframework.security.config.http.SessionCreationPolicy;
import org.springframework.security.crypto.password.NoOpPasswordEncoder;
import org.springframework.security.crypto.password.PasswordEncoder;
import org.springframework.security.web.authentication.UsernamePasswordAuthenticationFilter;

@EnableWebSecurity
public class SecurityConfigurer extends WebSecurityConfigurerAdapter {
    @Autowired
    private MyUserDetailsService myUserDetailsService;

    @Autowired
    private JwtRequestFilter jwtRequestFilter;

    @Override
    protected void configure(AuthenticationManagerBuilder auth) throws Exception {
        auth.userDetailsService(myUserDetailsService);
    }

    @Override
    protected void configure(HttpSecurity http) throws Exception {
        http.csrf().disable()
//              ALLOW HTTP CALL TO HIT /authenticate API WITHOUT ASKING FOR JWT
                .authorizeRequests().antMatchers("/authenticate").permitAll()
//               ASK FOR JWT FOR ALL THE OTHER API ENDPOINT
                .anyRequest().authenticated()
                .and().sessionManagement()
                .sessionCreationPolicy(SessionCreationPolicy.STATELESS);
//      ATTACHNIG FILTER CLASS FOR INTERCEPTING ALL INCOMING HTTP CALLS TO API (EXCEPT /authenticate)
        http.addFilterBefore(jwtRequestFilter, UsernamePasswordAuthenticationFilter.class);
    }

    @Override
    @Bean
    public AuthenticationManager authenticationManagerBean() throws Exception {
        return super.authenticationManagerBean();
    }

    @Bean
    public PasswordEncoder passwordEncoder(){
        return NoOpPasswordEncoder.getInstance();
    }
}
In the above spring boot security config code, I’ve added comments and explained briefly a few steps.
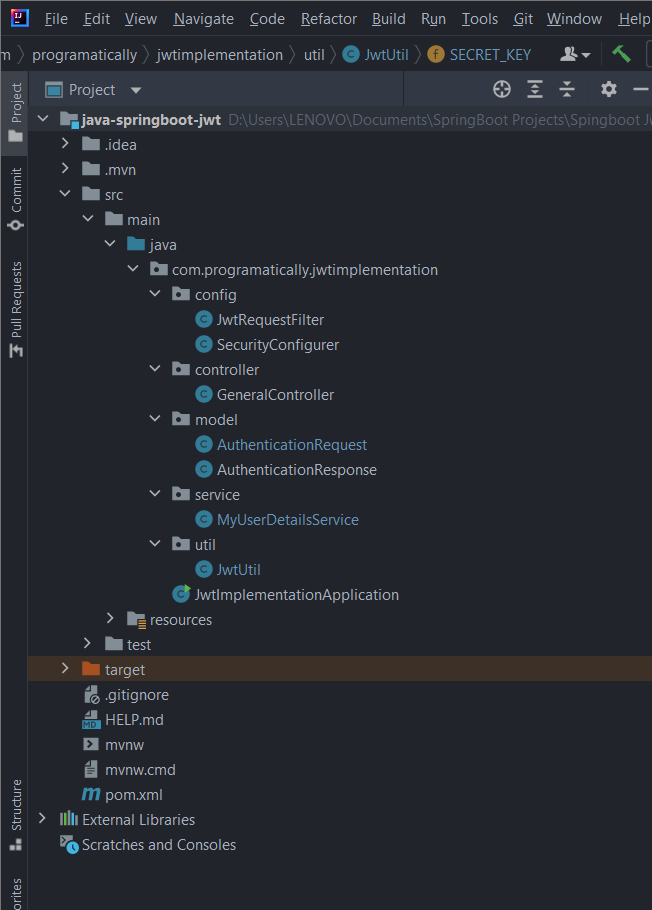
The big picture
This is how the entire SpringBoot Security project directories and files are going to be managed.
Testing SpringBoot Security Project with Postman
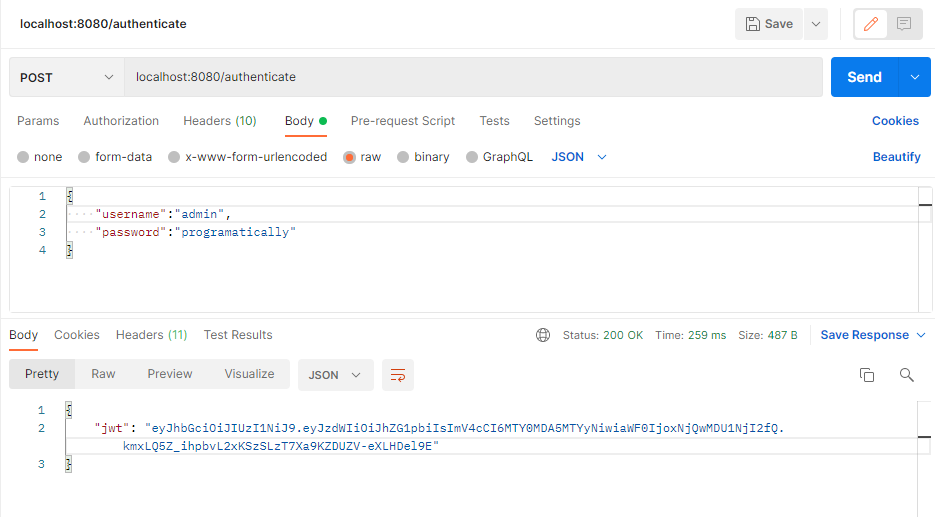
Authenticating and Retrieving JWT
As seen in the below image the endpoint is slash (‘/’) authenticate and in the request body, I am passing the username and password. These credentials are set in the “MyUserDetails” Java class.
Adding JWT Token in All HTTP Requests
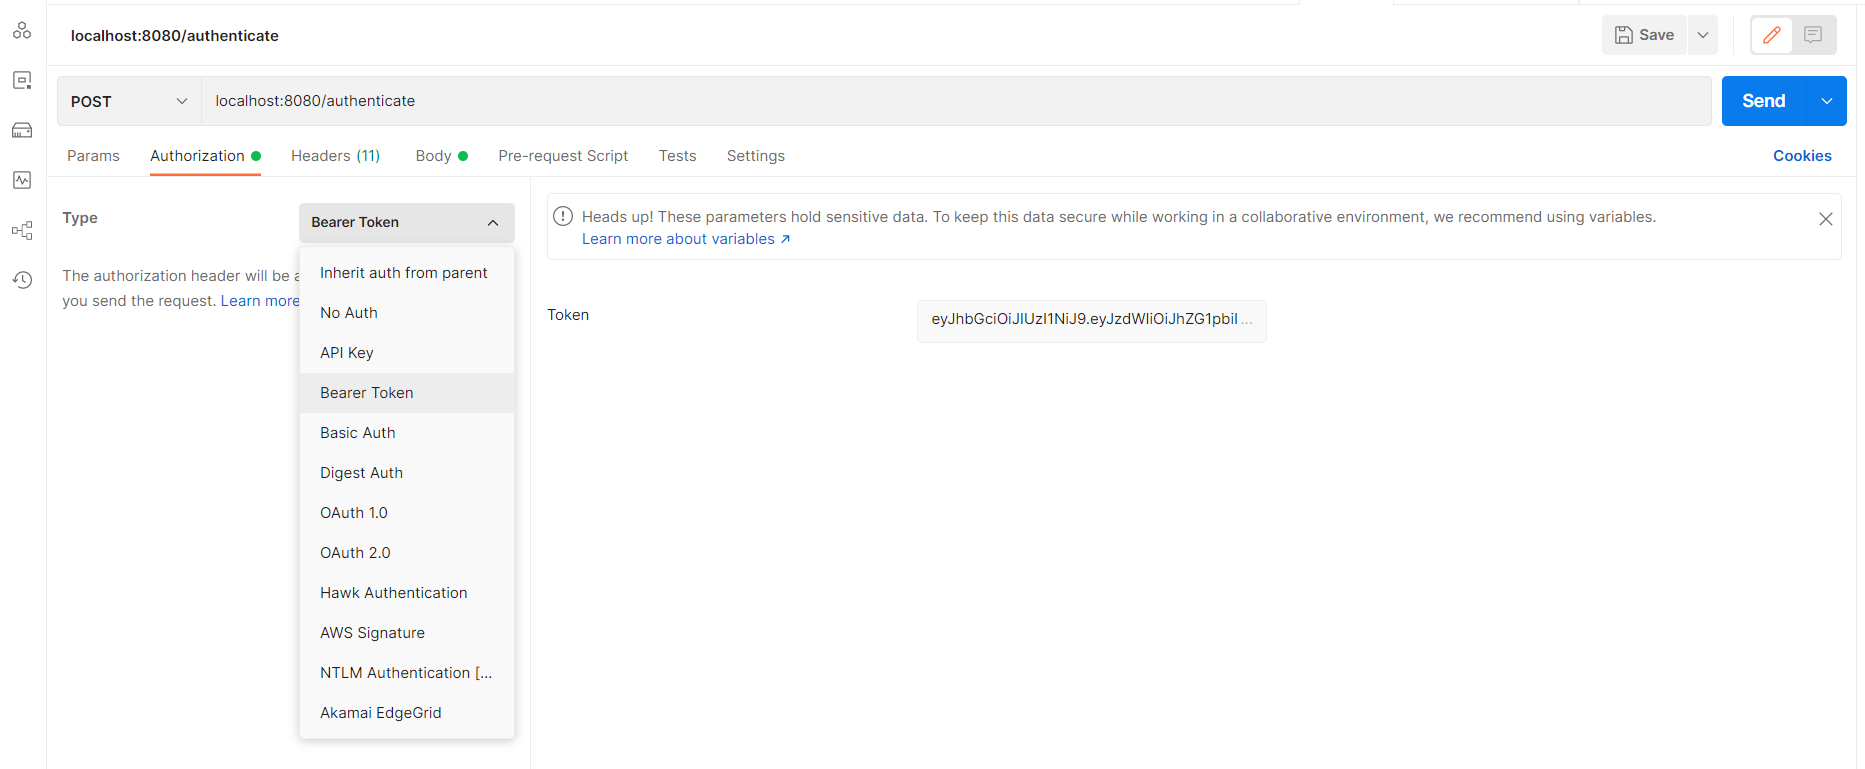
After successfully authenticating and retrieving the JWT token in the previous HTTP call, from now on we need to add that token in all HTTP request calls to the backend APIs. This is because the JWT filter class intercepts all of these incoming HTTP calls and checks for that valid JWT security token. This incoming token in the HTTP call is required for spring boot JWT auth.
The big picture
This is how the entire project directories and files are going to be managed.
Conclusion:
- We created a basic Java SpringBoot application from spring initializr
- First, we created a basic API in Java SpringBoot, printing “Hello World”
- We added all the necessary dependencies to implement JWT in our SpringBoot Security project
- We created two model classes, one for parsing the incoming username and password from HTTP calls. The other is to store the JWT security token and return it back in the response to the user if authentication is successful.
- We then created “UserDetailsService” class in order to authenticate the incoming HTTP request containing the username and password
- Creating JWT utils class which will be responsible for generating and validating the JWT security token.
- Afterward, an authentication endpoint was created, for the incoming HTTP calls. Specifically for creating JWT tokens only.
- Next, we created JWT filter class, which stops all the incoming requests and checks for a valid JWT before letting it pass.
- We then implemented web security configuration.
- Lastly, we tested everything out using the Postman tool.
That’s a Wrap!
I hope this tutorial helped you learn how to implement Java SpringBoot security using JWT token. You may also want to learn how to add basic springboot security or how to add Swagger UI in SpringBoot project. Feel free to leave a review in the comment section below.
Have a great one!
GitHub Repository
Recent Comments
Categories
- Angular
- AWS
- Backend Development
- Big Data
- Cloud
- Database
- Deployment
- DevOps
- Docker
- Frontend Development
- GitHub
- Google Cloud Platform
- Installations
- Java
- JavaScript
- Linux
- MySQL
- Networking
- NodeJS
- Operating System
- Python
- Python Flask
- Report
- Security
- Server
- SpringBoot
- Subdomain
- TypeScript
- Uncategorized
- VSCode
- Webhosting
- WordPress
Search
Recent Post
Understanding Mutex, Semaphores, and the Producer-Consumer Problem
- 13 October, 2024
- 10 min read
Process scheduling algorithm – FIFO SJF RR
- 14 September, 2024
- 8 min read
How to Implement Multithreading in C Language
- 8 September, 2024
- 9 min read
