Welcome to another article on Docker; here we will be looking at how to create MongoDB database using Docker Compose. For some basics on Docker, check out this article: create a docker file for Nginx.
In this article, we will look at how to create and configure a Docker MongoDB Compose YAML file. Then we will use it to spin up a MongoDB Docker container. Later, we would also look at how to import MongoDB database. So, let’s get started.
Prerequisites
Docker should be installed (Docker Desktop for windows and simple Docker for Linux/macOS. Download Here)
In order to configure Docker MongoDB compose file, create a file named the ‘mongo.yml’ file. Open it in a text editor, such as VSCode, but you choose whichever. Afterward, copy the below text into the mongo.yml file. These commands are the configuration commands for spinning up our Docker MongoDB Container.
Configuring Docker Compose to Start MongoDB Docker Container
Explanation:
There is a lot going on in the above script. Let’s break it down:
version: “3.8”: This is simply stating the version of Docker Compose to be used. The version being 3.8
Services: You would include all the services or applications that we want to run in a docker container (i.e. MongoDB Service). And we will add our custom configuration for our mongo docker image and their consequent containers.
mongodb: this is the service name whose docker container will be spun up when we run our docker-compose script. There can be more than one service in a single script. However, there is just a MongoDB service in this script.
image: mongo: This is referencing the docker MongoDB image on Docker Hub. It will download and use this Image to run Docker MongoDB container.
container_name: MongoDB: Here we are assigning a name to the Docker MongoDB container when we spin it up.
environment:
PUID=1000
PGID=1000
These commands are used to define the MongoDB docker image environment variables. Setting PUID and PGID at the same value implies that we are mapping the user of the MongoDB docker container to the user of the host machine i.e., windows. This is done so that you don’t have to run the service as a root user for security and accessibility purposes.
volumes
‘D:/mongodb/database:/data/db’
MongoDB Docker Compose volume command is used for mounting volumes in the docker container. Basically, when the docker container is stopped, all the data and your work in it gets erased. To save it or make it persist after the container is stopped, you need to mount a folder from your host machine into the docker container and save all your work there. In this article, ’D:/mongodb/database’ is the location on your windows, being mounted into the ’/data/db’ location inside the Docker MongoDB container.
ports:
27017:27017
Docker Compose ports command is used to map the application/service port 27017 of the Docker MongoDB container to the host machine port 27017. This is done so that you can access the MongoDB service on your host machine, even though it’s running inside the container.
restart: “unless-stopped”: This is to always restart your container if it gets closed somehow. Only if the container is stopped manually, will the MongoDB docker container not restart again.
MongoDB Service: Start MongoDB Docker Container Using Docker Compose
Next, we need to create a directory in our host machine where we will keep this ‘mongo.yml’ Docker Compose file. Subsequently, that location will also be mounted on our docker container as we discussed in the first step. So, go to your “D” drive and create a folder named ‘mongodb’ and keep your mongo.yml file here. Next, create another folder inside mongodb, named database. Lastly, you need to keep your JSON database file in the D:/mongodb/database directory. You can download a few sample DB from this link.
Note: It is very important that you create the folders in the mentioned location with the exact name as stated here. If you do not have a D Drive, then create it in another drive, let’s say C Drive. For that reason, you need to change the location of the MongoDB Docker Compose volume in the mongo.yml file as well. Like so: volumes: – ‘C:/mongodb/database:/data/db’
Let’s spin up our Docker MongoDB Container
Finally, we are ready to spin up our MongoDB docker container using Docker Compose. To start our container, open your cmd or terminal and go to the D:/mongodb directory and execute the following command:
This will take a few moments to complete, as it’s going to download the Docker MongoDB image from Docker Hub. Once it’s done, execute the following command to check if your Docker MongoDB container is up or not.
MongoDB Docker Container spined up using Docker MongoDB Compose
MongoDB Database Creation: How to Import MongoDB Database
Previously, we successfully deployed a MongoDB NoSQL Database using Docker Compose. Additionally, let’s see how to create MongoDB database and then how to import MongoDB database. I am assuming you have already kept a JSON formatted database in the D:/mongodb/database directory.
Here we need to jump inside of the mongo container and import the database from inside the container. Note in the first step, I explained the importance of Volume mounting. Since we kept the database in D:/mongodb/database, the database is also going to be present inside the container. For this example, I am using the ‘sample_mflix’ database from here. Let’s start.
Execute the following commands to get inside the MongoDB docker container. And then import MongoDB database inside the container.
Note: This step will only work if all the previous steps are completed successfully.
Explanation:
docker exec -it mongodb bash (This command will connect to the container using the interactive terminal and get you inside the MongoDB docker container)
cd /data/db will change your current directory to /data/db location, where your volume is also mounted. In this location, you will find all the JSON database files that you copied in your “D:/mongodb/database” folder locally.
For MongoDB database creation, we will make all these JSON files as individual Collections. They all will be under the 1 database, named “mflixdb”. To do so, we will execute the following commands:
That was it. MongoDB database creation is complete and data has been imported. The commands below are additional MongoDB query we executed.
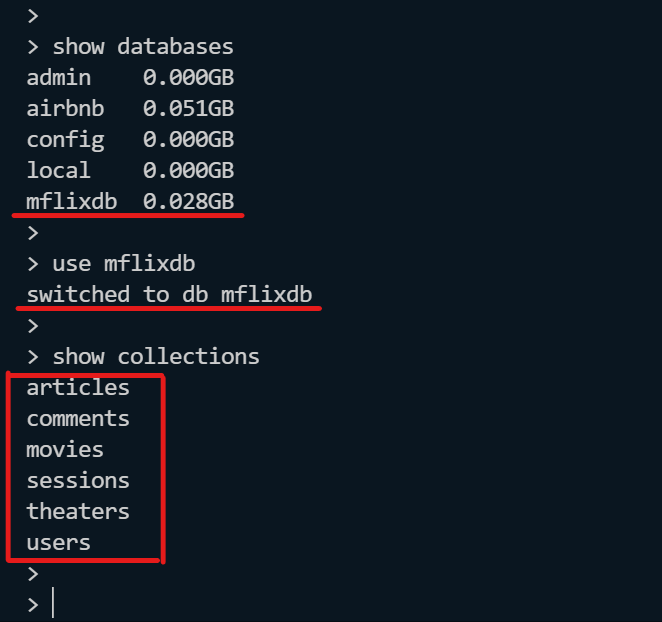
mongo This is used to start using mongo shell
show databases This will show MongoDB DB list of all databases we imported earlier
usemflixdb This is to select and use the MongoDB database we created
Now to list all the MongoDB collections we created, we use the command: show collections
And so, we are finally done with starting a MongoDB docker container using Docker Compose. And additionally, we also saw how to import MongoDB database inside the mongo container.
Summary
In summary, we were successful in the performing the following tasks:
Created and Configured Docker MongoDB Compose File
Made directories to be mounted in the container for data persistence
We started MongoDB Docker container using Docker Compose
Lastly, we saw how to import MongoDB database inside its docker container