Let’s say you have successfully made a jasper report and assigned it a data source as well and it is being populated with the data you want as well. Now you are ready to publish or deploy your report from JasperSoft Studio to JasperReport Server. Both are different tools with different usages. The former is done locally, and the latter is done on a server. In this article, we will go through steps on how to publish your report and Data Adapter to JasperReport Server.
Also, note that this method would still work even when your JasperReport Server is deployed to either your local Webserver or on External Server or even when its deployed using Docker containers. For this article, we will be using JasperReport Server on a Local Webserver.
Prerequisites!
A report and Data Adapter have already been made on JasperSoft Studio. (Click here to learn how)
Connecting to JasperReport Server from JasperSoft Studio
Exporting Data Adapter to Project File
Adjusting Data Adapter Source Path in JasperSoft Studio
Deploying Report from JasperSoft Studio to JasperReport Server
STEP 1: Connecting to JasperReport Server from JasperSoft Studio
To begin with, open JasperSoft Studio and locate the‘Servers’ option on the left panel. Right-click on it and select ‘Create JasperReports Server Connection’ as shown in the image below.
Connecting to JasperReport Server from JasperSoft Studio
After which you will be prompted with the configuration window. Just follow the steps shown in the image below.
Configuring Connection to JasperReport Server
Note that the URL could be anywhere where the JasperReport Server has been deployed at. It could be an External Server or deployed Docker container. Just add the proper port number, URL, and credentials and you would be good to go.
STEP 2: Exporting Data Adapter to Project Directory
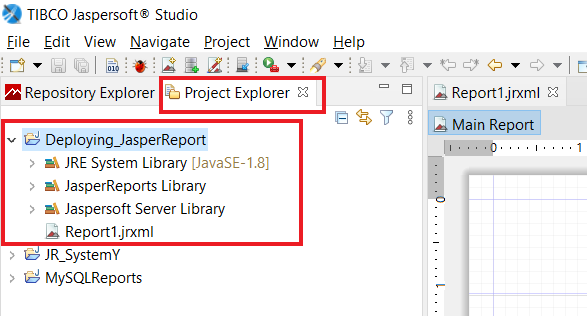
Next, we need to export the data adapter source into the project directory. The project directory is the place for the report is saved. So, when you click on the ‘Project Explorer’ tab in the left panel, you will be shown all the projects that have been made. I have made a project named ‘Deploying_JasperReprot’ as seen in the image below.
Now go back to ‘Repository Explorer’ and right-click on the Data Adapter that you’ve created. Then click on ‘Export to File’. Take reference from the image shown here:
Exporting Data Adapter to Project Directory
This will open up a window where you would need to select the project to export this data adapter in. Here you will 2 things. The First would be to select the project, this will be the same project directory in which you would have created your jasper report template. For this article, the project name is ‘Deploying_JasperReprot’, it may differ for you of course. The second and more important thing to do is to copy the exact name of the Data Adapter. I could not stress enough how important this step is. Press the OK button to complete the step. An image is shown below to guide you.
Configuring to Export Data Adapter to Project Directory
STEP 3: Adjusting Data Adapter Source Path in JasperSoft Studio
Moving on, this leads us to our last step before publishing our work to JasperReport Server. We need to change the data source path of the report template. Basically, the report data source is the Data Adapter. But when we deploy both of these to the JasperReport Server, they will not be in the same directory as it is in JasperSoft Studio. So before publishing them, we need the change the data source path in the report template. So that it can find the Data Adapter when it’s deployed. Because there is no option to change the path once it is deployed. Let us see how it’s done.
Changing DataAdapter path for jasper report template
Once you select the data adapter, its path would be stated in the field of the first widow. What you need to do next, is simply add the“../”at the beginning of the path and click the ‘Finish’ button, and save the report template (CTRL + S). That is all. Take reference from the image shown below.
Adjusting Data Source Path in Jasper Report Template
STEP 4: Deploying Report from JasperSoft Studio to JasperReport Server
Lastly, we are now ready to deploy our work to JasperReport Server. So, let’s Open the JasperReport Server Connection that we created in the first step. I have created a new folder inside the root directory called “JasperSoft Report Published”. I will be deploying all the files inside this folder only. So go ahead and right-click on the folder and select ‘New’. This will open up a window as shown below:
Configuring to Export Data Adapter to JasperReport Server part1
After clicking the Next button comes the crucial step. Here you must name the adapter that you are publishing. And this needs to be matching the exact name of the adapter that you have created in JasperSoft Studio. Remember in the last part of Step 2, I asked you to copy the name of the data adapter, just copy that complete name here. See the image below:
Configuring to Export Data Adapter to JasperReport Server part2
After that, click the Next button. Then it will take you to another window where you will choose the data adapter from your project directory. See the image below for reference.
Configuring to Export Data Adapter to JasperReport Server part3
When you select the ‘Upload from Workspace’ from the drop-down menu, a browse window will show up where you will select your data adapter and hit Finish. And you are done with the first half of deploying the report from JasperSoft Studio to JasperReport Server. Let’s now deploy the report itself.
To upload the report, go to the same folder “JasperSoft Report Published” again and click New once more and this time select ‘Report Unit’ and click on Next button. Now you will be asked to enter a name. You can name it anything here, there is no restriction. For this article, I will name it “Report1”. You will now be prompted by a new window and the Local Resource option would already be checked. On the right side of this option, there will be a browse button. Click on that and select the report that’s inside our project directory and then hit next.
Configuring to Export Report Template to JasperReport Server
After that, there will come a few more windows. Do not do anything on them, just leave them as it is and keep on clicking ‘Next’ and finally ‘Finish’. And you are done!
Both of the files have now been exported to the JasperReport Server. Now simply open up JasperReport Server on your browser and go to the folder “JasperServer Report Published”. And simply click on the report unit file to open the report. See the images below for reference.
Deployed Report Location in JasperReport Server
Now simply click on the Report1 to open it and it would automatically have the data populated like so.
Successfully Running on JasperReport Server
And that’s a wrap!
Hope this article was helpful. Now you would know how to deploy report from JasperSoft Studio to JasperReport Server. If there is any particular topic that you want me to cover just drop a message in the comment and hit the like button. Have a great one!