Let’s say you have made a custom library on Angular, and you are planning to use it on multiple other projects. But you do not want to share that library with the public. And so, you do not want to store it in the NPM registry. Instead, you can upload it to Google Cloud Platform, which is not free btw. Therefore, in this article, I am going to show you how to publish the Angular library to Google Artifact Registry (GAR).
Note: I have made a similar article for the Maven package too. Have a look.
Prerequisites!
- Must have a Google Cloud Platform account made
- Must have relevant rights/privileges given to the user for using GAR
- Must have Google Cloud SDK installed on your computer (Click here to Download)
Table of Content
- Creating a repository on Google Artifact Registry
- Create an Angular Library
- Configure Cloud SDK shell to link to your artifact registry
- Configure authenticate for your local library to publish
STEP 1: Creating a Repository on Google Artifact Registry
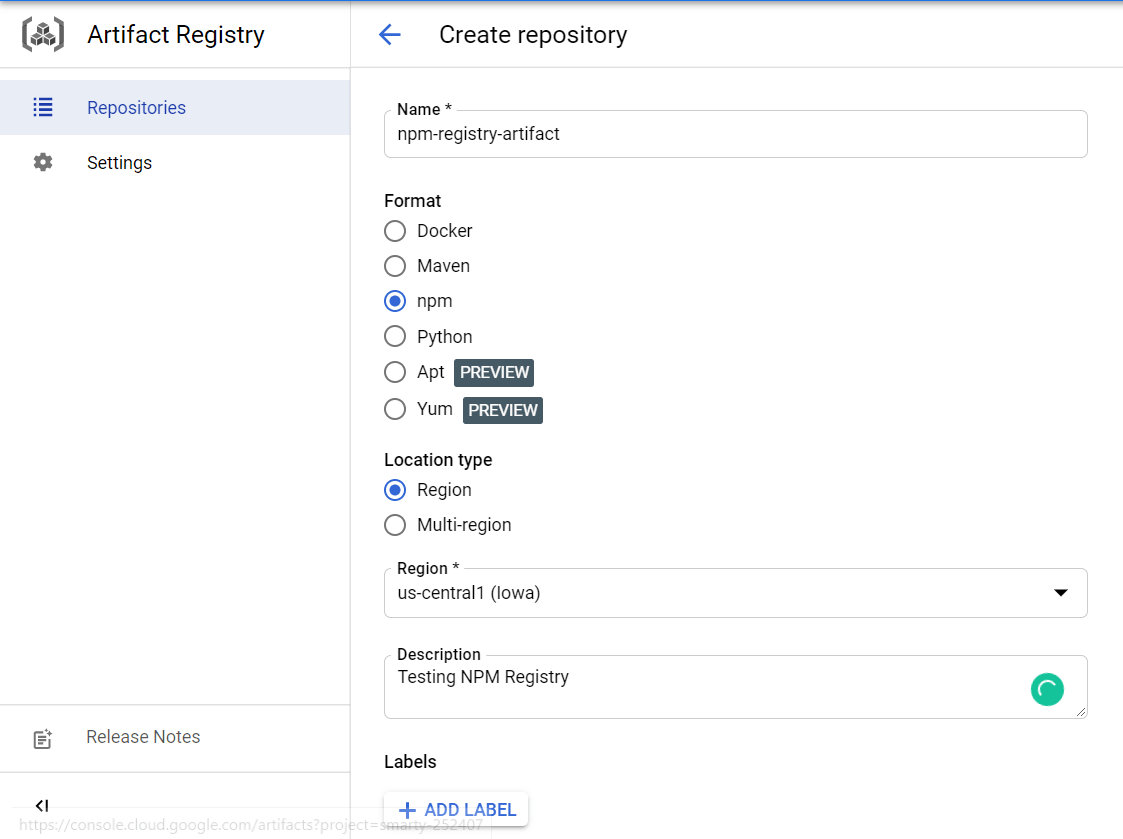
Firstly, we need to create a repository on the Google Artifact Registry. So simply go to this link and click on the ‘Create Repository’ option at the top. https://console.cloud.google.com/artifacts. After clicking the create option, you will be taken to fill out some information about the repository you want to create. Take reference to the image below:
Afterward, click on Create button at the bottom of the page and your repository would be made. And this is how you would be creating a repository on the google cloud artifact registry.
STEP 2: Create an Angular Library
Create a library in Angular project by executing the following commands in the terminal:
ng g lib MyAngularLib
Now you can modify the library and add whatever you need it to perform. After you’re done, execute this command to build your NPM library:
ng build MyAngularLib
This command will create a “dist“ folder where all your library-related files would be kept, including its own package.json file. And your Angular Library is made. To get more detailed step-by-step info on how to create an angular library, check out my other article here.
STEP 3: Configure Cloud SDK to Link to your Artifact Registry
Firstly, if it’s not already, then download and install the Google Cloud SDK shell. Here is the download link.
Afterward, open up Google Cloud SDK Shell and execute the following commands:
					gcloud auth login

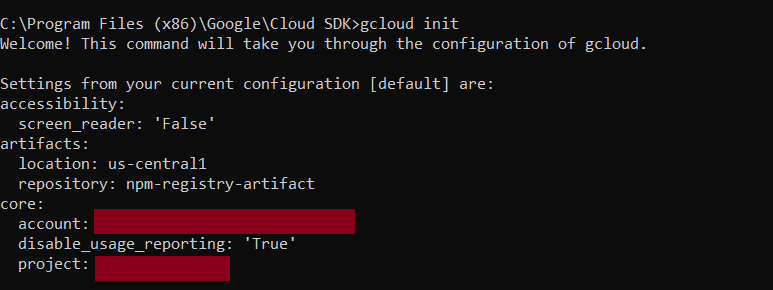
gcloud init
The first command will make you login into Google Cloud Platform to authenticate. The second command would then ask you a list of questions for your repository in the Google Artifact Registry. So that it knows where to target the repository. Take reference from the image below:
STEP 4: Configure Authentication for Angular Local Library to Publish
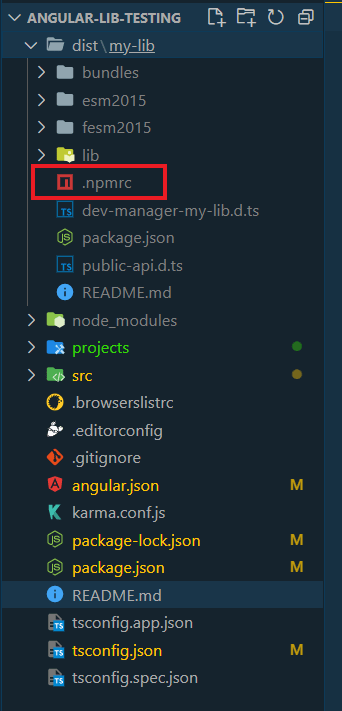
To allow your local Angular Library to publish your npm package to google cloud Artifact Registry, you need to create “.npmrc” file in your project. Which will create a token to authenticate to your artifact registry. There are a couple of steps so let’s get started.
- First, manually create a file named “.npmrc” INSIDE the ‘dist’ folder we created in step 2. As shown in the image
- Execute the following command and fill in the needed info. Note that the scope name will be used in the next command.
npm init
- After that, execute this command to set the scope name for the google artifact registry:
					gcloud artifacts print-settings npm --scope=@<"scope name">

// FOR EXAMPLE:
//gcloud artifacts print-settings npm --scope=@dev-manager
- The above command will generate a few lines. Copy those lines and paste them into the “.npmrc” file we created. Now I’ve taken a snapshot of the output from Google Cloud Documentations. Yours would obviously be different. But you would NOT have to change anything. Just copy the whole thing that’s printed on your console and paste it to the “.npmrc” file.
- Next step is crucial. You need to execute this command to change your registry location.
npm config set registry <"registry location URL">
The location URL would be the first line in the .npmrc file that you just pasted, starting from HTTPS.
- Next, you need to add the following script tag inside your package.json file, which is INSIDE the ‘dist’ folder. Do not copy this inside the package.json file which is in the root folder of the project:
					"scripts": {
  "artifactregistry-login": "npx google-artifactregistry-auth"
}
- Now go to your gcloud SDK shell and ‘cd’ inside the ‘dist’ of your library where the .npmrc file also exists. Then execute this command:
npm run artifactregistry-login .npmrc
This will generate the token inside the .npmrc file and now you will be authenticated to deploy your npm package to the Artifact Registry.
- Lastly, execute this command to deploy to your repository:
npm publish
And that’s a wrap!
Thanks for sticking to the end. Hope this article helps you in figuring out exactly how to publish Angular Library to Google Artifact Registry. If you liked this article, please hit the like button on this page and leave a review down below.
Thanks, and have a great one!
Recent Comments
Categories
- Angular
- AWS
- Backend Development
- Big Data
- Cloud
- Database
- Deployment
- DevOps
- Docker
- Frontend Development
- GitHub
- Google Cloud Platform
- Installations
- Java
- JavaScript
- Linux
- MySQL
- Networking
- NodeJS
- Operating System
- Python
- Python Flask
- Report
- Security
- Server
- SpringBoot
- Subdomain
- TypeScript
- Uncategorized
- VSCode
- Webhosting
- WordPress
Search
Recent Post
Understanding Mutex, Semaphores, and the Producer-Consumer Problem
- 13 October, 2024
- 10 min read
Process scheduling algorithm – FIFO SJF RR
- 14 September, 2024
- 8 min read
How to Implement Multithreading in C Language
- 8 September, 2024
- 9 min read
