In this article, we will learn how to add Angular Material UI Table to your Angular Project. We would be using Material UI in all the Angular Table examples in this article.
Below you will see various Angular Tables, each with different features. So, let’s get right to it.
Prerequisite
- Create a basic Angular project (Create Angular Project)
Table of Content
- Install Angular Material UI Library
- Basic Angular Material UI Table
- Angular Table with Expanded Row
- Dynamically Populate Data Using Loop
- Angular Material UI Table Filter Example
- Angular Material UI Table Pagination Example
- Angular Material UI Table Sorting Column Example
- Adding Footer in Angular Material UI Table
- Adding Checkbox for Row Selection in Angular Material UI Table
Add Angular Material UI Table
What is Angular Material UI?
Material UI is a Library that developers can use for free in their projects. Material UI is a fast way of adding prebuilt modern UI components to your project.
They include components for Data Table, Drop Down, Form Fields, Nav Bar, etc. You can check out the Documentation here.
Install Angular Material UI Library
To install Angular Material UI, just open the project in your text editor i.e. VS Code, and in your terminal execute the below command:
ng add @angular/material
It will ask you a bunch of questions, just hit enter on all of them.
Once done, you will need to add a few Material UI Modules in the app.module.ts file.
These modules are necessary for running the Angular Table example shown in this article.
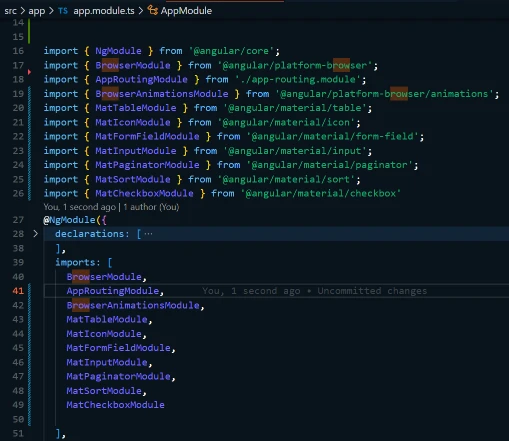
Go to app.module.ts and import these modules then add them to the imports list as mentioned below.
					import { NgModule } from '@angular/core';
import { BrowserModule } from '@angular/platform-browser';
import { AppRoutingModule } from './app-routing.module';
import { BrowserAnimationsModule } from '@angular/platform-browser/animations';
import { MatTableModule } from '@angular/material/table';
import { MatIconModule } from '@angular/material/icon';
import { MatFormFieldModule } from '@angular/material/form-field';
import { MatInputModule } from '@angular/material/input';
import { MatPaginatorModule } from '@angular/material/paginator';
import { MatSortModule } from '@angular/material/sort';
import { MatCheckboxModule } from '@angular/material/checkbox'

@NgModule({
  declarations: [
...
  ],
  imports: [
    BrowserModule,
    AppRoutingModule,
    BrowserAnimationsModule,
    MatTableModule,
    MatIconModule,
    MatFormFieldModule,
    MatInputModule,
    MatPaginatorModule,
    MatSortModule,
    MatCheckboxModule

  ],
Now you are ready to create all Angular Table examples.
Basic Angular Material UI Table
First this first, for every Angular Table example, I have created a new Angular Component. So do the same. To create a component named ‘MatTable1’, execute the following command:
ng g c MatTable1
Afterward, add the following code in the mat-table.component.html
					<table mat-table [dataSource]="dataSource" class="mat-elevation-z8">

    <!--- Note that these columns can be defined in any order.
          The actual rendered columns are set as a property on the row definition" -->

    <!-- Position Column -->
    <ng-container matColumnDef="position">
      <th mat-header-cell *matHeaderCellDef> No. </th>
      <td mat-cell *matCellDef="let element"> {{element.position}} </td>
    </ng-container>

    <!-- Name Column -->
    <ng-container matColumnDef="name">
      <th mat-header-cell *matHeaderCellDef> Name </th>
      <td mat-cell *matCellDef="let element"> {{element.name}} </td>
    </ng-container>

    <!-- Weight Column -->
    <ng-container matColumnDef="weight">
      <th mat-header-cell *matHeaderCellDef> Weight </th>
      <td mat-cell *matCellDef="let element"> {{element.weight}} </td>
    </ng-container>

    <!-- Symbol Column -->
    <ng-container matColumnDef="symbol">
      <th mat-header-cell *matHeaderCellDef> Symbol </th>
      <td mat-cell *matCellDef="let element"> {{element.symbol}} </td>
    </ng-container>

    <tr mat-header-row *matHeaderRowDef="displayedColumns"></tr>
    <tr mat-row *matRowDef="let row; columns: displayedColumns;"></tr>
  </table>
Then add the following code in the mat-table.component.css
					table {
    width: 100%;
  }
Then add the following code in the mat-table.component.ts
					import { Component, OnInit } from '@angular/core';

export interface TableColumns {
  name: string;
  position: number;
  weight: number;
  symbol: string;
}

const TABLE_DATA: TableColumns[] = [
  {position: 1, name: 'Hydrogen', weight: 1.0079, symbol: 'H'},
  {position: 2, name: 'Helium', weight: 4.0026, symbol: 'He'},
  {position: 3, name: 'Lithium', weight: 6.941, symbol: 'Li'},
  {position: 4, name: 'Beryllium', weight: 9.0122, symbol: 'Be'},
  {position: 5, name: 'Boron', weight: 10.811, symbol: 'B'},
  {position: 6, name: 'Carbon', weight: 12.0107, symbol: 'C'},
  {position: 7, name: 'Nitrogen', weight: 14.0067, symbol: 'N'},
  {position: 8, name: 'Oxygen', weight: 15.9994, symbol: 'O'},
  {position: 9, name: 'Fluorine', weight: 18.9984, symbol: 'F'},
  {position: 10, name: 'Neon', weight: 20.1797, symbol: 'Ne'},
];

@Component({
  selector: 'app-mat-table',
  templateUrl: './mat-table.component.html',
  styleUrls: ['./mat-table.component.css']
})


export class MatTableComponent implements OnInit {

  displayedColumns: string[] = ['position', 'name', 'weight', 'symbol'];
  dataSource = TABLE_DATA;

  constructor() { }

  ngOnInit(): void {

  }

}
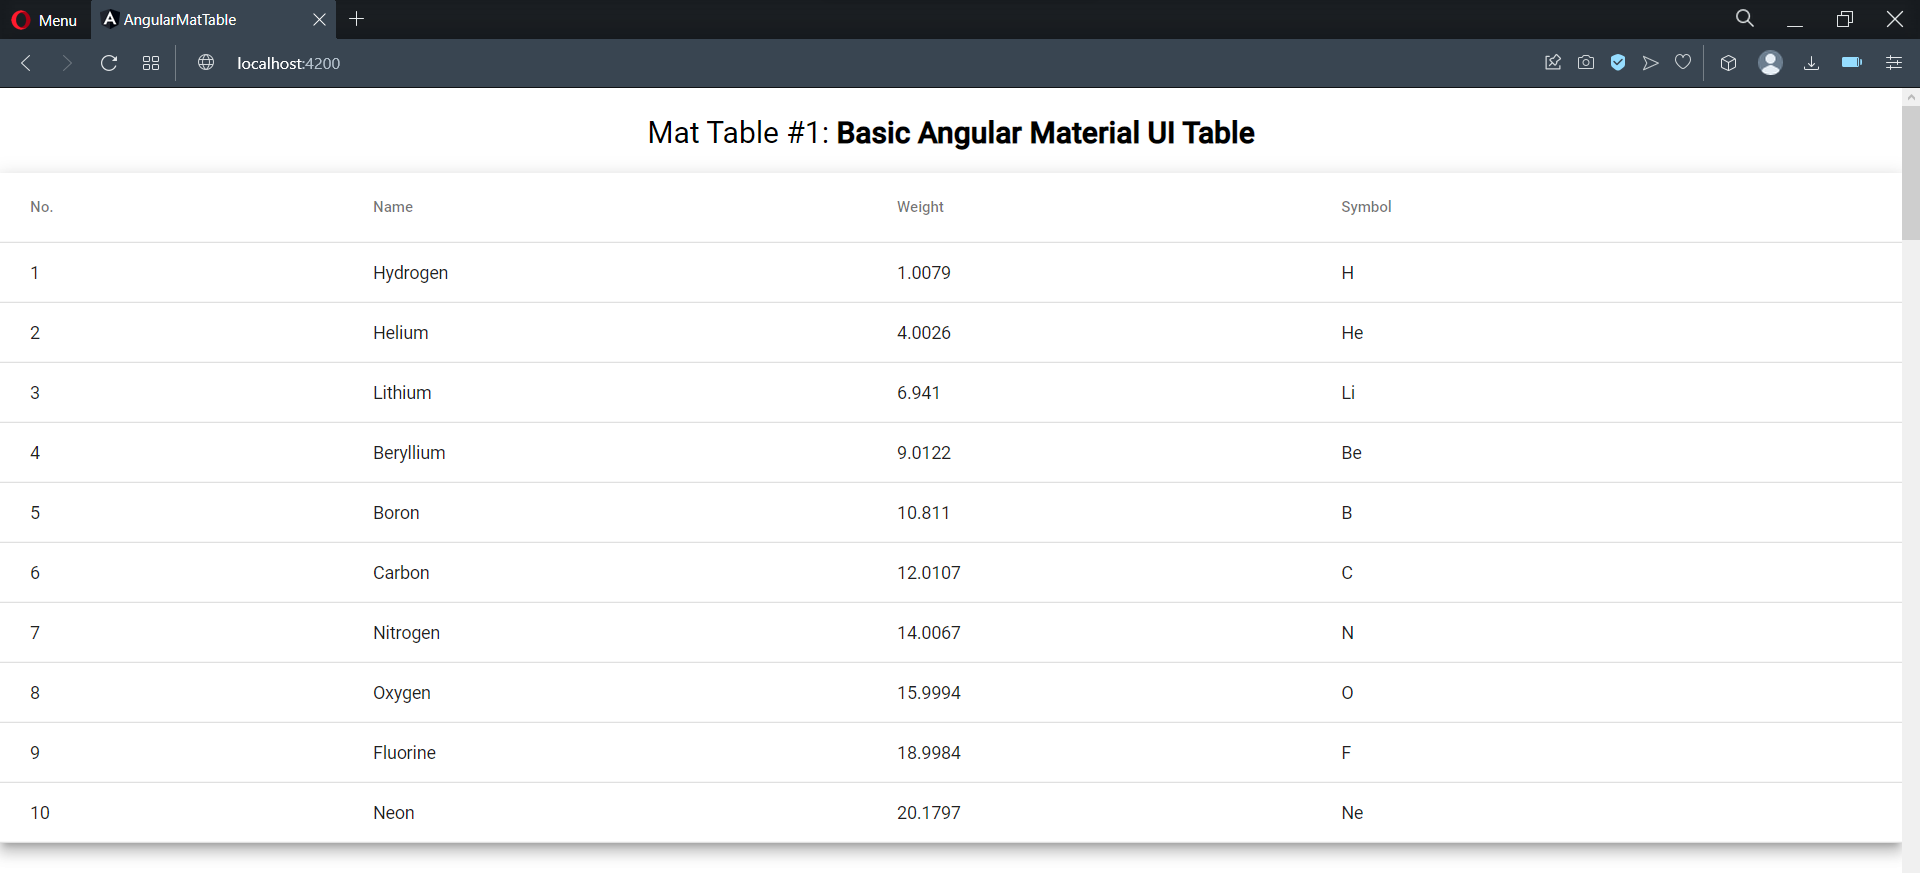
Finally, run the Angular project with the following command. The output should look like the image shown below:
ng serve
Material UI Table: Angular Table with Expanded Row
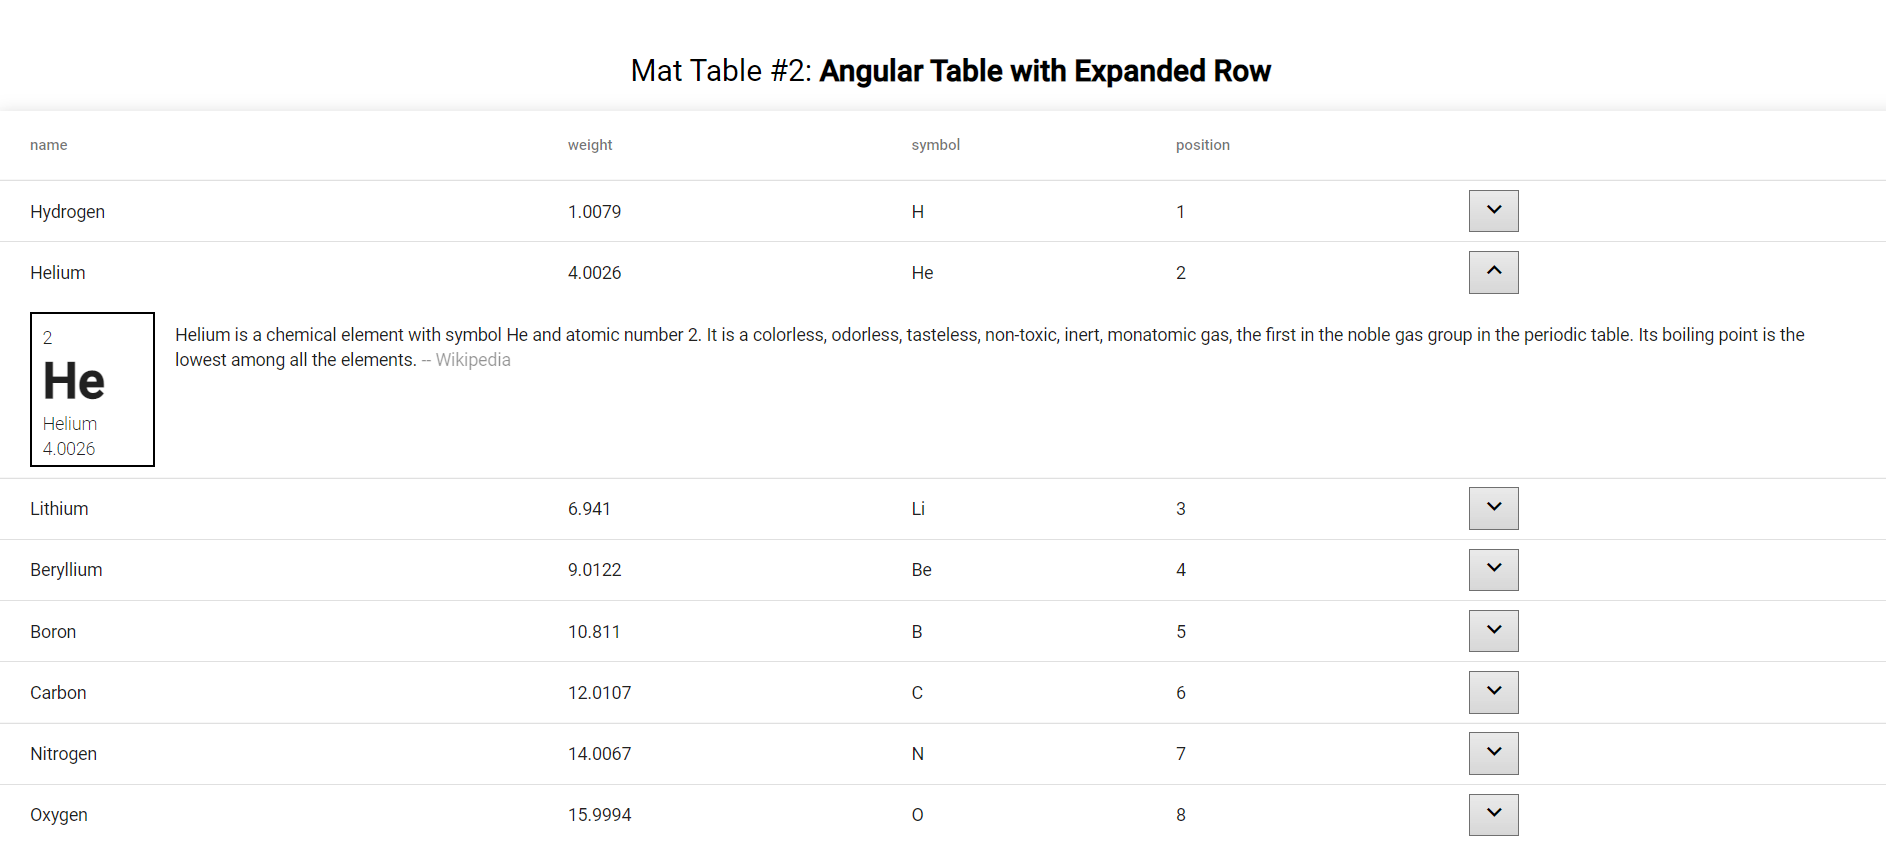
Earlier we saw a basic implementation of Angular Table with material UI. Let’s make it a bit complex and implement an expandable row in Angular Table.
Create a new component named ‘MatTable2’
Add the following code in the mat-table2.component.html
<table mat-table
[dataSource]="dataSource" multiTemplateDataRows
class="mat-elevation-z8">
<ng-container matColumnDef="{{column}}" *ngFor="let column of columnsToDisplay">
<th mat-header-cell *matHeaderCellDef> {{column}} </th>
<td mat-cell *matCellDef="let element"> {{element[column]}} </td>
</ng-container>
<ng-container matColumnDef="expand">
<th mat-header-cell *matHeaderCellDef aria-label="row actions"> </th>
<td mat-cell *matCellDef="let element">
<button mat-icon-button aria-label="expand row" (click)="(expandedElement = expandedElement === element ? null : element); $event.stopPropagation()">
<mat-icon *ngIf="expandedElement !== element">keyboard_arrow_down</mat-icon>
<mat-icon *ngIf="expandedElement === element">keyboard_arrow_up</mat-icon>
</button>
</td>
</ng-container>
<!-- Expanded Content Column - The detail row is made up of this one column that spans across all columns -->
<ng-container matColumnDef="expandedDetail">
<td mat-cell *matCellDef="let element" [attr.colspan]="columnsToDisplayWithExpand.length">
<div class="example-element-detail"
[@detailExpand]="element == expandedElement ? 'expanded' : 'collapsed'">
<div class="example-element-diagram">
<div class="example-element-position"> {{element.position}} </div>
<div class="example-element-symbol"> {{element.symbol}} </div>
<div class="example-element-name"> {{element.name}} </div>
<div class="example-element-weight"> {{element.weight}} </div>
</div>
<div class="example-element-description">
{{element.description}}
<span class="example-element-description-attribution"> -- Wikipedia </span>
</div>
</div>
</td>
</ng-container>
<tr mat-header-row *matHeaderRowDef="columnsToDisplayWithExpand"></tr>
<tr mat-row *matRowDef="let element; columns: columnsToDisplayWithExpand;"
class="example-element-row"
[class.example-expanded-row]="expandedElement === element"
(click)="expandedElement = expandedElement === element ? null : element">
</tr>
<tr mat-row *matRowDef="let row; columns: ['expandedDetail']" class="example-detail-row"></tr>
</table>
Then add the following code in the mat-table2.component.css
					table {
    width: 100%;
  }

  tr.example-detail-row {
    height: 0;
  }

  tr.example-element-row:not(.example-expanded-row):hover {
    background: whitesmoke;
  }

  tr.example-element-row:not(.example-expanded-row):active {
    background: #efefef;
  }

  .example-element-row td {
    border-bottom-width: 0;
  }

  .example-element-detail {
    overflow: hidden;
    display: flex;
  }

  .example-element-diagram {
    min-width: 80px;
    border: 2px solid black;
    padding: 8px;
    font-weight: lighter;
    margin: 8px 0;
    height: 104px;
  }

  .example-element-symbol {
    font-weight: bold;
    font-size: 40px;
    line-height: normal;
  }

  .example-element-description {
    padding: 16px;
  }

  .example-element-description-attribution {
    opacity: 0.5;
  }
Then add the following code in the mat-table2.component.ts
					import { Component, OnInit } from '@angular/core';
import {animate, state, style, transition, trigger} from '@angular/animations';

@Component({
  selector: 'app-mat-table2',
  templateUrl: './mat-table2.component.html',
  styleUrls: ['./mat-table2.component.css'],
  animations: [
    trigger('detailExpand', [
      state('collapsed', style({height: '0px', minHeight: '0'})),
      state('expanded', style({height: '*'})),
      transition('expanded <=> collapsed', animate('225ms cubic-bezier(0.4, 0.0, 0.2, 1)')),
    ]),
  ]
})
export class MatTable2Component implements OnInit {

  dataSource = TableData;
  columnsToDisplay = ['name', 'weight', 'symbol', 'position'];
  columnsToDisplayWithExpand = [...this.columnsToDisplay, 'expand'];
  expandedElement!: TableColumns | null;

  constructor() { }

  ngOnInit(): void {
  }

}

export interface TableColumns {
  name: string;
  position: number;
  weight: number;
  symbol: string;
  description: string;
}

const TableData: TableColumns[] = [
  {
    position: 1,
    name: 'Hydrogen',
    weight: 1.0079,
    symbol: 'H',
    description: `Hydrogen is a chemical element with symbol H and atomic number 1. With a standard
        atomic weight of 1.008, hydrogen is the lightest element on the periodic table.`,
  },
  {
    position: 2,
    name: 'Helium',
    weight: 4.0026,
    symbol: 'He',
    description: `Helium is a chemical element with symbol He and atomic number 2. It is a
        colorless, odorless, tasteless, non-toxic, inert, monatomic gas, the first in the noble gas
        group in the periodic table. Its boiling point is the lowest among all the elements.`,
  },
  {
    position: 3,
    name: 'Lithium',
    weight: 6.941,
    symbol: 'Li',
    description: `Lithium is a chemical element with symbol Li and atomic number 3. It is a soft,
        silvery-white alkali metal. Under standard conditions, it is the lightest metal and the
        lightest solid element.`,
  },
  {
    position: 4,
    name: 'Beryllium',
    weight: 9.0122,
    symbol: 'Be',
    description: `Beryllium is a chemical element with symbol Be and atomic number 4. It is a
        relatively rare element in the universe, usually occurring as a product of the spallation of
        larger atomic nuclei that have collided with cosmic rays.`,
  },
  {
    position: 5,
    name: 'Boron',
    weight: 10.811,
    symbol: 'B',
    description: `Boron is a chemical element with symbol B and atomic number 5. Produced entirely
        by cosmic ray spallation and supernovae and not by stellar nucleosynthesis, it is a
        low-abundance element in the Solar system and in the Earth's crust.`,
  },
  {
    position: 6,
    name: 'Carbon',
    weight: 12.0107,
    symbol: 'C',
    description: `Carbon is a chemical element with symbol C and atomic number 6. It is nonmetallic
        and tetravalent—making four electrons available to form covalent chemical bonds. It belongs
        to group 14 of the periodic table.`,
  },
  {
    position: 7,
    name: 'Nitrogen',
    weight: 14.0067,
    symbol: 'N',
    description: `Nitrogen is a chemical element with symbol N and atomic number 7. It was first
        discovered and isolated by Scottish physician Daniel Rutherford in 1772.`,
  },
  {
    position: 8,
    name: 'Oxygen',
    weight: 15.9994,
    symbol: 'O',
    description: `Oxygen is a chemical element with symbol O and atomic number 8. It is a member of
         the chalcogen group on the periodic table, a highly reactive nonmetal, and an oxidizing
         agent that readily forms oxides with most elements as well as with other compounds.`,
  },
  {
    position: 9,
    name: 'Fluorine',
    weight: 18.9984,
    symbol: 'F',
    description: `Fluorine is a chemical element with symbol F and atomic number 9. It is the
        lightest halogen and exists as a highly toxic pale yellow diatomic gas at standard
        conditions.`,
  },
  {
    position: 10,
    name: 'Neon',
    weight: 20.1797,
    symbol: 'Ne',
    description: `Neon is a chemical element with symbol Ne and atomic number 10. It is a noble gas.
        Neon is a colorless, odorless, inert monatomic gas under standard conditions, with about
        two-thirds the density of air.`,
  },
];
And you are done! Run the project and check out the Angular Table with expanded rows.
Material UI Table: Dynamically Populate Data Using Loop
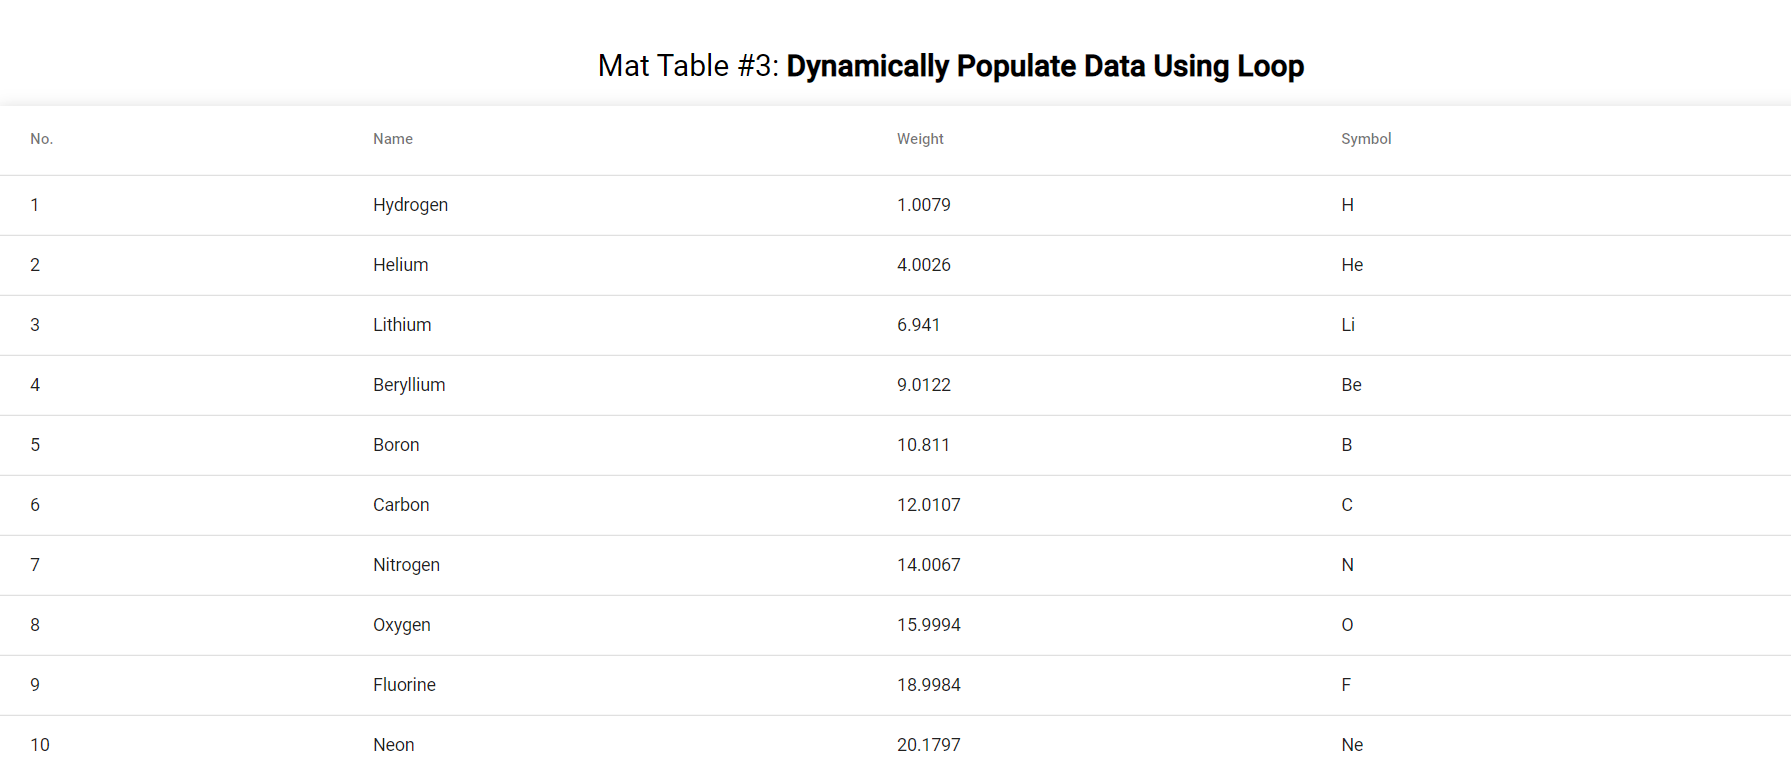
Before we saw a static way to populate data in the angular table. In this Angular Table example, we will see how to dynamically populate data in the table using ngFor loop. Create a new component named ‘MatTable3’
Add the following code in the mat-table3.component.html
					<table mat-table [dataSource]="dataSource" class="mat-elevation-z8 demo-table">
    <ng-container *ngFor="let column of columns" [matColumnDef]="column.columnDef">
      <th mat-header-cell *matHeaderCellDef>
        {{column.header}}
      </th>
      <td mat-cell *matCellDef="let row">
        {{column.cell(row)}}
      </td>
    </ng-container>

    <tr mat-header-row *matHeaderRowDef="displayedColumns"></tr>
    <tr mat-row *matRowDef="let row; columns: displayedColumns;"></tr>
  </table>
Then add the following code in the mat-table3.component.css
					.demo-table {
    width: 100%;
  }
Then add the following code in the mat-table3.component.ts
					import { Component, OnInit } from '@angular/core';

export interface TableColumns {
  name: string;
  position: number;
  weight: number;
  symbol: string;
}

const TableData: TableColumns[] = [
  {position: 1, name: 'Hydrogen', weight: 1.0079, symbol: 'H'},
  {position: 2, name: 'Helium', weight: 4.0026, symbol: 'He'},
  {position: 3, name: 'Lithium', weight: 6.941, symbol: 'Li'},
  {position: 4, name: 'Beryllium', weight: 9.0122, symbol: 'Be'},
  {position: 5, name: 'Boron', weight: 10.811, symbol: 'B'},
  {position: 6, name: 'Carbon', weight: 12.0107, symbol: 'C'},
  {position: 7, name: 'Nitrogen', weight: 14.0067, symbol: 'N'},
  {position: 8, name: 'Oxygen', weight: 15.9994, symbol: 'O'},
  {position: 9, name: 'Fluorine', weight: 18.9984, symbol: 'F'},
  {position: 10, name: 'Neon', weight: 20.1797, symbol: 'Ne'},
];

@Component({
  selector: 'app-mat-table3',
  templateUrl: './mat-table3.component.html',
  styleUrls: ['./mat-table3.component.css']
})
export class MatTable3Component implements OnInit {

  columns = [
    {
      columnDef: 'position',
      header: 'No.',
      cell: (element: TableColumns) => `${element.position}`,
    },
    {
      columnDef: 'name',
      header: 'Name',
      cell: (element: TableColumns) => `${element.name}`,
    },
    {
      columnDef: 'weight',
      header: 'Weight',
      cell: (element: TableColumns) => `${element.weight}`,
    },
    {
      columnDef: 'symbol',
      header: 'Symbol',
      cell: (element: TableColumns) => `${element.symbol}`,
    },
  ];
  dataSource = TableData;
  displayedColumns = this.columns.map(c => c.columnDef);

  constructor() { }

  ngOnInit(): void {
  }

}
The output should look exactly like the previous example.
Angular Material UI Table Filter Example
Now let’s look at the Angular Material UI table filter feature. Create another component named ‘MatTable4’.
Add the following code in the mat-table4.component.html
					<mat-form-field appearance="standard">
    <mat-label>Filter</mat-label>
    <input matInput (keyup)="applyFilter($event)" placeholder="Hydrogen" #input>
  </mat-form-field>

  <table mat-table [dataSource]="dataSource" class="mat-elevation-z8">

    <!-- Position Column -->
    <ng-container matColumnDef="position">
      <th mat-header-cell *matHeaderCellDef> No. </th>
      <td mat-cell *matCellDef="let element"> {{element.position}} </td>
    </ng-container>

    <!-- Name Column -->
    <ng-container matColumnDef="name">
      <th mat-header-cell *matHeaderCellDef> Name </th>
      <td mat-cell *matCellDef="let element"> {{element.name}} </td>
    </ng-container>

    <!-- Weight Column -->
    <ng-container matColumnDef="weight">
      <th mat-header-cell *matHeaderCellDef> Weight </th>
      <td mat-cell *matCellDef="let element"> {{element.weight}} </td>
    </ng-container>

    <!-- Symbol Column -->
    <ng-container matColumnDef="symbol">
      <th mat-header-cell *matHeaderCellDef> Symbol </th>
      <td mat-cell *matCellDef="let element"> {{element.symbol}} </td>
    </ng-container>

    <tr mat-header-row *matHeaderRowDef="displayedColumns"></tr>
    <tr mat-row *matRowDef="let row; columns: displayedColumns;"></tr>

    <!-- Row shown when there is no matching data. -->
    <tr class="mat-row" *matNoDataRow>
      <td class="mat-cell" colspan="4">No data matching the filter "{{input.value}}"</td>
    </tr>
  </table>
Then add the following code in the mat-table4.component.css
					table {
    width: 100%;
  }

  .mat-form-field {
    font-size: 14px;
    width: 100%;
  }
Then add the following code in the mat-table4.component.ts
					import { Component, OnInit } from '@angular/core';
import {MatTableDataSource} from '@angular/material/table';

export interface TableColumns {
  name: string;
  position: number;
  weight: number;
  symbol: string;
}

const TableData: TableColumns[] = [
  {position: 1, name: 'Hydrogen', weight: 1.0079, symbol: 'H'},
  {position: 2, name: 'Helium', weight: 4.0026, symbol: 'He'},
  {position: 3, name: 'Lithium', weight: 6.941, symbol: 'Li'},
  {position: 4, name: 'Beryllium', weight: 9.0122, symbol: 'Be'},
  {position: 5, name: 'Boron', weight: 10.811, symbol: 'B'},
  {position: 6, name: 'Carbon', weight: 12.0107, symbol: 'C'},
  {position: 7, name: 'Nitrogen', weight: 14.0067, symbol: 'N'},
  {position: 8, name: 'Oxygen', weight: 15.9994, symbol: 'O'},
  {position: 9, name: 'Fluorine', weight: 18.9984, symbol: 'F'},
  {position: 10, name: 'Neon', weight: 20.1797, symbol: 'Ne'},
];

@Component({
  selector: 'app-mat-table4',
  templateUrl: './mat-table4.component.html',
  styleUrls: ['./mat-table4.component.css']
})
export class MatTable4Component implements OnInit {

  displayedColumns: string[] = ['position', 'name', 'weight', 'symbol'];
  dataSource = new MatTableDataSource(TableData);

  applyFilter(event: Event) {
    const filterValue = (event.target as HTMLInputElement).value;
    this.dataSource.filter = filterValue.trim().toLowerCase();
  }

  constructor() { }
   ngOnInit(): void {
  }
 }
The material UI table filter feature should look like the image below:
Angular Material UI Table Pagination Example
Let’s say we are dealing with a lot of data, and they need to be shown in the same table. Pagination makes total sense. Let’s see how to add material UI table pagination feature. Create another component named ‘MatTable5’
Add the following code in the mat-table5.component.html
					<div class="mat-elevation-z8">
    <table mat-table [dataSource]="dataSource">

      <!-- Position Column -->
      <ng-container matColumnDef="position">
        <th mat-header-cell *matHeaderCellDef> No. </th>
        <td mat-cell *matCellDef="let element"> {{element.position}} </td>
      </ng-container>

      <!-- Name Column -->
      <ng-container matColumnDef="name">
        <th mat-header-cell *matHeaderCellDef> Name </th>
        <td mat-cell *matCellDef="let element"> {{element.name}} </td>
      </ng-container>

      <!-- Weight Column -->
      <ng-container matColumnDef="weight">
        <th mat-header-cell *matHeaderCellDef> Weight </th>
        <td mat-cell *matCellDef="let element"> {{element.weight}} </td>
      </ng-container>

      <!-- Symbol Column -->
      <ng-container matColumnDef="symbol">
        <th mat-header-cell *matHeaderCellDef> Symbol </th>
        <td mat-cell *matCellDef="let element"> {{element.symbol}} </td>
      </ng-container>

      <tr mat-header-row *matHeaderRowDef="displayedColumns"></tr>
      <tr mat-row *matRowDef="let row; columns: displayedColumns;"></tr>
    </table>

    <mat-paginator [pageSizeOptions]="[5, 10, 20]"
                   showFirstLastButtons
                   aria-label="Select page of periodic elements">
    </mat-paginator>
  </div>
Now add the following code in the mat-table5.component.css
					table {
    width: 100%;
  }
Then add the following code in the mat-table5.component.ts
					import {AfterViewInit, Component, OnInit, ViewChild} from '@angular/core';
import {MatPaginator} from '@angular/material/paginator';
import {MatTableDataSource} from '@angular/material/table';

@Component({
  selector: 'app-mat-table5',
  templateUrl: './mat-table5.component.html',
  styleUrls: ['./mat-table5.component.css']
})
export class MatTable5Component implements OnInit, AfterViewInit  {

  displayedColumns: string[] = ['position', 'name', 'weight', 'symbol'];
  dataSource = new MatTableDataSource<PeriodicElement>(ELEMENT_DATA);

  @ViewChild(MatPaginator) paginator!: MatPaginator;

  ngAfterViewInit() {
    this.dataSource.paginator = this.paginator;
  }

  constructor() { }

  ngOnInit(): void {
  }

}


export interface PeriodicElement {
  name: string;
  position: number;
  weight: number;
  symbol: string;
}

const ELEMENT_DATA: PeriodicElement[] = [
  {position: 1, name: 'Hydrogen', weight: 1.0079, symbol: 'H'},
  {position: 2, name: 'Helium', weight: 4.0026, symbol: 'He'},
  {position: 3, name: 'Lithium', weight: 6.941, symbol: 'Li'},
  {position: 4, name: 'Beryllium', weight: 9.0122, symbol: 'Be'},
  {position: 5, name: 'Boron', weight: 10.811, symbol: 'B'},
  {position: 6, name: 'Carbon', weight: 12.0107, symbol: 'C'},
  {position: 7, name: 'Nitrogen', weight: 14.0067, symbol: 'N'},
  {position: 8, name: 'Oxygen', weight: 15.9994, symbol: 'O'},
  {position: 9, name: 'Fluorine', weight: 18.9984, symbol: 'F'},
  {position: 10, name: 'Neon', weight: 20.1797, symbol: 'Ne'},
  {position: 11, name: 'Sodium', weight: 22.9897, symbol: 'Na'},
  {position: 12, name: 'Magnesium', weight: 24.305, symbol: 'Mg'},
  {position: 13, name: 'Aluminum', weight: 26.9815, symbol: 'Al'},
  {position: 14, name: 'Silicon', weight: 28.0855, symbol: 'Si'},
  {position: 15, name: 'Phosphorus', weight: 30.9738, symbol: 'P'},
  {position: 16, name: 'Sulfur', weight: 32.065, symbol: 'S'},
  {position: 17, name: 'Chlorine', weight: 35.453, symbol: 'Cl'},
  {position: 18, name: 'Argon', weight: 39.948, symbol: 'Ar'},
  {position: 19, name: 'Potassium', weight: 39.0983, symbol: 'K'},
  {position: 20, name: 'Calcium', weight: 40.078, symbol: 'Ca'},
];
The material UI table pagination feature should look like the image below:
Angular Material UI Table Sorting Column Example
Now let’s have a look at how to sort table rows in ascending or descending order based on columns. Create another component named ‘MatTable6’
Now add the following code in the mat-table6.component.html
					<table mat-table [dataSource]="dataSource" matSort (matSortChange)="announceSortChange($event)"
    class="mat-elevation-z8">

  <!-- Position Column -->
  <ng-container matColumnDef="position">
    <th mat-header-cell *matHeaderCellDef mat-sort-header sortActionDescription="Sort by number">
      No.
    </th>
    <td mat-cell *matCellDef="let element"> {{element.position}} </td>
  </ng-container>

  <!-- Name Column -->
  <ng-container matColumnDef="name">
    <th mat-header-cell *matHeaderCellDef mat-sort-header sortActionDescription="Sort by name">
      Name
    </th>
    <td mat-cell *matCellDef="let element"> {{element.name}} </td>
  </ng-container>

  <!-- Weight Column -->
  <ng-container matColumnDef="weight">
    <th mat-header-cell *matHeaderCellDef mat-sort-header sortActionDescription="Sort by weight">
      Weight
    </th>
    <td mat-cell *matCellDef="let element"> {{element.weight}} </td>
  </ng-container>

  <!-- Symbol Column -->
  <ng-container matColumnDef="symbol">
    <th mat-header-cell *matHeaderCellDef mat-sort-header sortActionDescription="Sort by symbol">
      Symbol
    </th>
    <td mat-cell *matCellDef="let element"> {{element.symbol}} </td>
  </ng-container>

  <tr mat-header-row *matHeaderRowDef="displayedColumns"></tr>
  <tr mat-row *matRowDef="let row; columns: displayedColumns;"></tr>
</table>
Now add the following code in the mat-table6.component.css
					table {
    width: 100%;
  }

  th.mat-sort-header-sorted {
    color: black;
  }
Then add the following code in the mat-table6.component.ts
					import {LiveAnnouncer} from '@angular/cdk/a11y';
import {AfterViewInit, Component, OnInit, ViewChild} from '@angular/core';
import {MatSort, Sort} from '@angular/material/sort';
import {MatTableDataSource} from '@angular/material/table';

export interface TableColumns {
  name: string;
  position: number;
  weight: number;
  symbol: string;
}

const TableData: TableColumns[] = [
  {position: 1, name: 'Hydrogen', weight: 1.0079, symbol: 'H'},
  {position: 2, name: 'Helium', weight: 4.0026, symbol: 'He'},
  {position: 3, name: 'Lithium', weight: 6.941, symbol: 'Li'},
  {position: 4, name: 'Beryllium', weight: 9.0122, symbol: 'Be'},
  {position: 5, name: 'Boron', weight: 10.811, symbol: 'B'},
  {position: 6, name: 'Carbon', weight: 12.0107, symbol: 'C'},
  {position: 7, name: 'Nitrogen', weight: 14.0067, symbol: 'N'},
  {position: 8, name: 'Oxygen', weight: 15.9994, symbol: 'O'},
  {position: 9, name: 'Fluorine', weight: 18.9984, symbol: 'F'},
  {position: 10, name: 'Neon', weight: 20.1797, symbol: 'Ne'},
];

@Component({
  selector: 'app-mat-table6',
  templateUrl: './mat-table6.component.html',
  styleUrls: ['./mat-table6.component.css']
})
export class MatTable6Component implements OnInit, AfterViewInit  {

  constructor(private _liveAnnouncer: LiveAnnouncer) {}

  ngOnInit(): void {
  }

  displayedColumns: string[] = ['position', 'name', 'weight', 'symbol'];
  dataSource = new MatTableDataSource(TableData);

  @ViewChild(MatSort) sort!: MatSort;

  ngAfterViewInit() {
    this.dataSource.sort = this.sort;
  }

  /** Announce the change in sort state for assistive technology. */
  announceSortChange(sortState: Sort) {
    // This example uses English messages. If your application supports
    // multiple language, you would internationalize these strings.
    // Furthermore, you can customize the message to add additional
    // details about the values being sorted.
    if (sortState.direction) {
      this._liveAnnouncer.announce(`Sorted ${sortState.direction}ending`);
    } else {
      this._liveAnnouncer.announce('Sorting cleared');
    }
  }
}
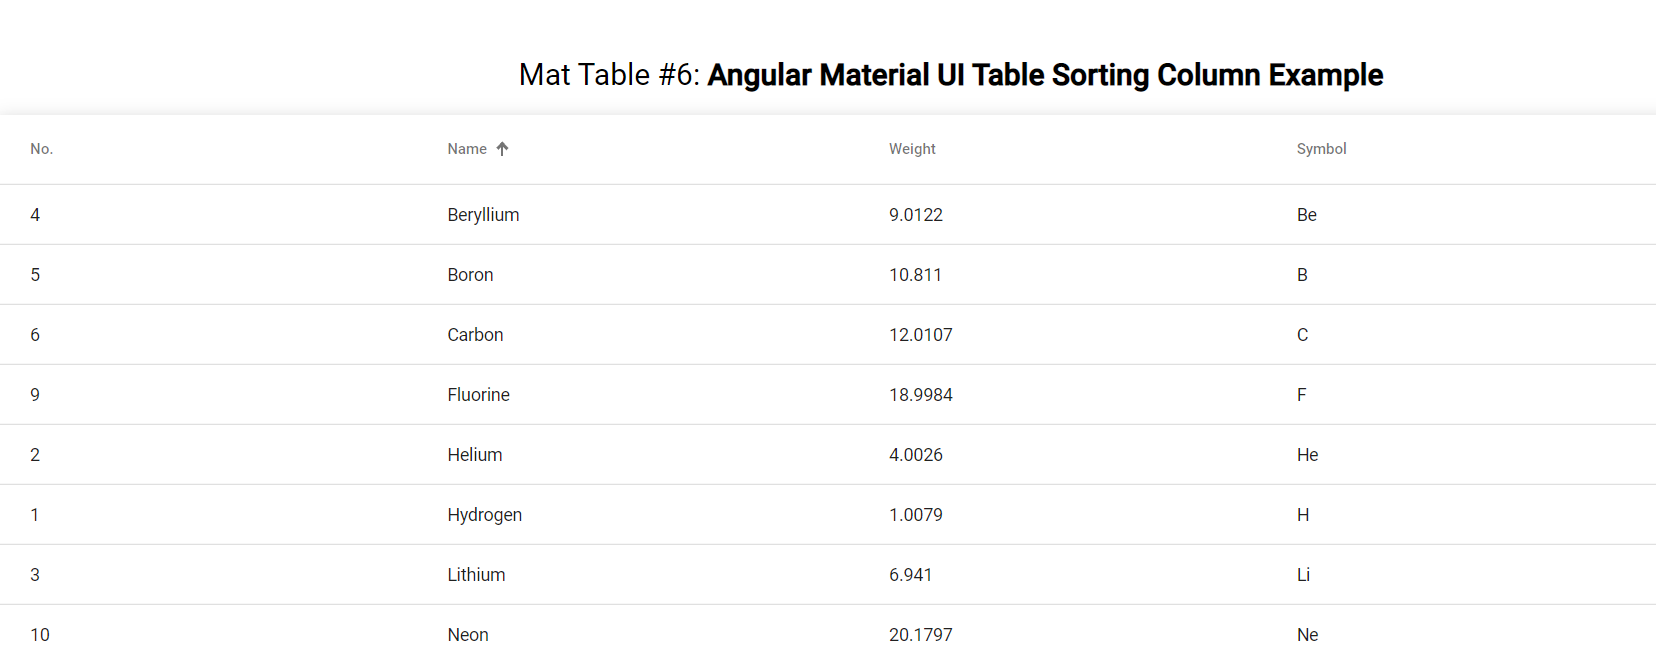
The material UI table sorting rows feature should look like the image below:
Adding Footer in Angular Material UI Table
Next, from angular mat table examples, we will look at how to add a fixed footer to the table. The footer would be displaying some useful info. Create a new component named ‘MatTable7’.
Add the following code in the mat-table7.component.html
					<table mat-table [dataSource]="transactions" class="mat-elevation-z8">
    <!-- Item Column -->
    <ng-container matColumnDef="item">
      <th mat-header-cell *matHeaderCellDef> Item </th>
      <td mat-cell *matCellDef="let transaction"> {{transaction.item}} </td>
      <td mat-footer-cell *matFooterCellDef> Total </td>
    </ng-container>

    <!-- Cost Column -->
    <ng-container matColumnDef="cost">
      <th mat-header-cell *matHeaderCellDef> Cost </th>
      <td mat-cell *matCellDef="let transaction"> {{transaction.cost | currency}} </td>
      <td mat-footer-cell *matFooterCellDef> {{getTotalCost() | currency}} </td>
    </ng-container>

    <tr mat-header-row *matHeaderRowDef="displayedColumns"></tr>
    <tr mat-row *matRowDef="let row; columns: displayedColumns;"></tr>
    <tr mat-footer-row *matFooterRowDef="displayedColumns"></tr>
  </table>
Now add the following code in the mat-table7.component.css
					table {
    width: 100%;
  }

  tr.mat-footer-row {
    font-weight: bold;
  }
Then add the following code in the mat-table7.component.ts
					import { Component, OnInit } from '@angular/core';

interface Transaction {
  item: string;
  cost: number;
}

@Component({
  selector: 'app-mat-table7',
  templateUrl: './mat-table7.component.html',
  styleUrls: ['./mat-table7.component.css']
})
export class MatTable7Component implements OnInit {

  displayedColumns: string[] = ['item', 'cost'];
  transactions: Transaction[] = [
    {item: 'Beach ball', cost: 4},
    {item: 'Towel', cost: 5},
    {item: 'Frisbee', cost: 2},
    {item: 'Sunscreen', cost: 4},
    {item: 'Cooler', cost: 25},
    {item: 'Swim suit', cost: 15},
  ];

  /** Gets the total cost of all transactions. */
  getTotalCost() {
    return this.transactions.map(t => t.cost).reduce((acc, value) => acc + value, 0);
  }

  constructor() { }

  ngOnInit(): void {
  }

}
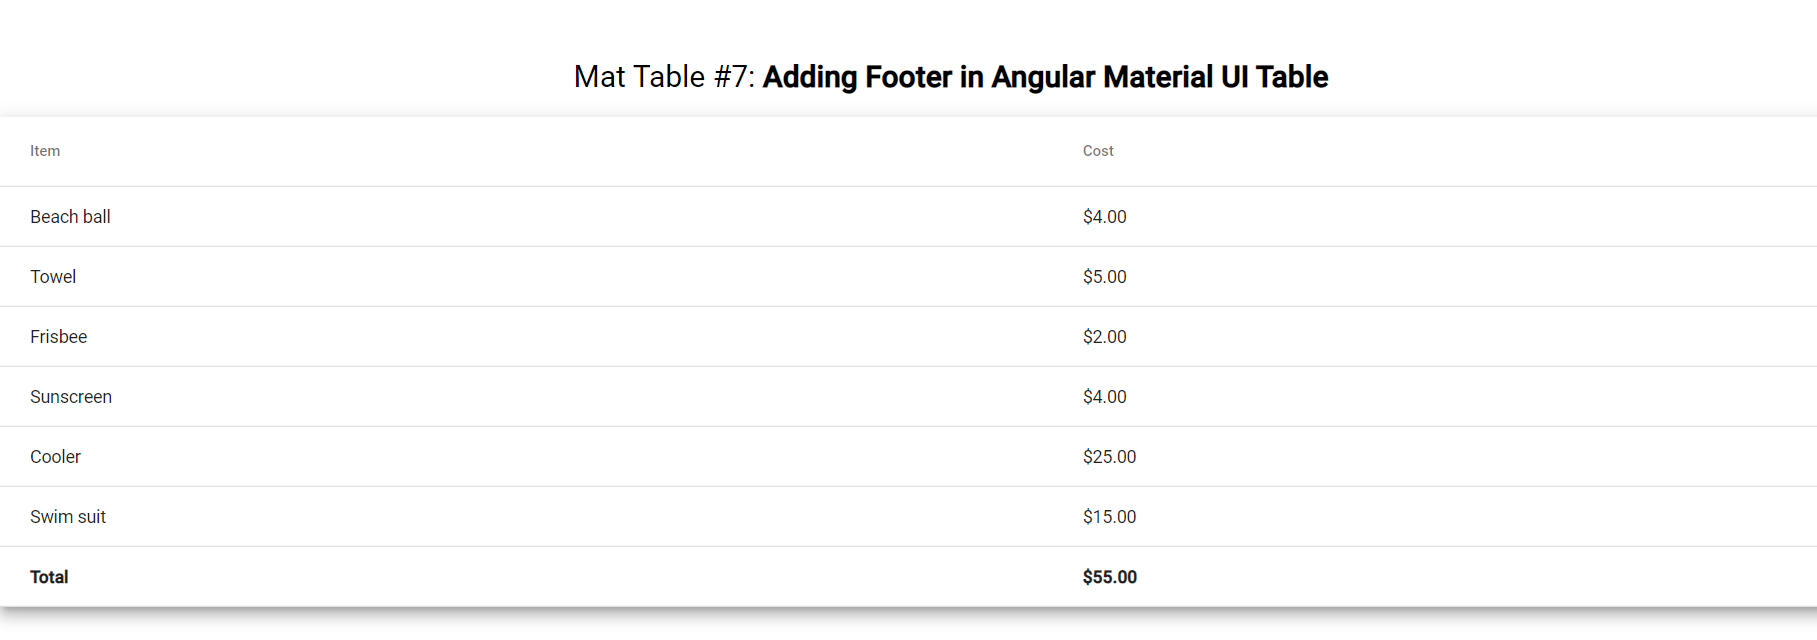
The material UI table with a fixed footer example should look like the image below:
Adding Checkbox for Row Selection in Angular Material UI Table
Lastly, we will look at another important feature of adding a checkbox to the table. This would allow the user to select a specific row and fetch details from it.
Create another component named ‘MatTable8’. Add the following code in the mat-table8.component.html
					<table mat-table [dataSource]="dataSource" class="mat-elevation-z8">

    <!-- Checkbox Column -->
    <ng-container matColumnDef="select">
      <th mat-header-cell *matHeaderCellDef>
        <mat-checkbox (change)="$event ? toggleAllRows() : null"
                      [checked]="selection.hasValue() && isAllSelected()"
                      [indeterminate]="selection.hasValue() && !isAllSelected()"
                      [aria-label]="checkboxLabel()">
        </mat-checkbox>
      </th>
      <td mat-cell *matCellDef="let row">
        <mat-checkbox (click)="$event.stopPropagation()"
                      (change)="$event ? selection.toggle(row) : null"
                      [checked]="selection.isSelected(row)"
                      [aria-label]="checkboxLabel(row)">
        </mat-checkbox>
      </td>
    </ng-container>

    <!-- Position Column -->
    <ng-container matColumnDef="position">
      <th mat-header-cell *matHeaderCellDef> No. </th>
      <td mat-cell *matCellDef="let element"> {{element.position}} </td>
    </ng-container>

    <!-- Name Column -->
    <ng-container matColumnDef="name">
      <th mat-header-cell *matHeaderCellDef> Name </th>
      <td mat-cell *matCellDef="let element"> {{element.name}} </td>
    </ng-container>

    <!-- Weight Column -->
    <ng-container matColumnDef="weight">
      <th mat-header-cell *matHeaderCellDef> Weight </th>
      <td mat-cell *matCellDef="let element"> {{element.weight}} </td>
    </ng-container>

    <!-- Symbol Column -->
    <ng-container matColumnDef="symbol">
      <th mat-header-cell *matHeaderCellDef> Symbol </th>
      <td mat-cell *matCellDef="let element"> {{element.symbol}} </td>
    </ng-container>

    <tr mat-header-row *matHeaderRowDef="displayedColumns"></tr>
    <tr mat-row *matRowDef="let row; columns: displayedColumns;"
        (click)="selection.toggle(row)">
    </tr>
  </table>
Now add the following code in the mat-table8.component.css
					table {
    width: 100%;
  }
Then dd the following code in the mat-table8.component.ts
					import {SelectionModel} from '@angular/cdk/collections';
import {Component, OnInit} from '@angular/core';
import {MatTableDataSource} from '@angular/material/table';

export interface TableColumns {
  name: string;
  position: number;
  weight: number;
  symbol: string;
}

const TableData: TableColumns[] = [
  {position: 1, name: 'Hydrogen', weight: 1.0079, symbol: 'H'},
  {position: 2, name: 'Helium', weight: 4.0026, symbol: 'He'},
  {position: 3, name: 'Lithium', weight: 6.941, symbol: 'Li'},
  {position: 4, name: 'Beryllium', weight: 9.0122, symbol: 'Be'},
  {position: 5, name: 'Boron', weight: 10.811, symbol: 'B'},
  {position: 6, name: 'Carbon', weight: 12.0107, symbol: 'C'},
  {position: 7, name: 'Nitrogen', weight: 14.0067, symbol: 'N'},
  {position: 8, name: 'Oxygen', weight: 15.9994, symbol: 'O'},
  {position: 9, name: 'Fluorine', weight: 18.9984, symbol: 'F'},
  {position: 10, name: 'Neon', weight: 20.1797, symbol: 'Ne'},
];

@Component({
  selector: 'app-mat-table8',
  templateUrl: './mat-table8.component.html',
  styleUrls: ['./mat-table8.component.css']
})
export class MatTable8Component implements OnInit {

  displayedColumns: string[] = ['select', 'position', 'name', 'weight', 'symbol'];
  dataSource = new MatTableDataSource<TableColumns>(TableData);
  selection = new SelectionModel<TableColumns>(true, []);

  /** Whether the number of selected elements matches the total number of rows. */
  isAllSelected() {
    const numSelected = this.selection.selected.length;
    const numRows = this.dataSource.data.length;
    return numSelected === numRows;
  }

  /** Selects all rows if they are not all selected; otherwise clear selection. */
  toggleAllRows() {
    if (this.isAllSelected()) {
      this.selection.clear();
      return;
    }

    this.selection.select(...this.dataSource.data);
  }

  /** The label for the checkbox on the passed row */
  checkboxLabel(row?: TableColumns): string {
    if (!row) {
      return `${this.isAllSelected() ? 'deselect' : 'select'} all`;
    }
    console.log(this.selection.selected);
    return `${this.selection.isSelected(row) ? 'deselect' : 'select'} row ${row.position + 1}`;
  }

  constructor() { }

  ngOnInit(): void {
  }

}
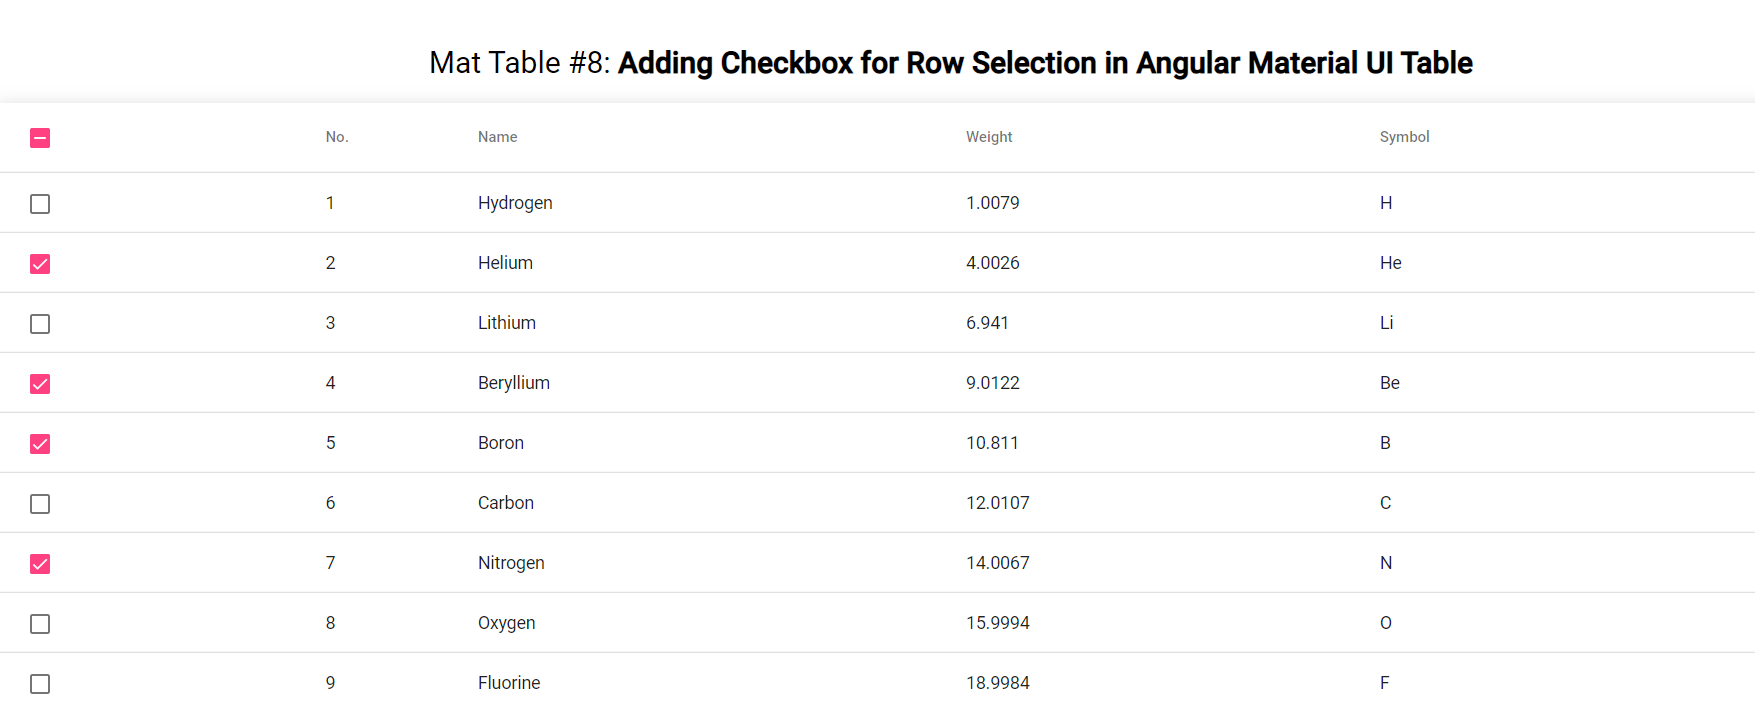
The material UI table with checkbox selection feature example should look like the image below:
And that’s a wrap!
We just saw 8 different ways How to Add Angular Material UI Table. You may also want to read about Lazy Loading in Angular Projects and also How to create a dropdown in Angular. Please like, and leave your reviews in the comment section below.
Have a great one!
Recent Comments
Categories
- Angular
- AWS
- Backend Development
- Big Data
- Cloud
- Database
- Deployment
- DevOps
- Docker
- Frontend Development
- GitHub
- Google Cloud Platform
- Installations
- Java
- JavaScript
- Linux
- MySQL
- Networking
- NodeJS
- Operating System
- Python
- Python Flask
- Report
- Security
- Server
- SpringBoot
- Subdomain
- TypeScript
- Uncategorized
- VSCode
- Webhosting
- WordPress
Search
Recent Post
Understanding Mutex, Semaphores, and the Producer-Consumer Problem
- 13 October, 2024
- 10 min read
Process scheduling algorithm – FIFO SJF RR
- 14 September, 2024
- 8 min read
How to Implement Multithreading in C Language
- 8 September, 2024
- 9 min read
