In this article, we are going to go step by step on how to create CRUD API using NodeJS and MySQL database. This can be done on all operating systems, such as Windows, Mac or Linux. Then at the end we will look at testing this API as well using popular testing tool POSTMAN. But before we start there are some prerequisites that we need to look at:
Prerequisites!
- NodeJS and therefore, NPM should be installed. (Install Node JS)
- Should have basic knowledge about JavaScript and MVC architecture
- Should have MySQL installed. (Install MySQL)
STEP 1: Creating NodeJS Backend
So, let’s get started. Create a folder called “node_crud_api”. And then open up a terminal or a console and execute the following command to initialize NPM and also to install all the needed node packages.
npm init
After you entered the above command, it’s going to ask you a bunch of questions, just add what’s relevant and hit enter otherwise. Just as shown in the section below:
					name: node_crud_api
version: (1.0.0) <press enter>
description: <press enter>
entry point: (index.js) server.js
test command: <press enter>
git repository: <press enter>
keywords: <press enter>
author: <your name>
license: (ISC) <press enter>

Is this ok? (yes) yes
Then execute this command in order to install required packages. This would create a file named “package.json”
					npm install express mysql body-parser ––save
npm install nodemon -g
STEP 2: Setting Up Webserver
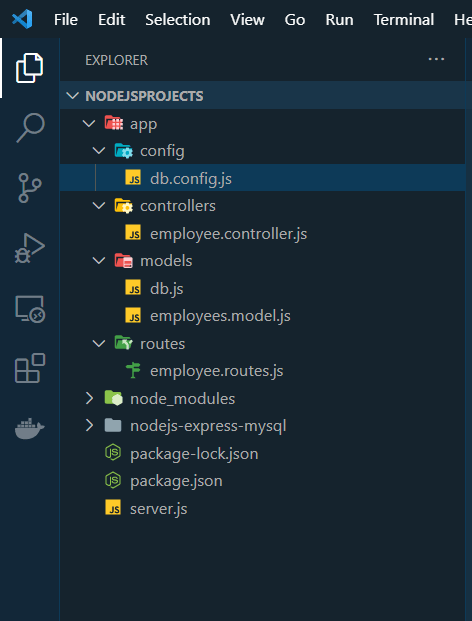
Now you need to open up our project folder in a text editor such as VSCode and start creating files and directories. There is a picture attached at the bottom of this article that shows all the files and folders that we’re going to add in this project. So, you can check that out for clarity. First create a file called “server.js” in the root directory. Add the following code in there.
					const express = require("express");
const bodyParser = require("body-parser");

const app = express();

// parse requests of content-type: application/json
app.use(bodyParser.json());

// parse requests of content-type: application/x-www-form-urlencoded
app.use(bodyParser.urlencoded({ extended: true }));


// a route for home page
app.get("/home", (req, res) => {
  res.json({ message: "NodeJs CRUD Application" });
});


// setting port to 3000, & listening for requests http request.
app.listen(3000, () => {
  console.log("Server is running on port 3000.");
});
Explanation
We are importing 2 important modules here, namely Express and bodyParder. Express module is used for creating API and body-parser extracts the entire body portion of an incoming request stream and exposes it on req.body. Which makes it easier to deal with. We are then creating a basic GET route or any incoming request on “/home” URL. And lastly, we are opening up port 3000 and listening on all incoming http requests directed to that port.
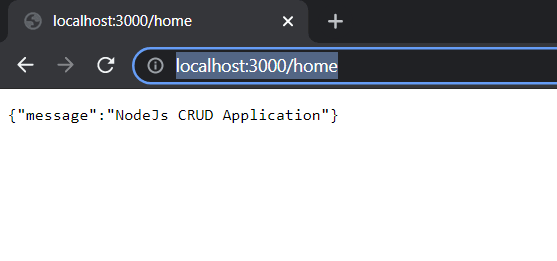
Now we have created a basic server on NodeJS. Let’s run it and check of its working. Execute the following command and then go to a browser and type the URL: http://localhost:3000/home. It should give the following output:
nodemon server.js
STEP 3: Setting Up Database
A) Creating MySQL DB and Table
Open up any GUI based MySQL management studio. I will be using MySQL Workbench. And create a Database called ‘employeedb’ and then create a table called ‘employee’. Add some records into it. It should show something like this:
B) Database Configuration
To make everything neat and clean and to make sense, we are going to separate out all the development layers into different folders and files. So, first make a folder called “app” and then make another folder called “config” inside the app folder. Now we need to add a file called “db.config.js” inside the config folder. In this file, we will add some database environment variables. Copy the following code in that file.
					module.exports = {
    HOST: "localhost",
    USER: "root",
    PASSWORD: "root",
    DB: "employeedb"
  };
You will obviously change according to your setting of MySQL. For example, DB name or PASSWORD may not be the same, so you should it accordingly.
C) Connecting MySQL with Server
After that, we need to get MySQL connection with our NodeJS Server. Let’s make a folder called “models” in the app folder and add a new file called “db.js” inside it and the following in db.js file
					const mysql = require("mysql");
const dbConfig = require("../config/db.config.js");

// Create a connection to the database
const connection = mysql.createConnection({
  host: dbConfig.HOST,
  user: dbConfig.USER,
  password: dbConfig.PASSWORD,
  database: dbConfig.DB
});

// open the MySQL connection
connection.connect(error => {
  if (error) throw error;
  console.log("Successfully connected to the database.");
});

module.exports = connection;
STEP 4: Configuring CRUD Operation
Moving on, we are now going to create a service layer where all the CRUD operation is being held. For this, we need to create a file called “employees.model.js” inside the “models” folder. The functions we’ll will make are for the following:
- Add New Employee
- Find Employee by Id
- Get All Employees
- Update Employee by Id
- Remove Employee by Id
- Remove All Employees
Add the following code in the file:
					const sql = require("./db.js");

// constructor
const Employee = function(employee) {
  this.designation = employee.designation;
  this.doj = employee.doj;
  this.name = employee.name;
  this.salary = employee.salary;
};

Employee.create = (newEmployee, result) => {
  sql.query("INSERT INTO employee SET ?", newEmployee, (err, res) => {
    if (err) {
      console.log("error: ", err);
      result(err, null);
      return;
    }

    console.log("created employee: ", { id: res.insertId, ...newEmployee });
    result(null, { id: res.insertId, ...newEmployee });
  });
};

Employee.findById = (employeeId, result) => {
  sql.query(`SELECT * FROM employee WHERE id = ${employeeId}`, (err, res) => {
    if (err) {
      console.log("error: ", err);
      result(err, null);
      return;
    }

    if (res.length) {
      console.log("found employee: ", res[0]);
      result(null, res[0]);
      return;
    }

    // not found employee with the id
    result({ kind: "not_found" }, null);
  });
};


Employee.getAll = result => {
  sql.query("SELECT * FROM employee", (err, res) => {
    if (err) {
      console.log("error: ", err);
      result(null, err);
      return;
    }

    console.log("employees: ", res);
    result(null, res);
  });
};

Employee.updateById = (id, employee, result) => {
  sql.query(
    "UPDATE employee SET designation = ?, doj = ?, name = ?, salary = ? WHERE id = ?",
    [employee.designation, employee.doj, employee.name, employee.salary, id],
    (err, res) => {
      if (err) {
        console.log("error: ", err);
        result(null, err);
        return;
      }

      if (res.affectedRows == 0) {
        // not found employee with the id
        result({ kind: "not_found" }, null);
        return;
      }

      console.log("updated employee: ", { id: id, ...employee });
      result(null, { id: id, ...employee });
    }
  );
};

Employee.remove = (id, result) => {
  sql.query("DELETE FROM employee WHERE id = ?", id, (err, res) => {
    if (err) {
      console.log("error: ", err);
      result(null, err);
      return;
    }

    if (res.affectedRows == 0) {
      // not found employee with the id
      result({ kind: "not_found" }, null);
      return;
    }

    console.log("deleted employee with id: ", id);
    result(null, res);
  });
};

Employee.removeAll = result => {
  sql.query("DELETE FROM employee", (err, res) => {
    if (err) {
      console.log("error: ", err);
      result(null, err);
      return;
    }

    console.log(`deleted ${res.affectedRows} employees`);
    result(null, res);
  });
};

module.exports = Employee;
STEP 5: Creating Routes
After that, now we jump on creating various routes for all the incoming HTTP requests (GET, POST, PUT, DELETE). Create a folder called “routes” inside the app folder and then create a file called “employee.routes.js” inside the folder. Add the following routing code in the file:
					module.exports = app => {
    const employees = require("../controllers/employee.controller.js");

    // Create a new employee
    app.post("/employees", employees.create);

    // Retrieve all employees
    app.get("/employees", employees.findAll);

    // Retrieve a single employee with employeeId
    app.get("/employees/:employeeId", employees.findOne);

    // Update a employee with employeeId
    app.put("/employees/:employeeId", employees.update);

    // Delete a employee with employeeId
    app.delete("/employees/:employeeId", employees.delete);

    // Create a new employee
    app.delete("/employees", employees.deleteAll);
  };
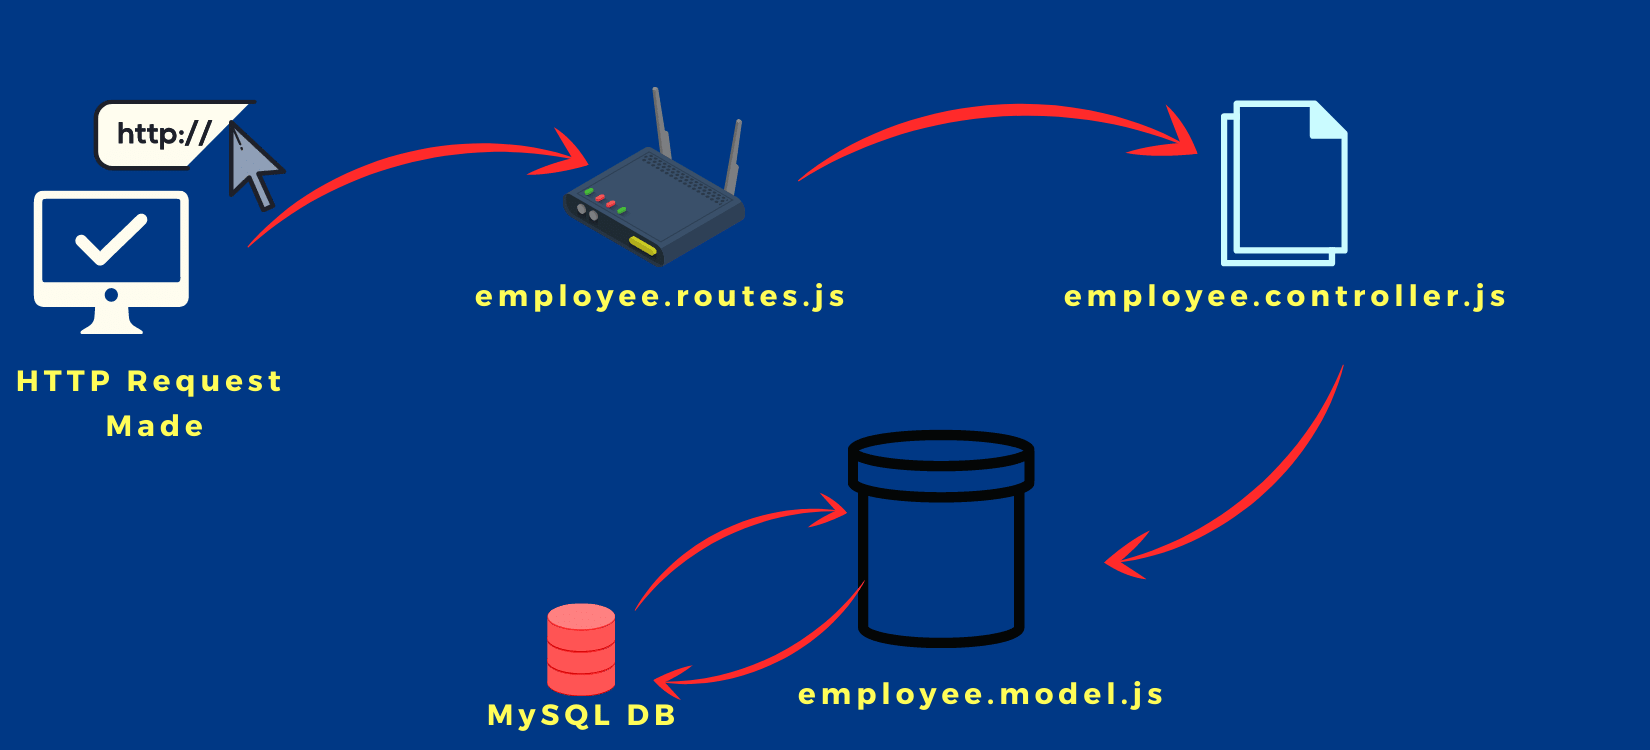
This contains all the endpoints for all the incoming http requests. After a user searches a URL and it gits this endpoint, this endpoint will then call a controller class. That controller class will validate the incoming request and then call the relevant CRUD service from the “employees.model.js” file that we created earlier.
One more thing that we need to do is to add the routes folder path in the server.js file too. The final version of the server.js file would contain the following code.
					const express = require("express");
const bodyParser = require("body-parser");

const app = express();

// parse requests of content-type: application/json
app.use(bodyParser.json());

// parse requests of content-type: application/x-www-form-urlencoded
app.use(bodyParser.urlencoded({ extended: true }));

// a route for home page
app.get("/home", (req, res) => {
  res.json({ message: "NodeJs CRUD Application" });
});

require("./app/routes/employee.routes.js")(app);

// setting port to 3000, & listening for requests http request.
app.listen(3000, () => {
  console.log("Server is running on port 3000.");
});
The new addition is done on line 12.
STEP 6: Creating Controllers
Create a new folder called “controllers” and then add file named “employee.controller.js” inside that folder. Now add the following code inside the file:
					const Employee = require("../models/employees.model.js");

// Create and Save a new employee
exports.create = (req, res) => {
    // Validate request
    if (!req.body) {
        res.status(400).send({
        message: "Content can not be empty!"
        });
    }

    // Create a Employee
    const employee = new Employee({
        designation: req.body.designation,
        doj: req.body.doj,
        name: req.body.name,
        salary: req.body.salary
    });

    // Save Employee in the database
    Employee.create(employee, (err, data) => {
        if (err)
        res.status(500).send({
            message:
            err.message || "Some error occurred while creating the Employee."
        });
        else res.send(data);
    });
};

// Retrieve all employees from the database.
exports.findAll = (req, res) => {
    Employee.getAll((err, data) => {
        if (err)
          res.status(500).send({
            message:
              err.message || "Some error occurred while retrieving employees."
          });
        else res.send(data);
    });
};

// Find a single employee with a employeeId
exports.findOne = (req, res) => {
    Employee.findById(req.params.employeeId, (err, data) => {
        if (err) {
          if (err.kind === "not_found") {
            res.status(404).send({
              message: `Not found Employee with id ${req.params.employeeId}.`
            });
          } else {
            res.status(500).send({
              message: "Error retrieving Employee with id " + req.params.employeeId
            });
          }
        } else res.send(data);
    });
};

// Update an employee identified by the employeeId in the request
exports.update = (req, res) => {
    // Validate Request
    if (!req.body) {
        res.status(400).send({
          message: "Content can not be empty!"
        });
    }

    Employee.updateById(
        req.params.employeeId,
        new Employee(req.body),
        (err, data) => {
            if (err) {
            if (err.kind === "not_found") {
                res.status(404).send({
                message: `Not found Employee with id ${req.params.employeeId}.`
                });
            } else {
                res.status(500).send({
                message: "Error updating Employee with id " + req.params.employeeId
                });
            }
            } else res.send(data);
        }
    );
};

// Delete an employee with the specified employeeId in the request
exports.delete = (req, res) => {
    Employee.remove(req.params.employeeId, (err, data) => {
        if (err) {
          if (err.kind === "not_found") {
            res.status(404).send({
              message: `Not found Employee with id ${req.params.employeeId}.`
            });
          } else {
            res.status(500).send({
              message: "Could not delete Employee with id " + req.params.employeeId
            });
          }
        } else res.send({ message: `Employee was deleted successfully!` });
    });
};

// Delete all employees from the database.
exports.deleteAll = (req, res) => {
    Employee.removeAll((err, data) => {
        if (err)
          res.status(500).send({
            message:
              err.message || "Some error occurred while removing all employees."
          });
        else res.send({ message: `All Employees were deleted successfully!` });
    });

};
And that’s all. Let’s take a look at a visual representation on how the process actually works.
STEP 7: Testing With POSTMAN
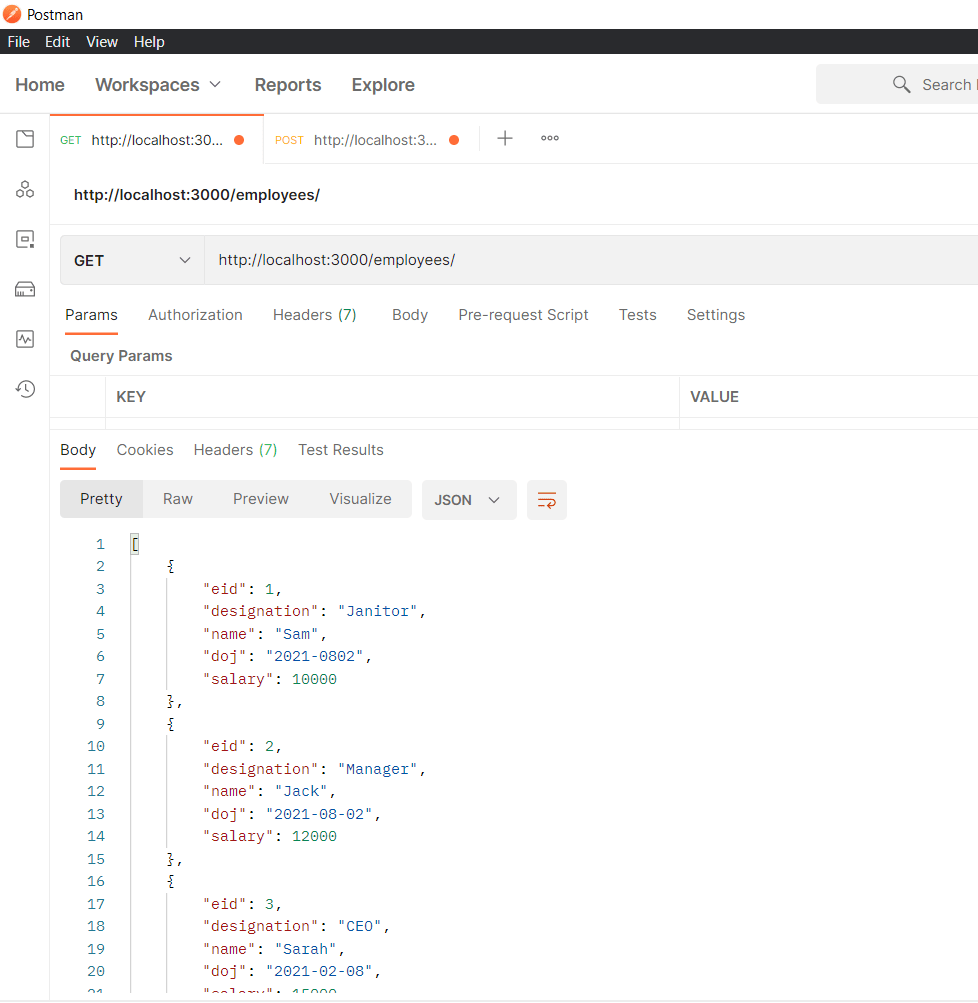
GET – Fetching all Employee
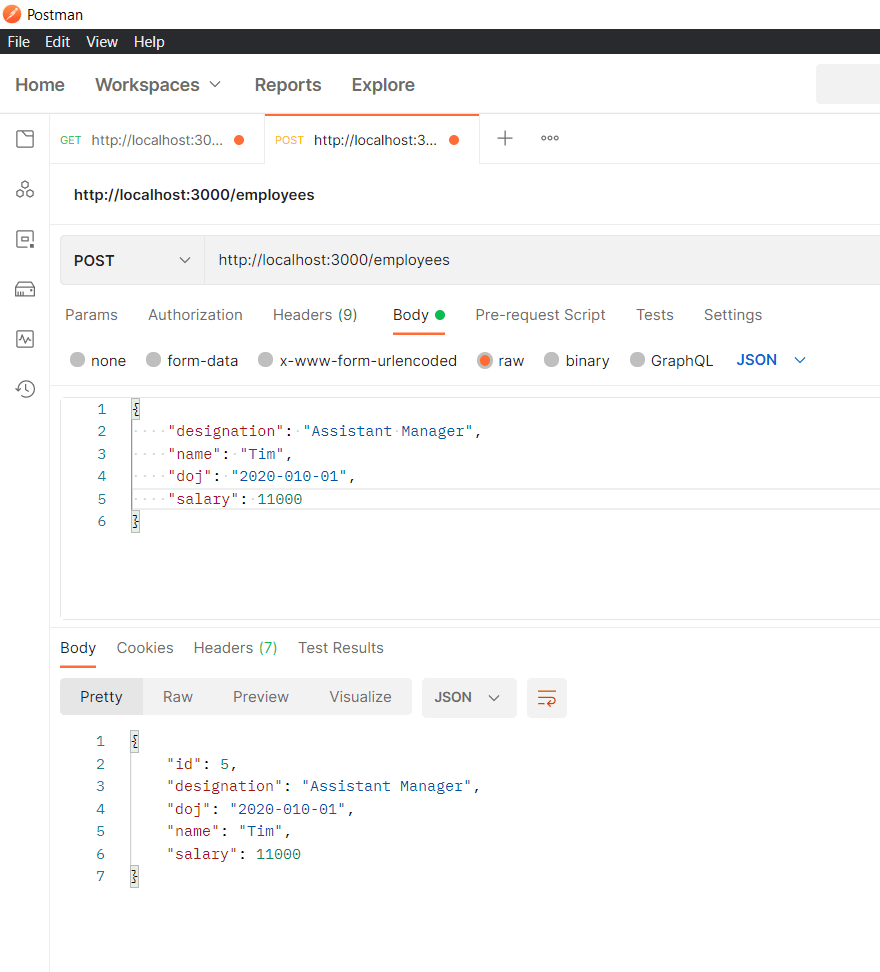
POST – Adding a new Employee
And that’s all!
I hope this article helped figure out exactly how you can create a CRUD API using NodeJS and MySQL. I hope it made you confident enough to start using this in your next project. Please like comment down you reviews.
Have a great one!
Final show of all directories and files in the project.
Recent Comments
Categories
- Angular
- AWS
- Backend Development
- Big Data
- Cloud
- Database
- Deployment
- DevOps
- Docker
- Frontend Development
- GitHub
- Google Cloud Platform
- Installations
- Java
- JavaScript
- Linux
- MySQL
- Networking
- NodeJS
- Operating System
- Python
- Python Flask
- Report
- Security
- Server
- SpringBoot
- Subdomain
- TypeScript
- Uncategorized
- VSCode
- Webhosting
- WordPress
Search
Recent Post
Understanding Mutex, Semaphores, and the Producer-Consumer Problem
- 13 October, 2024
- 10 min read
Process scheduling algorithm – FIFO SJF RR
- 14 September, 2024
- 8 min read
How to Implement Multithreading in C Language
- 8 September, 2024
- 9 min read
