Hey developers! As you’ve probably guessed, we are going to see how to create Node JS REST API with SQL Server example. I have also made a similar article for node js rest API crud MySQL database as well. So, feel free to check that out too.
Prerequisites
- NodeJS and therefore, NPM should be installed. (Download and install node.js on windows)
- Should have basic knowledge about JavaScript and MVC architecture
- MS SQL Server should be installed. (Installation of SQL server)
Table of Content
- Create NodeJS Project
- Install NodeJS Project Dependencies
- Setting up a Web Server with Node JS
- SQL Server Connection in Node JS
- Creating REST API for Crud Operations
- Creating Routes in Node JS
- Adding Controllers in Node JS
- Direct HTTP CALLS to Routes
- Testing With POSTMAN
STEP 1: Create Node JS
Let’s get started with creating a folder for our project named “node-js-rest-api-with-sql-server”. Next, we need to initialize our NodeJS project. To do that, execute the following command in terminal or CMD:
npm init –y
The above command will generate a file named “package.json” in your project’s root directory.
STEP 2: Install NodeJS Project Dependencies
Next, we need to install all the dependencies that are required to create Node JS REST API with SQL Server database. We need 4 NPM dependencies: Express, node-parser, mssql, and nodemon.
					npm install express mssql body-parser
npm install nodemon -g
STEP 3: Setting up a Web Server with Node JS
Now that our Node JS project has been set up, let’s create a simple web server with node js. Create a file named “index.js” and copy the following code into it.
					const express = require("express");
const bodyParser = require("body-parser");

const app = express();

// parse requests of content-type: application/json
app.use(bodyParser.json());

// parse requests of content-type: application/x-www-form-urlencoded
app.use(bodyParser.urlencoded({ extended: true }));

// setting port to 3000, & listening for requests http request.
app.listen(3000, () => {
  console.log("Server is running on port 3000.");
});
After this, open a terminal or CMD and run the following command to start the NodeJS server.
nodemon index.js
This will start the server on port 3000. You can check this by going to the following link in your browser: ‘localhost:3000’
Explanation:
In this class, we have imported Express and body-parser. Express is a web framework that will be used to create routing and REST APIs in our simple Node JS project. Body-parser is used to attach to the HTTP request and can parse it to be more accessible for us. The bodyParser.json() method will allow and handle the incoming request body or payload to be in JSON format.
Then we are exposing our server to listen to any HTTP call on port 3000. Below is the image of the output:
STEP 4: SQL Server Connection in Node JS
For the next step, we will be configuring SQL Server in our NodeJS Service. Note that installation of SQL server is a prerequisite for this step. Create a folder named “config” and inside create a file named “db.config.js”. Add the following code in the db.config.js file:
					module.exports = {
    server: "localhost",
    user: "sa",
    password: "MyPassword",
    database: "MyDatabase",
    trustServerCertificate: true
};
In the above code, change the password and database to your actual database and its password.
STEP 5: Creating REST API for Crud Operations
We will now create our service layer where all the CRUD-related operations will be performed. For this, create a folder named “model” and create a file inside it named “customer.model.js”. We will be creating four functions for performing Insert, Update, Delete and Fetch from SQL Server Database. Copy the following code in the “customer.model.js” class.
					const mssql = require("mssql");
const dbConfig = require("../config/db.config.js");
const customers = {};


// FETCHING ALL FROM CUSTOMER TABLE
customers.findAllFromCustomer = () => {
  return new Promise((resolve, reject) => {
    mssql.connect(dbConfig, function (err, result) {
      var request = new mssql.Request();
      request.query(`SELECT * FROM CUSTOMER;`, (err, res) => {
        if (err) reject(err);
        console.log(res.recordset);
        resolve(res.recordset); // FETCHING ALL DATA
      });
    });
  });
};

// ADD NEW CUSTOMER
customers.insertCustomers = (custObject) => {
  return new Promise((resolve, reject) => {
    mssql.connect(dbConfig, function (err, result) {
      // PARAMETERIZING QUERIES
      var request = new mssql.Request()
        .input("name", custObject.name)
        .input("address", custObject.address)
        .input("age", custObject.age)
        .input("gender", custObject.gender);

      request.query(
        `INSERT INTO CUSTOMER (name, address, age, gender) VALUES (@name, @address, @age, @gender);`,
        (err, res) => {
          if (err) reject(err);
          console.log(res.recordset);
          resolve(res.recordset); // ADDING NEW CUSTOMER
        }
      );
    });
  });
};


// UPDATE CUSTOMER
// node js rest api put example
customers.updateCustomers = (param_id, custObject) => {
  return new Promise((resolve, reject) => {
    mssql.connect(dbConfig, function (err, result) {
      // PARAMETERIZING QUERIES
      var request = new mssql.Request()
        .input("cust_id", param_id)
        .input("name", custObject.name)
        .input("address", custObject.address)
        .input("age", custObject.age)
        .input("gender", custObject.gender);

      request.query(
        `UPDATE CUSTOMER SET name = @name, address = @address, age = @age, gender = @gender WHERE id = @cust_id;`,
        (err, res) => {
          if (err) reject(err);
          console.log(res.recordset);
          resolve(res.recordset); // UPDATING CUSTOMER DATA
        }
      );
    });
  });
};


// DELETING BY ID FROM CUSTOMER TABLE
// node js rest api delete example
customers.deleteCustomerById = (param_id) => {
  return new Promise((resolve, reject) => {
    mssql.connect(dbConfig, function (err, result) {
      var request = new mssql.Request()
      .input("cust_id", param_id);

      request.query(`DELETE FROM CUSTOMER WHERE id = @cust_id`, (err, res) => {
        if (err) reject(err);
        console.log(res.recordset);
        resolve(res.recordset); // DELETING CUSTOMER DATA
      });
    });
  });
};

module.exports = customers;
STEP 6: Creating Routes in Node JS
Moving on, we need to create routes to handle all incoming HTTP calls. Create a folder named “routes” in the root directory and then create a file name “customer.routes.js” in it. Add the following code to the file:
					module.exports = app => {
    const customer = require("../controllers/customer.controller.js");

    // fetching ALL customers route
    app.get("/customer/fetchAll", customer.getAllCustomer);

    // adding new customer route
    app.post("/customer/insert", customer.insertNewCustomer);

    // node js rest api put example
    app.put("/customer/update/:cust_id", customer.updateCustomer);

    // node js rest api delete example
    app.delete("/customer/delete/:cust_id", customer.deleteCustomer);
  };
Here I have added 4 different routes, one for each CRUD operation as mentioned in the comments.
STEP 7: Adding Controllers in Node JS
Lastly, we need to create a controller class which would be an intermediate between the routes and the service layer (customer.model.js). This is where nodejs call rest API would be performed. Hence, create a folder named “controllers” and then create a file inside it named “customer.controller.js”. Copy the following code inside this file:
					const Customer = require("../model/customer.model");


// NODEJS CALL REST API TO INSSERT NEW CUSTOMER
exports.insertNewCustomer = async (req, res) => {
  const obj = await Customer.insertCustomers(req.body);
  res.send(obj);
};

// NODEJS CALL REST API TO FETCH ALL DATA
exports.getAllCustomer = async (req, res) => {
  const obj = await Customer.findAllFromCustomer();r
  res.send(obj);
};

// NODEJS CALL REST API FOR UPDATE
exports.updateCustomer = async (req, res) => {
  const obj = await Customer.updateCustomers(req.params.cust_id, req.body);
  res.send(obj);
};

// NODEJS CALL REST API FOR DELETE
exports.deleteCustomer = async (req, res) => {
  const obj = await Customer.deleteCustomerById(req.params.cust_id);
  res.send(obj);
};
STEP 8: Direct HTTP CALLS to Routes
Lastly, you need to redirect all the incoming HTTP calls for specific routes to its routes.js file. Since we only have customer routes in our project, we will redirect to only it. Just copy the following code and replace all in the “index.js file”.
					const express = require("express");
const bodyParser = require("body-parser");

const app = express();

// parse requests of content-type: application/json
app.use(bodyParser.json());

// parse requests of content-type: application/x-www-form-urlencoded
app.use(bodyParser.urlencoded({ extended: true }));

require('./routes/customer.routes')(app)

// setting port to 3000, & listening for requests http request.
app.listen(3000, () => {
  console.log("Server is running on port 3000.");
});
And that’s all!
Run the project using this command:
nodemon index.js
STEP 9: Testing With POSTMAN
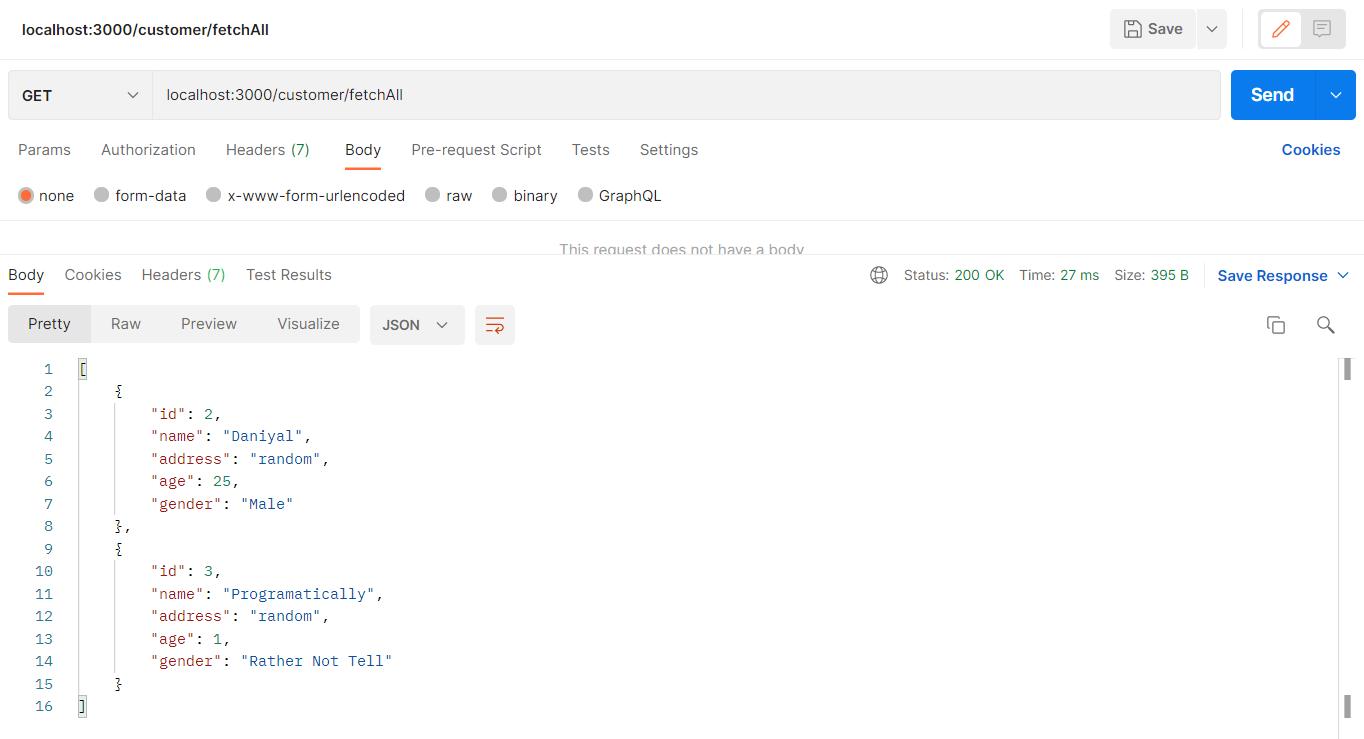
GET – Fetching all Customers
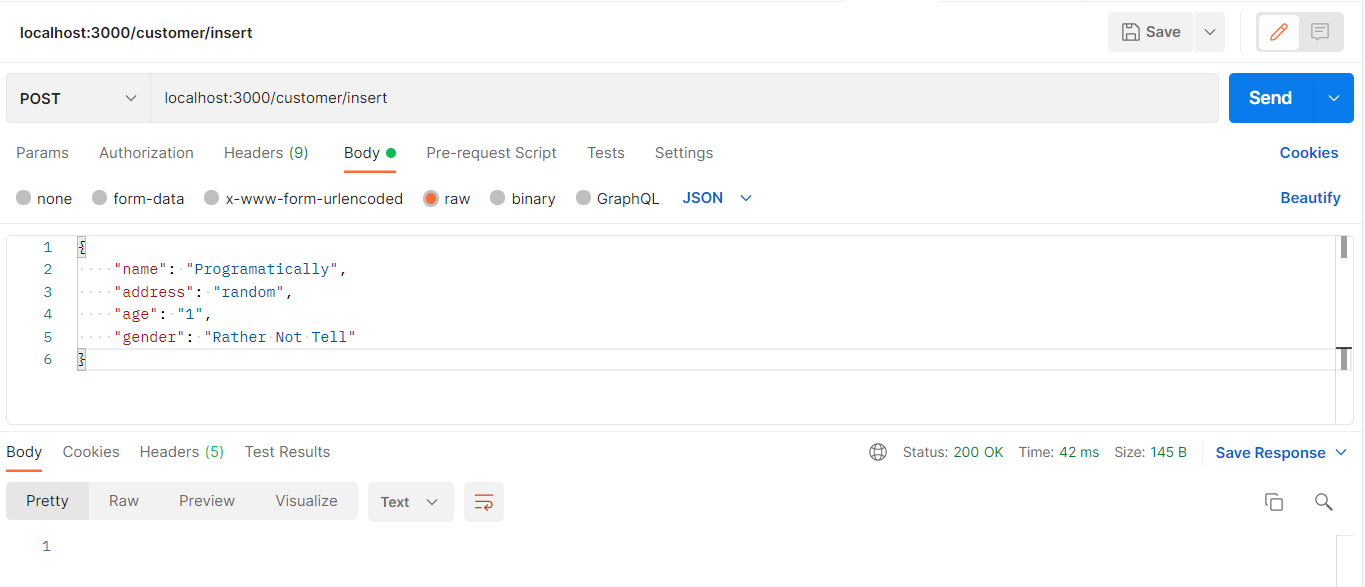
POST – Adding a new Customer
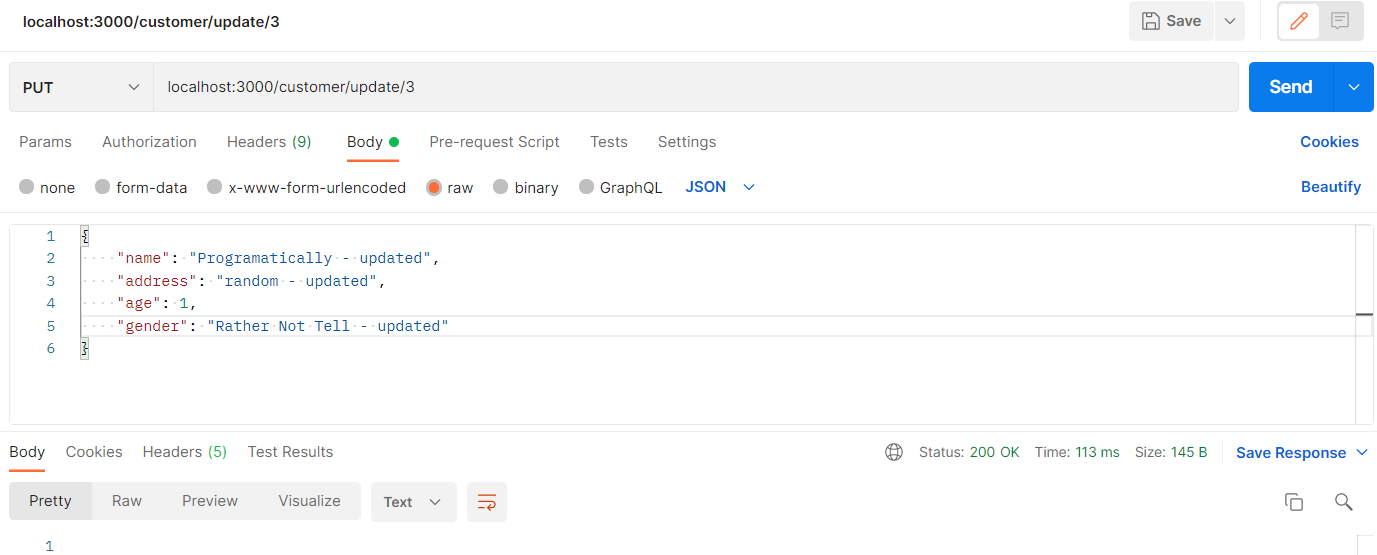
PUT – Updating a Customer Using Customer Id & Request Body
DELETE – Delete a Customer Using Customer Id
And that’s all!
I hope this article helped you figure out exactly how to create Node JS REST API with SQL Server example. I hope it made you confident enough to start using this in your next project. Please like, and leave your reviews in the comment section below.
Have a great one!
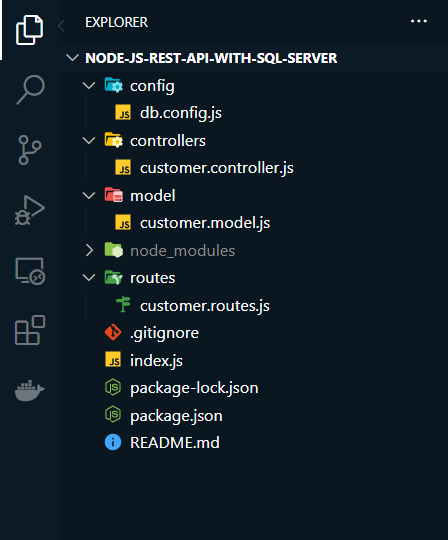
The final show of all directories and files in the project.
GitHub Repository
Recent Comments
Categories
- Angular
- AWS
- Backend Development
- Big Data
- Cloud
- Database
- Deployment
- DevOps
- Docker
- Frontend Development
- GitHub
- Google Cloud Platform
- Installations
- Java
- JavaScript
- Linux
- MySQL
- Networking
- NodeJS
- Operating System
- Python
- Python Flask
- Report
- Security
- Server
- SpringBoot
- Subdomain
- TypeScript
- Uncategorized
- VSCode
- Webhosting
- WordPress
Search
Recent Post
Understanding Mutex, Semaphores, and the Producer-Consumer Problem
- 13 October, 2024
- 10 min read
Process scheduling algorithm – FIFO SJF RR
- 14 September, 2024
- 8 min read
How to Implement Multithreading in C Language
- 8 September, 2024
- 9 min read

