Hey developers! If you are learning about angular component and came across a point where you want to learn how to send data between Angular component, then you’ve come to the right place. In this angular component example, I am going to show you step by step exactly how to do that.
Prerequisite
- Should have an Angular Project up and Running (See How)
Table of Content
- Create Angular Component: Child Component
- Adding HTML Code Angular Component (Parent)
- Angular Component Send Data from Parent to Child
- Receiving Data in Child Angular Component
- Working Model of the Angular Application
STEP 1: Create Angular Component (Child Component)
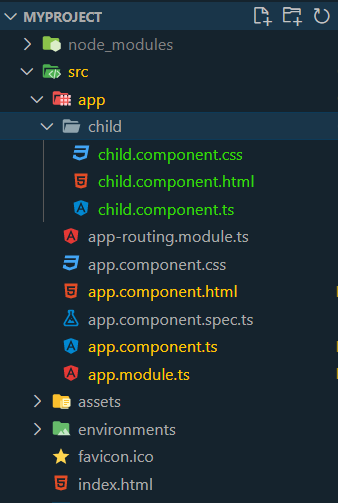
In this application, we will create 2 angular components. “App” Component and “Child” Component, where the App Component will act as a parent component. To create a child component, execute the following command
ng g c Child
STEP 2: Adding HTML Code to Angular Component (Parent)
As I have mentioned before, the App Component will act as the parent component. Which is created by default, when we created our Angular application. So open “app.component.html” file and add the following code to it.
					<div class="main">
  <div class="row" style="padding: 5%;">

    <div class="parent col-md-6">
      <h1>Parent Component</h1>
      <input type="text" class="form-control" [(ngModel)]="data">
      <br>
      <button type="submit" (click)="sendData()" class="btn btn-primary"> Send Data</button>
    </div>

    <div class="child col-md-6">
      <h1>Child Component</h1>
      <app-child [incoming_data]="parent_data" ></app-child>
    </div>

  </div>
</div>
Explanation
This is a basic HTML template is made using Bootstrap. I have created 2 columns, in which the left side is for the Parent Component view and the right side is for the Childe Component view. The text I write in the text input field of the Parent Angular Component will be sent to the Child Angular Component, upon clicking the button. And this is how the angular component communication would be performed.
- The <app-child> is the selector tag of the child component that I’ve used inside the parent component.
- The “parent_data” is the variable that stores the text I will write in the text field in the parent angular component.
- The “incoming_data” is the variable declared in the Child component that will receive and store the data coming from the “incoming_data” variable.
STEP 3: Angular Component Send Data from Parent to Child
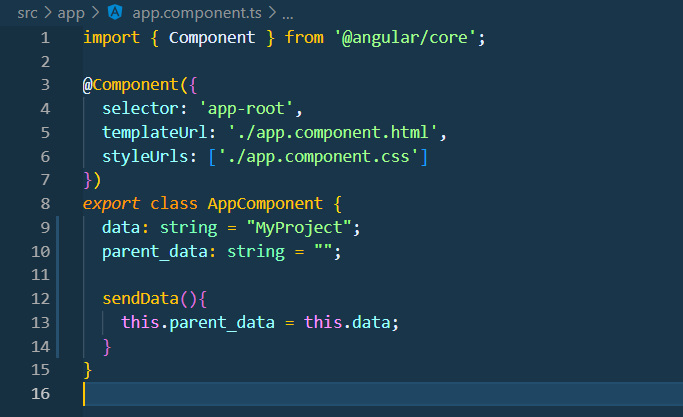
Before we perform angular get data from another component, we need to send the data first. Add the following code in the “app.component.ts” file. Insert it inside the AppComponent class, as shown below:
					MyData: string = "MyProject";
parent_data: string = "";

sendData(){
  this.parent_data = this.MyData;
}
This sendData() function is being called whenever the button is clicked on the screen. It’s our angular component output method for sending data to another component. When clicked, it will fetch the text from the text field and store it in the “parent_data” variable. The value of that variable has already been sent to Child Component because we have bind this variable in the <app-child> script tag in the app.component.html file. As shown before.
STEP 4: Receiving Data in Child Angular Component
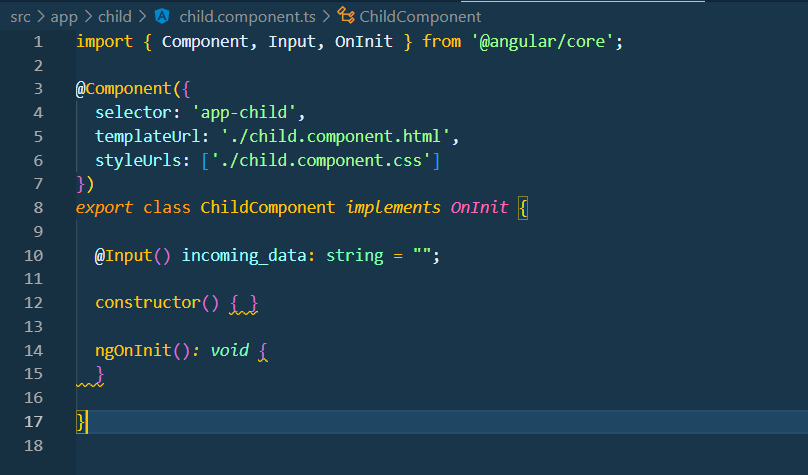
Previously we saw how angular component send data to another. Let’s write the angular component input method, for the Child component to accept the incoming data. For that, we use the Angular Component @Input decorator. Open the child.component.ts file and copy the code below in the ChildComponent class.
@Input() incoming_data: string = "";
Now then, we are in the last step of this angular component example. Since we have declared the “incoming_data” variable in the child angular component, it will automatically receive data from the parent component. Hence, now we only need to display incoming data in the child component HTML. So just copy the following code in the child.component.html file and we are good to go.
<p>child works!</p> {{ incoming_data }}
And that’s a wrap! Although there are a few other methods of data transfer between angular components. I found this the cleanest and most logical method for angular component communication.
Hope you developers found this guide helpful. I hope now you know exactly How to Send Data Between Angular Components. For any queries, leave a comment below and share this article with others.
Have a great one!
Recent Comments
Categories
- Angular
- AWS
- Backend Development
- Big Data
- Cloud
- Database
- Deployment
- DevOps
- Docker
- Frontend Development
- GitHub
- Google Cloud Platform
- Installations
- Java
- JavaScript
- Linux
- MySQL
- Networking
- NodeJS
- Operating System
- Python
- Python Flask
- Report
- Security
- Server
- SpringBoot
- Subdomain
- TypeScript
- Uncategorized
- VSCode
- Webhosting
- WordPress
Search
Recent Post
Understanding Mutex, Semaphores, and the Producer-Consumer Problem
- 13 October, 2024
- 10 min read
Process scheduling algorithm – FIFO SJF RR
- 14 September, 2024
- 8 min read
How to Implement Multithreading in C Language
- 8 September, 2024
- 9 min read


