In this article, we will see how to deploy Docker Swarm Mode. We will also see how docker swarm services are run in the end. For assistance, I have created a docker swarm compose file with all the needed basic configurations. This will give a quick start on starting our Docker Swarm Cluster. Let’s begin.
Prerequisite
- Concept of Docker Swarm and its components (What is Docker Swarm)
- Docker should be installed
- Docker compose should be installed
- At least 4-8 GB of RAM on your host machine
Table of Content
- Docker Swarm
- Swarm Docker Compose
- Docker Swarm Services
- FAQ
What is Docker Swarm?
Docker Swarm is essentially a cluster of either physical or virtual machines. These machines, after forming a cluster, are called nodes and are managed by a master node. Once Docker Swarm Cluster is formed, you can execute your normal docker commands. But they would be executed by one of these nodes; depends on which node the master node assigns the task to.
What is Swarm Docker Compose?
Through Docker compose, you can start multiple Docker containers with all their configurations at once. Docker compose uses a YML file, where you mention all the different services you want to run. Along with configuring each of their dependencies, storage mount, networking, and more.
In this docker swarm example, we are deploying a docker swarm single node cluster. This means multiple nodes on a single host machine using docker containers. All nodes will be sharing a docker swarm bridge network to communicate with each other. (You can read more here.)
Let’s create a Swarm Docker Compose file. Create a folder named: “my_swarm”. Then create a file inside it called “docker-compose.yml”. Now copy the following code inside the docker-compose.yml file:
					version: "3.3"

services:
  node1:
    image: docker:dind
    tty: true
    stdin_open: true
    user: root
    privileged: true
    container_name: node1
    hostname: node1
    ports:
      - "8091:8091"
    volumes:
      - ./myvol/:/home/swarm_storage
    networks:
      - my-bridge


  node2:
    image: docker:dind
    tty: true
    stdin_open: true
    user: root
    privileged: true
    container_name: node2
    hostname: node2
    ports:
      - "8092:8092"
    volumes:
      - ./myvol/:/home/swarm_storage
    networks:
      - my-bridge


  node3:
    image: docker:dind
    tty: true
    stdin_open: true
    user: root
    privileged: true
    container_name: node3
    hostname: node3
    ports:
      - "8093:8093"
    volumes:
      - ./myvol/:/home/swarm_storage
    networks:
      - my-bridge


networks:
  my-bridge:
    driver: bridge
Explanation:
verson 3.3 : is stating the file format of Compose file. It’s linked with the Docker Engine version as well
services : under this, you would mention all of the docker containers that you want to run as a service. These are not docker swarm services. We will see those up ahead.
node1 : it’s the name of the first service that we will run in docker swarm. Note that node1, node2, and node3 are identical, so I will only cover node1 commands here.
image: docker:dind : here you are mentioning the docker image and its version that this service would run. This will be fetched from Docker Hub.
tty: true
stdin_open: true : These are simply to keep all the nodes in the docker swarm cluster up and running after starting all the services.
user: root : Here we are defining the user as the root for the container when it runs.
privileged: true : This is assigning the container root privileges by default.
container_name: node1 : it’s the name of the Docker Container that will spin up and join in docker swarm cluster.
hostname: node1 : This is setting the hostname of the container running inside the docker swarm mode.
ports:
– “8091:8091” : Here we are exposing Docker Container ports to our localhost port. So that we could access the docker swarm services on our localhost machines. So, any service that we run inside our docker swarm mode, at port 8091, would also be accessible on our machine on the same port.
volumes:
– ./myvol/:/home/swarm_storage : This is mounting a localhost volume inside the container. Basically, this is done so that there is a common folder where the container and your localhost machine can keep your files. So that you can transfer data from localhost to container, while the container is running. Its main purpose is to act as a docker swarm persistent storage. So that data is not wiped off when you restart your container.
networks:
– my-bridge : This is a docker swarm bridge network. All the nodes in the docker swarm single node cluster would be sharing this network. So that they can communicate with each other while running tasks in a swarm cluster. “my-bridge” is acting as a variable. Its actual config is done at the end.
– driver: bridge : This is where the docker swarm bridge network is actually defined.
Once the swarm docker compose file is created, you can start running all the services along with their configurations with a single command: “docker-compose up -d”. You can check the status of the nodes by listing them with this command:
docker ps
NOTE*: This is NOT going to create the docker swarm environment. This is simply going to create a cluster of nodes that are linked together to form docker swarm mode. Kind of like a prerequisite to actually starting docker swarm single node cluster.
Docker Swarm Services
Now that we have created a docker swarm cluster, we can jump inside the cluster and initialize docker swarm mode. For that, you need to create a manager node and the rest worker node. Let’s make node1 the manager node. Bash into the node1 container with this command:
docker exec -it node1_container_id sh
These containers have Alpine Linux distribution as the base image. So, to start the docker swarm mode, execute this command:
docker swarm init --advertise-addr $(hostname -i)
This will make the current node the manager node. Additionally, it will also provide you with a joining token that you will use to make others the worker node. Copy the joining token and then bash it into node2 and node3, then paste it in there. Take reference from the image below:
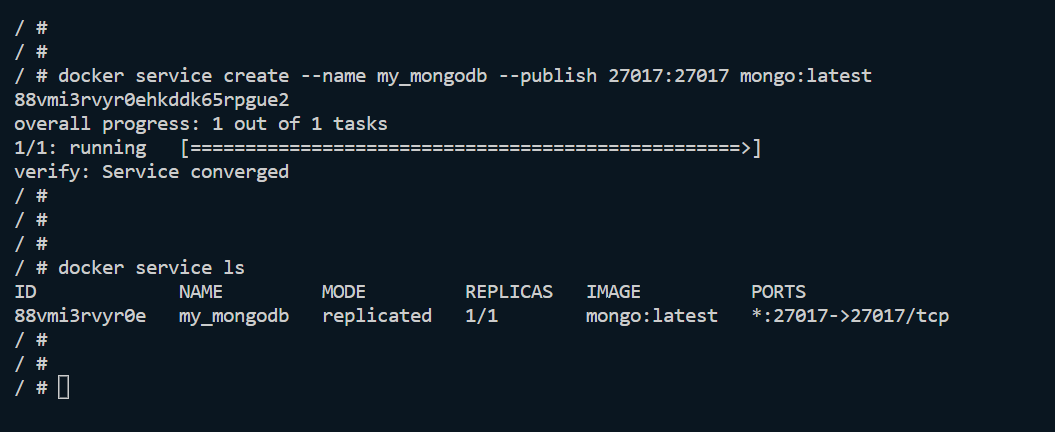
Since they are all already sharing the same docker swarm bridge network, this will make your swarm mode ready to start any docker swarm services. So, let’s do that exactly. For this example, we are going to start a MongoDB Service in our cluster.
Now you need to know one thing, from here on out, all of the tasks are to be executed only on the manager node. It will assign tasks to worker nodes automatically. So, bash into node1 (manager node) and execute this command to start MongoDB docker swarm service.
docker service create --name my_mongodb --publish 8091:27017 mongo:latest
This will first download the official MongoDB docker image from Docker-Hub and then run the service in Docker Swarm Cluster. To see all the service running, execute the following command:
docker service ls
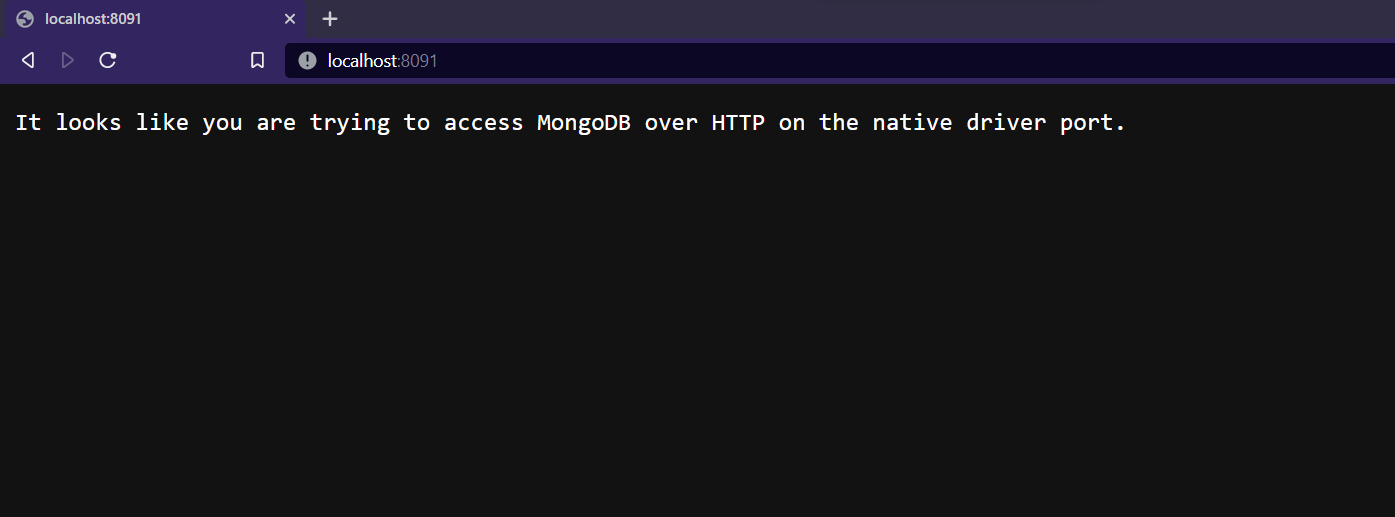
So, let’s go through the networking a little bit, cause it’s a little confusing. Basically, port mapping is when you are redirecting a port, on which a service is running, to another port. And the architecture is dealing with “dind” docker-in-docker. This means we are running docker container, inside another container.
The Mongo DB service is running on inner container and on port 27017. Which I have first mapped it to port 8091 of the outer container, which is the Alpine Linux base image. Then lastly, in order to access the service on my localhost machine, I’ve mapped port 8091 of the outer container, to port 8091 of my localhost machine. This last mapping is already done through swarm docker compose file. So, there you have it. This is the hierarchy: 27017 > 8091 > 8091.
FAQ
Docker Swarm is a lightweight and easy-to-use orchestration tool that comes by default when docker is installed. However, the docker swarm provides limited features. Unlike Kubernetes, which although more complex to use and adapt, provides robust functionalities such as self-healing and auto-scaling out of the box.
More can be found here: Docker vs Kubernetes
Docker Compose is used for configuring and launching multiple Docker containers on the same host machines. Whereas Docker Swarm is a container orchestration tool. It is used to connect and communicate multiple docker containers running on different host machines. Docker Swarm is similar to Kubernetes.
To make node-2 leave the swarm cluster execute this command:
docker swarm leave –force
Afterwards go to the manager node and execute this command:
docker node rm node-2
To stop Docker Swarm Cluster, just execute this command if cluster was created using docker compose:
docker compose stop
And that’s a wrap!
Thank you for going through my article, regarding how to deploy Docker Swarm mode. I hope that you found it helpful and were able to comprehend it. Feel free to share your thoughts and opinions, in the comments section down below.
Have a great one!
Recent Comments
Categories
- Angular
- AWS
- Backend Development
- Big Data
- Cloud
- Database
- Deployment
- DevOps
- Docker
- Frontend Development
- GitHub
- Google Cloud Platform
- Installations
- Java
- JavaScript
- Linux
- MySQL
- Networking
- NodeJS
- Python
- Python Flask
- Report
- Security
- Server
- SpringBoot
- Subdomain
- TypeScript
- Uncategorized
- VSCode
- Webhosting
- WordPress
Search
Recent Post
Understanding Linux Scheduling Algorithm: A Comprehensive Guide
- 13 June, 2023
- 3 min read
How to add routing in Angular
- 9 May, 2023
- 4 min read
What is Data at Rest in Cloud
- 13 March, 2023
- 2 min read


