Network configuration in Linux has always seemed daunting, but it’s not the case honestly. In this article, we will see how easy it is to perform networking configuration in Linux ubuntu server.
We will be performing all the networking config on Ubuntu Linux. But it’s relatively applicable to other Linux distribution as well. We will look at the setup of the static IP address, network interface, ethernet interface, and more. Let’s learn Ubuntu networking!
Note: The examples below are not done on Cloud Server, but rather locally on a VM Simulator i.e. VMware.
Prerequisite
- Must have Linux OS or its Virtual Machine (YouTube Tutorial)
- Basic Linux commands hands-on. (Check here)
Table of Content
Table of Contents
Networking Configuration in Linux Ubuntu
Identify Ethernet Interface
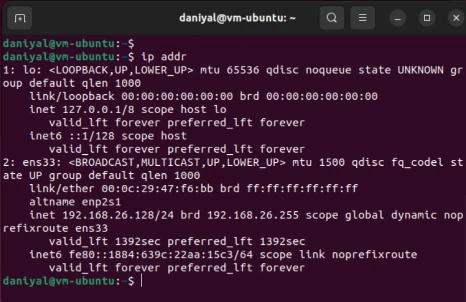
First, we need to create a shell script file. Execute the following command to create and open a shell script with ‘nano’ text editor.
ip addr
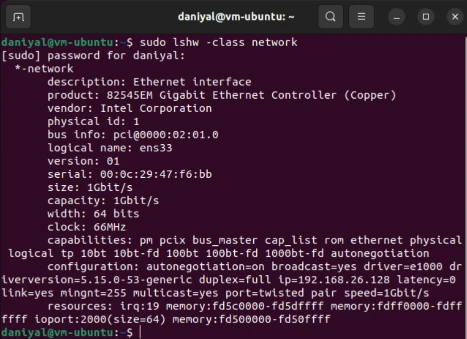
Another way to show available network interfaces is through the following IP command:
sudo lshw -class network
The network interface that we are concerned with will be against the ‘logical name’. In the image shown, it is ens33
Configure Default Gateway IP Address
IP configuration for the default gateway executes the IP command shown below. Note that the default gateway IP address should be according to the network IP assigned previously.
sudo ip route add default via 10.114.36.1
The below IP command is to confirm the change in network IP for the default gateway.
ip route show
Network Config in Linux: Assigning IP Address
Permanent IP Address Assignment
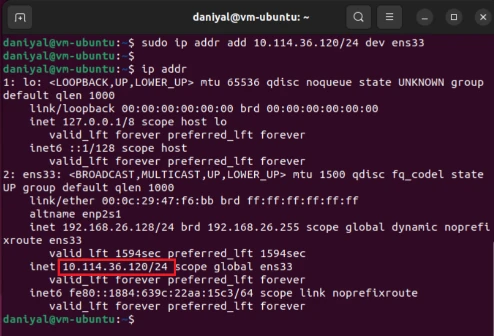
We can temporarily assign an IP address to our server. This assignment is not permanent and will be reset once the server is rebooted.
For permanent IP assignment, open up Network Configuration File:
sudo nano /etc/netplan/01-network-manager-all.yaml
Open the YAML file and copy the below code in it.
But before you do that, make sure that THE STATIC IP YOU ASSIGN IS IN THE SAME NETWORK AS OTHER SERVERS. Otherwise, you won’t be able to ping or connect to other server.
					# Let NetworkManager manage all devices on this system
network:
  version: 2
  renderer: NetworkManager
  ethernets:
    ens33:  # Change this to your interface name
      addresses:
        - 192.168.1.100/24  # Your desired static IP and subnet mask
      routes:
        - to: 0.0.0.0/0  # Default route
          via: 192.168.1.1  # Your gateway IP
      nameservers:
        addresses: [8.8.8.8, 8.8.4.4]  # DNS servers
After saving the file, you need to apply the changes. Run the command below:
sudo netplan apply
To ensure the new network configuration has taken effect, you can check the network interface with the following command:
Temporary IP Assignment
sudo ip addr add 192.168.1.100 dev ens33
In the above command, you will directly execute on the console, and then can confirm with “ip add” command.
You do need to replace the ip address and network interface “ens33” with the one you require and have.
How to Change Hostname in Linux
Super simple. Just open hostname file with superuser privileges and change the hostname. And then simply reboot.
sudo nano /etc/hostname
Change the hostname to whatever you want, and then reboot your system.
How to Assign a Hostname to an IP Address
1. Open the /etc/hosts File
sudo nano /etc/hosts
2. Edit the /etc/hosts File
Add a new line at the bottom of the file to map the IP address to the hostname. The format is:
					#<IP Address> <Hostname>

192.168.1.100  myserver
3. Save & Verify the Changes
After saving the file, and then you can verify that the hostname is correctly assigned by pinging the hostname:
ping myserver
If the mapping is correct, you should see responses from 192.168.1.100.
Reset all Network Settings in Ubuntu Linux
In order to reset all network settings in the Ubuntu Linux server to the default one, execute the following command:
ip addr flush ens33
Although, the above command would not reset the DNS nameserver IP in /etc/resolv.conf file. For that simply reboot your server or reset it manually.
Network Configuration Using the GUI
Previously we configured network settings for the Ubuntu Linux server through the command line. Now we will be configuring network interface using GUI.
How to give a Static IP Address
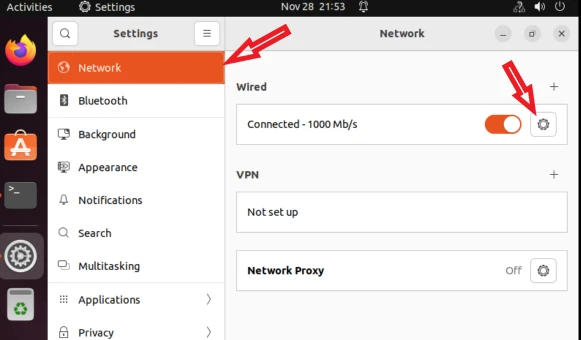
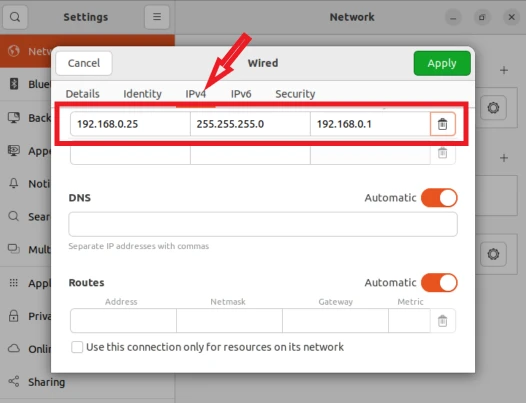
Let’s see how to configure static IP address. First, open up the Settings >> Network >> Wired setting icon. Refer to the image shown below. Go to the IPv4 tab and then select the ‘Manual’ option to assign a static IP address.
Here you should give the appropriate static IP, netmask, and default gateway address. Take reference from the image below:
After you are done, check the IP address from the ip addr command.
How to give a Dynamic IP Address through DHCP Server
Assigning dynamic IP address in Ubuntu Server through GUI works the same way as assigning static IP.
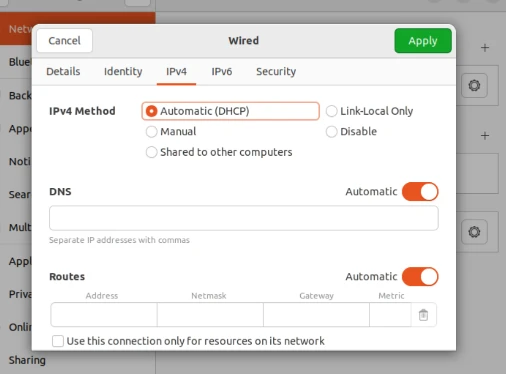
Open the Settings >> Network >> Wired setting icon. Then go to the IPv4 tab and select Automatic (DHCP). That’s it!
As the name suggests, the DHCP server will automatically assign all the relevant IP addresses wherever needed. Take reference from the image below.
Changing Hostname in Ubuntu Linux
It’s very easy to change a hostname in Linux. Using a text editor like Vim or nano, open hostname file with the below command:
sudo nano /etc/hostname
In this file, you will see your current hostname. Simply change it and save it. You may want to reboot your Linux Server before you can see the change.
Firewall Setup in Linux
A firewall is known for filtering good from bad incoming and outgoing traffic requests. It’s an essential step in fortifying your server’s security and a must to implement.
Allowing Various Protocols Traffic from the Firewall
The first thing we need to ensure is that ufw is installed on our Ubuntu server.
To verify ufw is running on your server, execute the following command:
sudo ufw status
If the above command returns statement as follow:
ufw: command not found
Then the firewall is not set up or enabled on your server. First, you need to install ufw and then enable it to start the firewall. For that, execute the following command:
					sudo apt-get install ufw
sudo ufw enable
But if the ufw is already installed and enabled, then you still need to make sure that incoming traffic is allowed through various protocols.
For that, execute the following commands.
					sudo ufw allow OpenSSH
sudo ufw allow 20/tcp
sudo ufw allow 21/tcp
sudo ufw allow 990/tcp
sudo ufw allow 40000:50000/tcp
The above commands will open up some ports and start running services to receive traffic.
- OpenSSH will be enabled if you want to connect to your server using SSH protocol.
- On ports 20 and 21, your FTP protocol would be running.
- Port 990 would be used for TLS (Transport Layer Security).
- Lastly, ports ranging from 40000 to 50000 are enabled for later services to be assigned to them.
After setting all the traffic rules, let’s check the status of our Firewall.
sudo ufw status
Something like the one below should show up. Meaning that we have successfully enabled and configured our server’s Firewall.
					Status: active
To                         Action From
--                              ------ ----
OpenSSH                    ALLOW Anywhere
990/tcp                    ALLOW Anywhere
20/tcp                     ALLOW Anywhere
21/tcp                     ALLOW Anywhere
40000:50000/tcp            ALLOW Anywhere
OpenSSH (v6)               ALLOW Anywhere (v6)
20/tcp (v6)                ALLOW Anywhere (v6)
21/tcp (v6)                ALLOW Anywhere (v6)
990/tcp (v6)               ALLOW Anywhere (v6)
40000:50000/tcp (v6)       ALLOW Anywhere (v6)
And that’s a wrap!
Again, these commands will only work on a LINUX terminal on Ubuntu server. And a common way to run Linux with Windows is to start a Virtual Machine using VMware.
I hope this article helped you How to manage networking configuration in Linux Ubuntu. You may also want to read about How to add Users, Group, and Linux Processes & Scheduling Algorithm. Please like this article and leave your reviews in the comment section below.
Have a great one!
Add Your Heading Text Here
Recent Comments
Categories
- Angular
- AWS
- Backend Development
- Big Data
- Cloud
- Database
- Deployment
- DevOps
- Docker
- Frontend Development
- GitHub
- Google Cloud Platform
- Installations
- Java
- JavaScript
- Linux
- MySQL
- Networking
- NodeJS
- Operating System
- Python
- Python Flask
- Report
- Security
- Server
- SpringBoot
- Subdomain
- TypeScript
- Uncategorized
- VSCode
- Webhosting
- WordPress
Search
Recent Post
Understanding Mutex, Semaphores, and the Producer-Consumer Problem
- 13 October, 2024
- 10 min read
Process scheduling algorithm – FIFO SJF RR
- 14 September, 2024
- 8 min read
How to Implement Multithreading in C Language
- 8 September, 2024
- 9 min read
