How to create a simple CRUD API using Java SpringBoot and MySQL database. In this article, we are going to cover, step-by-step, how to do exactly that. We will do complete crud of a typical employee MySQL database running on localhost. There are a few things that you need to fulfill before we get started though:
Prerequisites!
- JDK 8+ package should be installed (Click here to download)
- Must have Java IDE or a relevant text editor installed (such as IntelliJ or VSCode)
- MySQL service needs to be installed and running
- Preferably also have a GUI tool installed for MySQL (such as MySQL Workbench)
I am going to assume all of the above-mentioned prerequisites are already fulfilled. So, without wasting any more words, let’s get started.
STEP 1: Create SpringBoot Project using Initializr
If you have done SpringBoot before, you’re probably familiar with the Spring Initializr website to create a basic SpringBoot application. If not then just know, this is an extremely easy online tool, that’s completely free, to lets you create and start off with a SpringBoot application. Click here to get to the site.
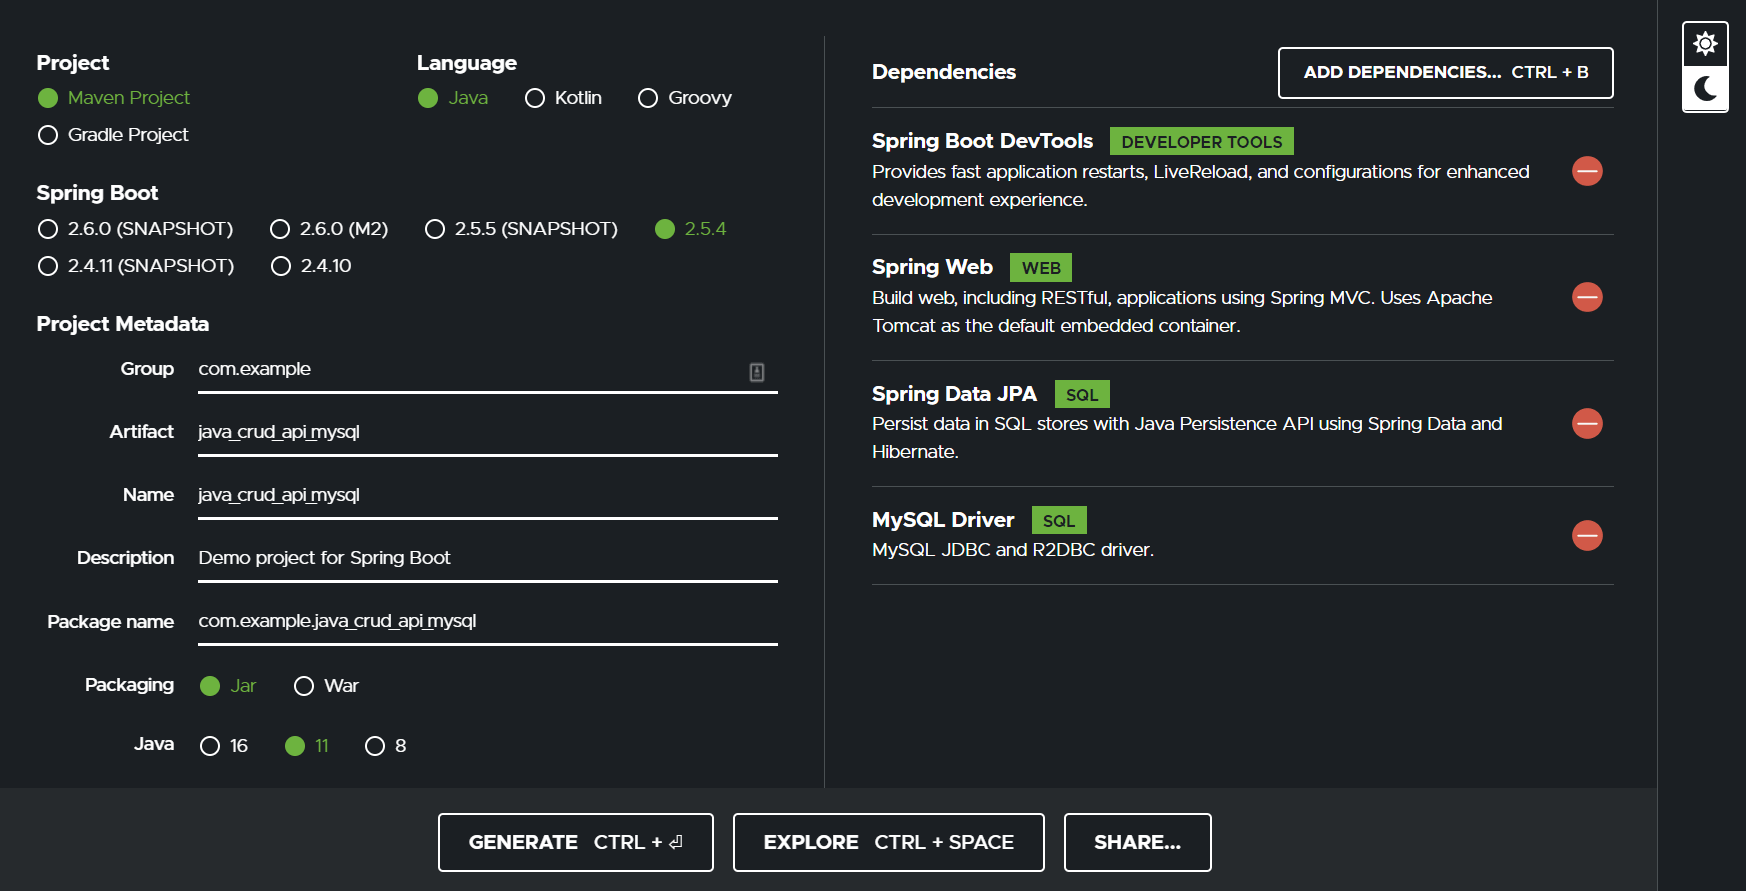
In here just fill in the basic information and choose the dependencies that you would like to have in your project. A very minimalistic setup is shown in the image below for your reference.
After the setup, hit Generate button. This will download the project for you, and you can now open it up into your IDE or a text editor. For this example, I am going to use IntelliJ IDE.
STEP 2: Create Model Class
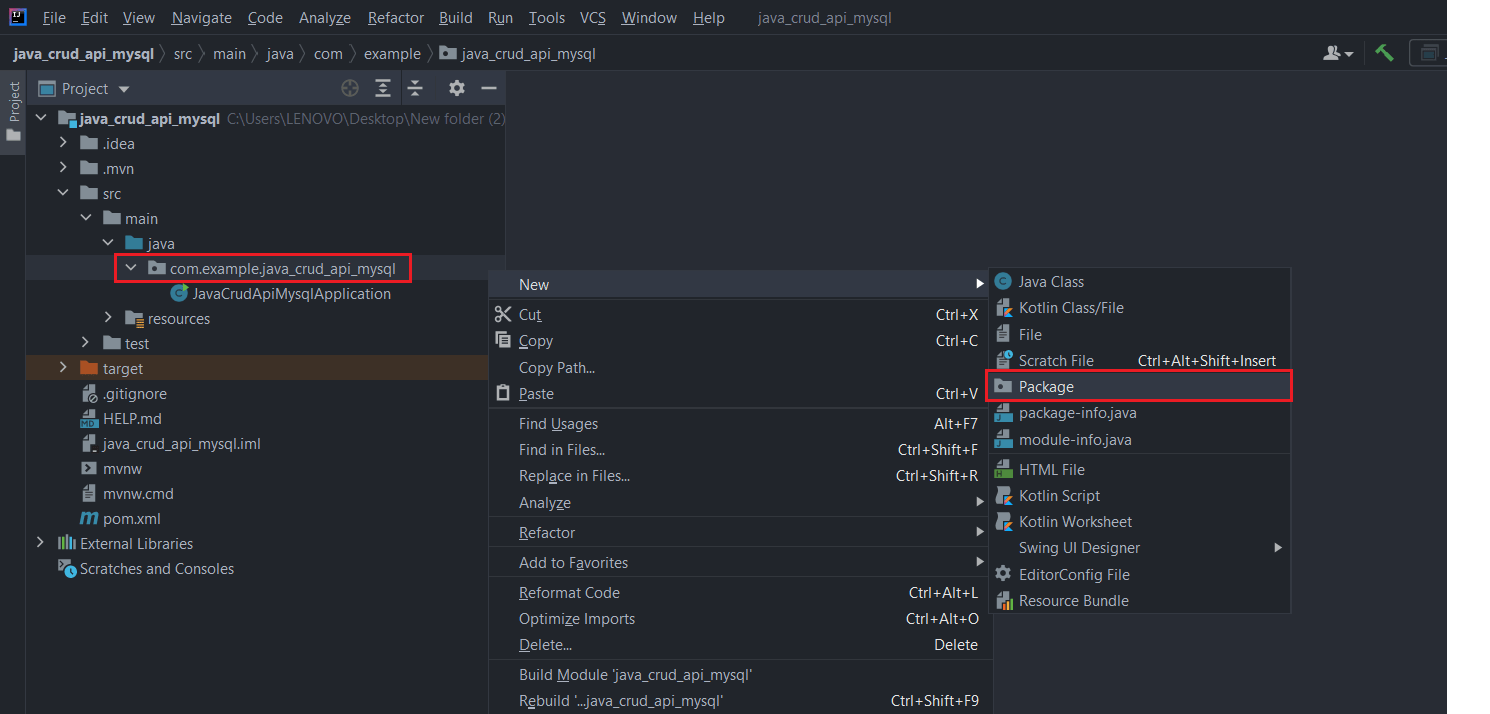
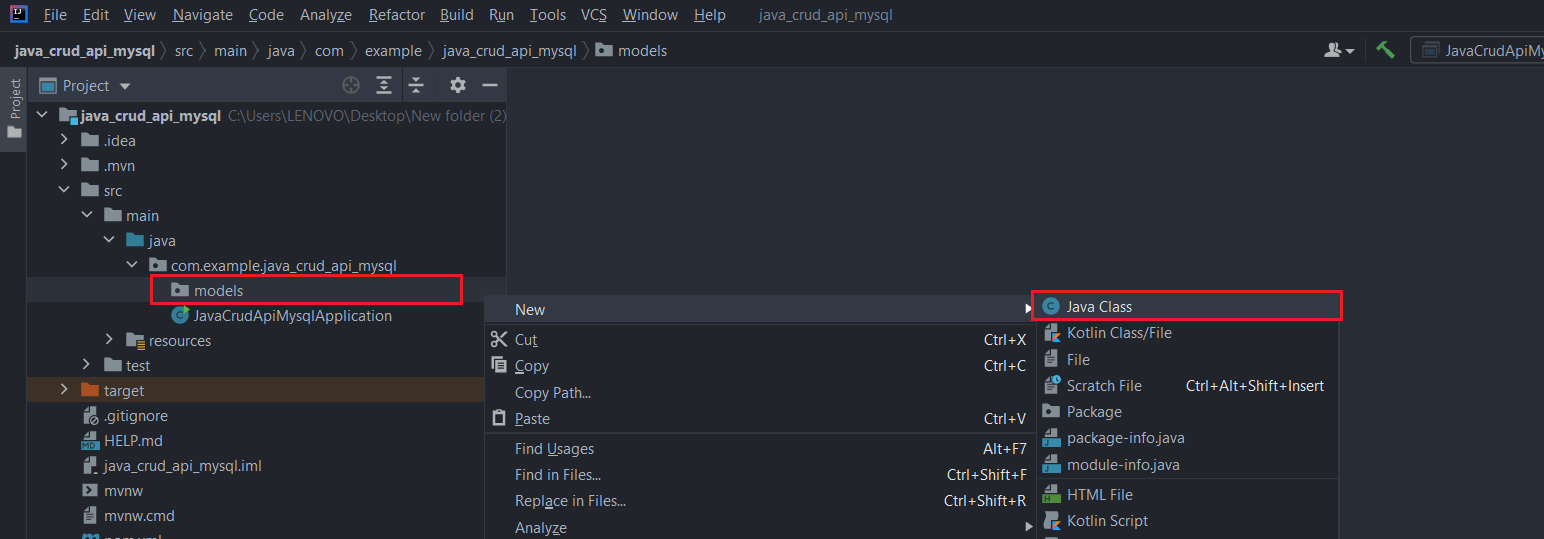
A model class is going to act as an entity class that will represent your database table. Whichever crud operation that we’ll be performing, it will be done by consuming this model class object. First, create a package called “models” and then create a java class called “Employee”. You can take references from the below shown images.
After that, add the following code in the “Employee.java” class:
					package com.example.java_crud_api_mysql.models;

import javax.persistence.Entity;
import javax.persistence.GeneratedValue;
import javax.persistence.GenerationType;
import javax.persistence.Id;

@Entity
public class Employee {

    @Id
    @GeneratedValue(strategy = GenerationType.AUTO)
    private Long id;

    private String designation;
    private String name;
    private String doj;
    private long salary;


    public Long getId() {
        return id;
    }

    public void setId(Long id) {
        this.id = id;
    }

    public String getDesignation() {
        return designation;
    }

    public void setDesignation(String designation) {
        this.designation = designation;
    }

    public String getName() {
        return name;
    }

    public void setName(String name) {
        this.name = name;
    }

    public String getDoj() {
        return doj;
    }

    public void setDoj(String doj) {
        this.doj = doj;
    }

    public long getSalary() {
        return salary;
    }

    public void setSalary(long salary) {
        this.salary = salary;
    }


    public Employee(){}
    public Employee(Long id, String designation, String name, String doj, long salary) {
        this.id = id;
        this.designation = designation;
        this.name = name;
        this.doj = doj;
        this.salary = salary;
    }
}
STEP 3: Create JPA Repository
This is a very helpful class and is why JPA is so popular. We need to perform all of the crud operations with the database. For this purpose, JPA Repository comes in very handy. The JPA repository is an interface that provides all of the basic crud operations without us having to actually code them. By default, it contains the following methods: save(), findOne(), findAll(), count(), delete() and more.
And we just need to call these methods in our service layer to perform all the operations. It’s really easy.
First things first, make a new package called “repository” and add an interface inside it called “EmployeeRepository”. Then that interface would extend to JpaRepository. Add the following code inside the interface:
					package com.example.java_crud_api_mysql.repository;

import com.example.java_crud_api_mysql.models.Employee;
import org.springframework.data.jpa.repository.JpaRepository;
import org.springframework.stereotype.Repository;

@Repository
public interface EmployeeRepository extends JpaRepository<Employee, Long> {


}
STEP 4: Create Service Layer
This is the layer where all of the crud operations are actually being performed. As soon as an endpoint is hit by the user; it will call onto this service layer to perform relevant crud operation and in turn, this service layer will call upon the repository class to fetch the default function from the JP repository.
Note that the difference between this service layer and the JPA repository class is that the repository class contains default crud functions that directly manage is the database when called upon. Whereas the service layer calls those functions when an API endpoint is hit by the user.
So, create a package called “service” and then create a Java class inside it called “EmployeeService”. after that add the following code inside the employee service Java class:
					package com.example.java_crud_api_mysql.service;

import com.example.java_crud_api_mysql.models.Employee;
import com.example.java_crud_api_mysql.repository.EmployeeRepository;
import org.springframework.beans.factory.annotation.Autowired;
import org.springframework.stereotype.Service;

import java.util.List;
import java.util.Optional;

@Service
public class EmployeeService {

     @Autowired
    private EmployeeRepository employeeRepository;


    // FETCHING ALL EMPLOYEE DATA
    public List<Employee> getAllEmployees(){
        return employeeRepository.findAll();
    }

    // FETCHING EMPLOYEE BY ID
    public Optional<Employee> getEmployeeById(Long empId){
        return employeeRepository.findById(empId);
    }

    // ADD NEW EMPLOYEE
    public void addNewEmployee(Employee empObj){
        employeeRepository.save(empObj);
    }

    // DELETING EMPLOYEE BY ID
    public void deleteEmployeeById(Employee employeeObj){
        employeeRepository.deleteById(employeeObj.getId());
    }

    // UPDATING EMPLOYEE BY ID
    public void updateEmployeeById(Employee employeeObj){
        employeeRepository.save(employeeObj);
    }
}
STEP 5: Create API Layer
Now we are finally going to make the API layer which would be called a controller class containing all the API endpoints. What that means, is that for instance if someone searches on the web “/allEmployees” then that URL would be an endpoint directing to this controller class. And we need to make sure that endpoint exists in this project, otherwise, it will give an error to the user, obviously. Let’s make this layer then.
Create a package called “controller” and then add a java class called “employeeContoller”. We are going to make 5 endpoints for each of the crud operations. Add the following code in the “EmployeeController.java” class:
					package com.example.java_crud_api_mysql.controller;

import com.example.java_crud_api_mysql.models.Employee;
import com.example.java_crud_api_mysql.service.EmployeeService;
import org.springframework.beans.factory.annotation.Autowired;
import org.springframework.web.bind.annotation.*;

import java.util.List;
import java.util.Optional;

@RestController
public class EmployeeController {

    @Autowired
    private EmployeeService employeeService;

    // END POINT TO FETCH ALL EMPLOYEES
    @GetMapping(value = "/allEmployees")
    public List<Employee> findAllEmployees(){
        return employeeService.getAllEmployees();
    }

    // END POINT TO FETCH SINGLE EMPLOYEE
    @GetMapping(value = "/findEmployee/{id}")
    public Optional<Employee> findEmployeeById(@PathVariable(value = "id") Long empId){
        return employeeService.getEmployeeById(empId);
    }

    // END POINT TO ADD NEW EMPLOYEE
    @PostMapping(value = "/addEmployee")
    public void addNewEmployee(@RequestBody Employee empObj){
        employeeService.addNewEmployee(empObj);
    }

    // END POINT TO UPDATE AN EMPLOYEE
    @PutMapping(value = "/updateEmployee")
    public void updateNewEmployee(@RequestBody Employee empObj){
        employeeService.updateEmployeeById(empObj);
    }

    // END POINT TO DELETE AN EMPLOYEE
    @DeleteMapping(value = "/deleteEmployee")
    public void deleteNewEmployee(@RequestBody Employee empObj){
        employeeService.deleteEmployeeById(empObj);
    }
}
STEP 6: Database Connections
So now we’re done with creating our API the only thing that’s left is database connectivity so that it can perform actions in it.
For this, you need to go into your “applications.properties” file which will be inside your resources directly. Then add the following code in there but make sure to replace the relevant information of your MySQL database accordingly.
					spring.jpa.hibernate.ddl-auto=update
spring.datasource.url=jdbc:mysql://localhost:3306/ employeedb
spring.datasource.username=root
spring.datasource.password=root
And that’s it!
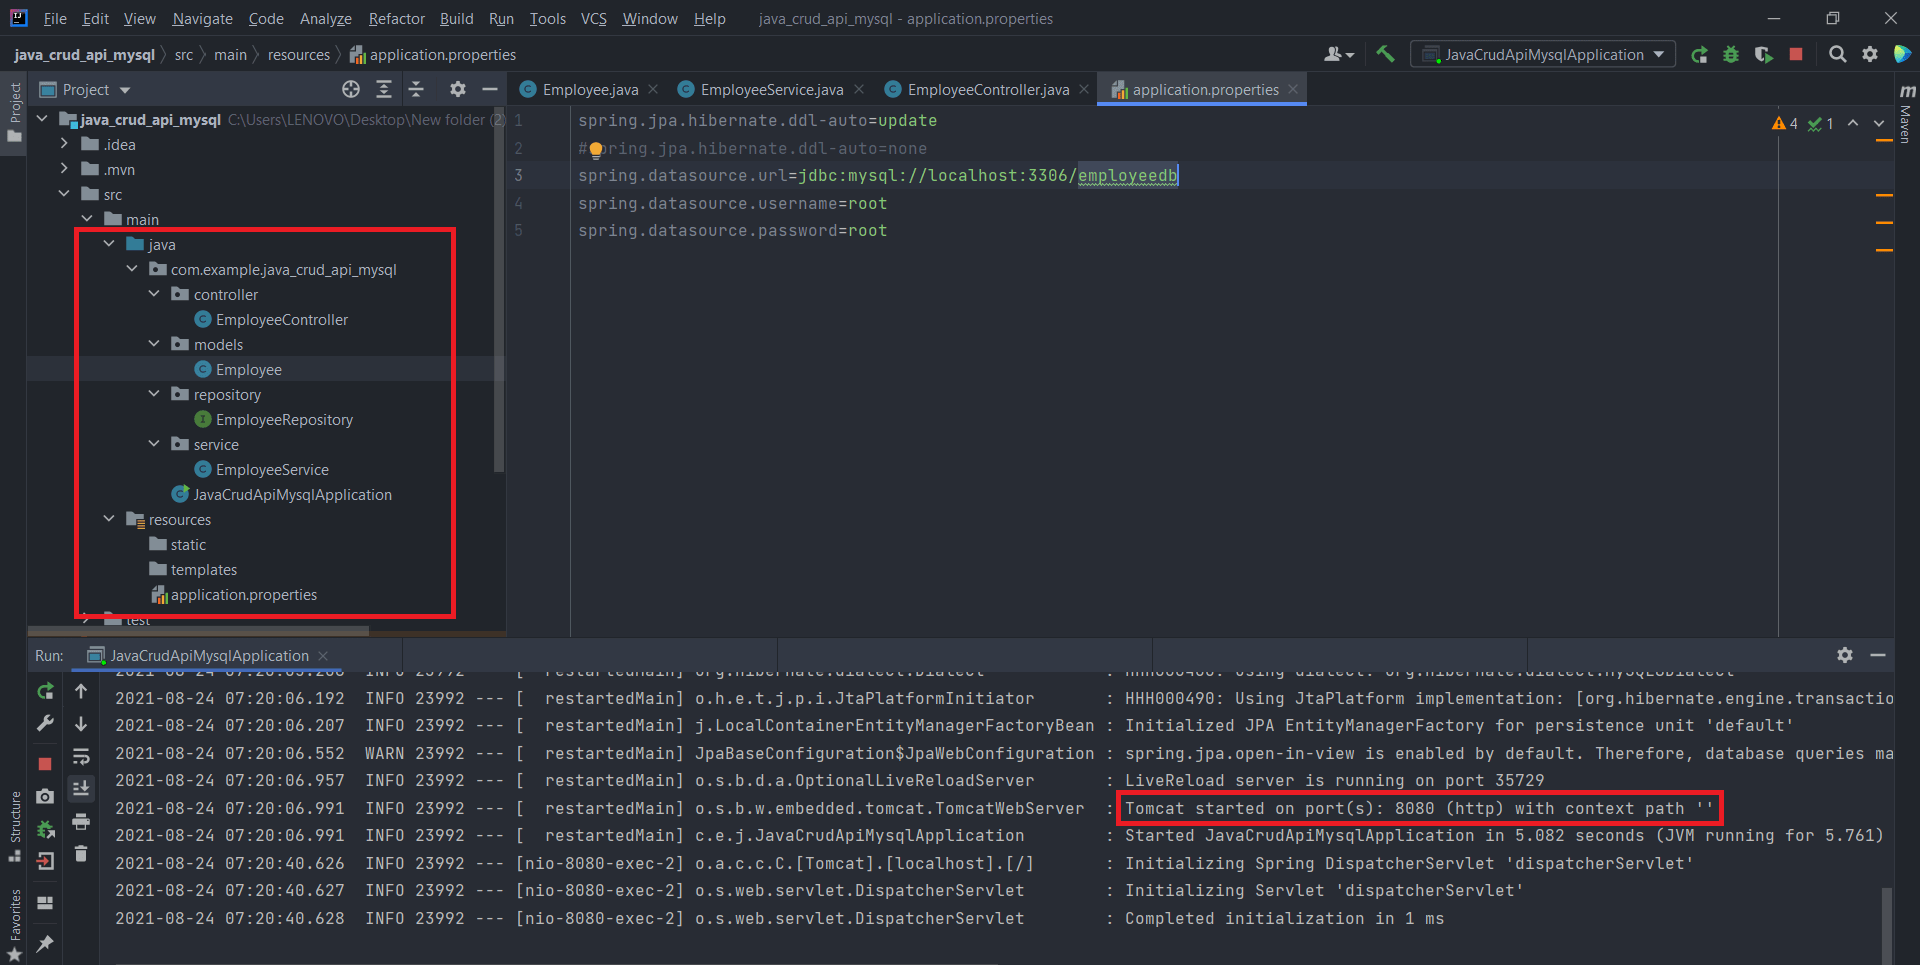
We are done with creating our CRUD API using Java SpringBoot with MySQL database. on the project and see if it gives you an error or not. hopefully didn’t give you any errors on the run so let’s try testing this API out. The final look at the running project should be like the following image:
STEP 7: Testing With POSTMAN
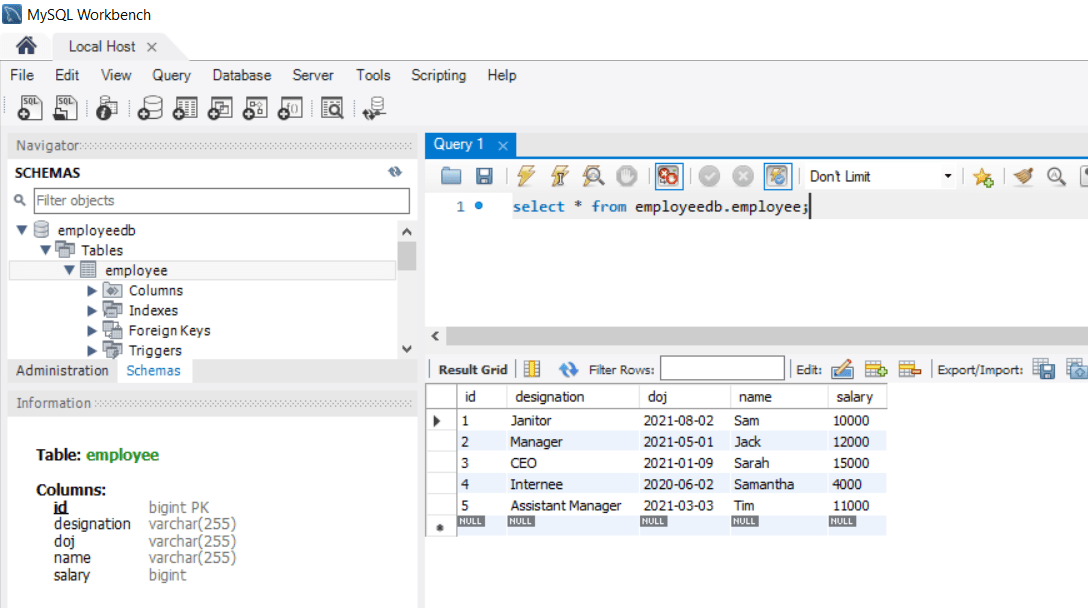
First, let’s have a look at how our database in MySQL Workbench because I have already added a few dummy records to it. But you do not have to make the table in the workbench. The SpringBoot API will automatically create a table if it does not exist.
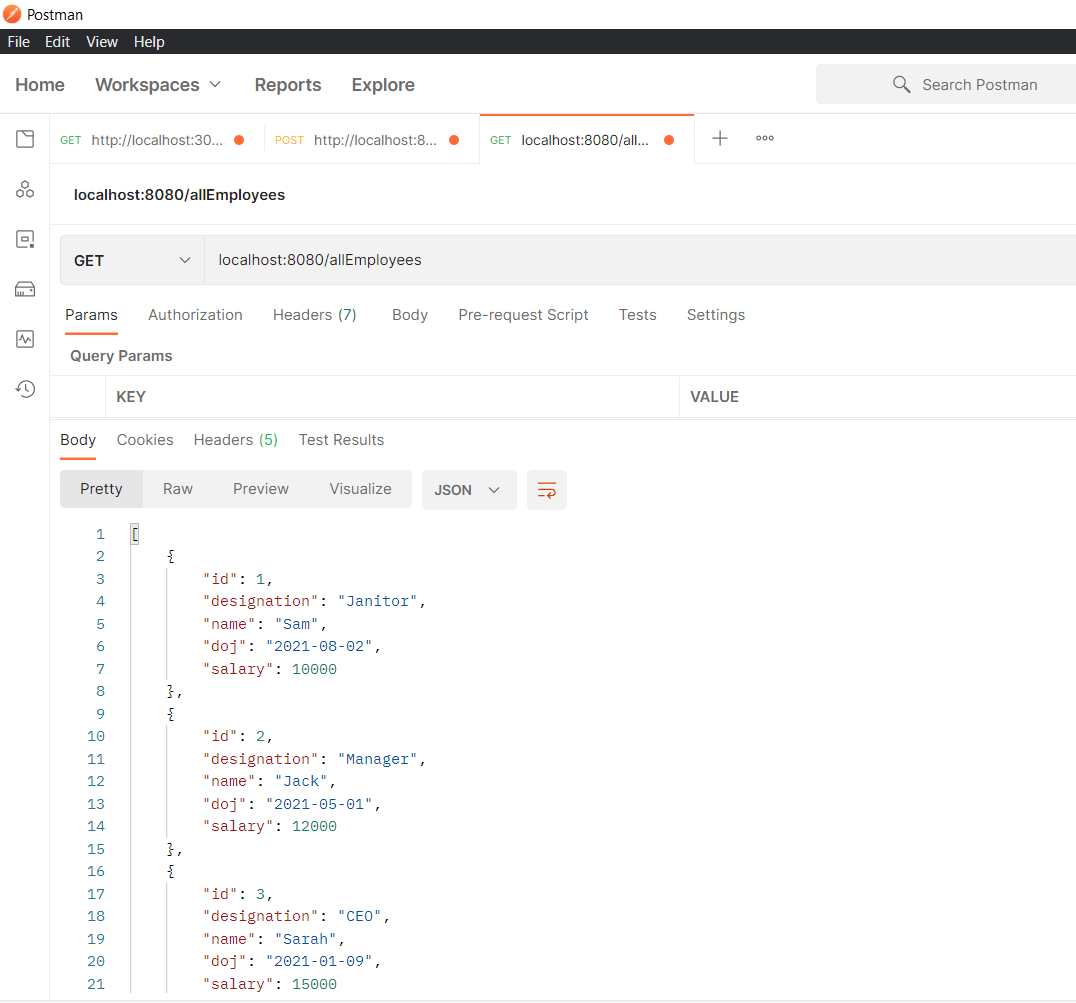
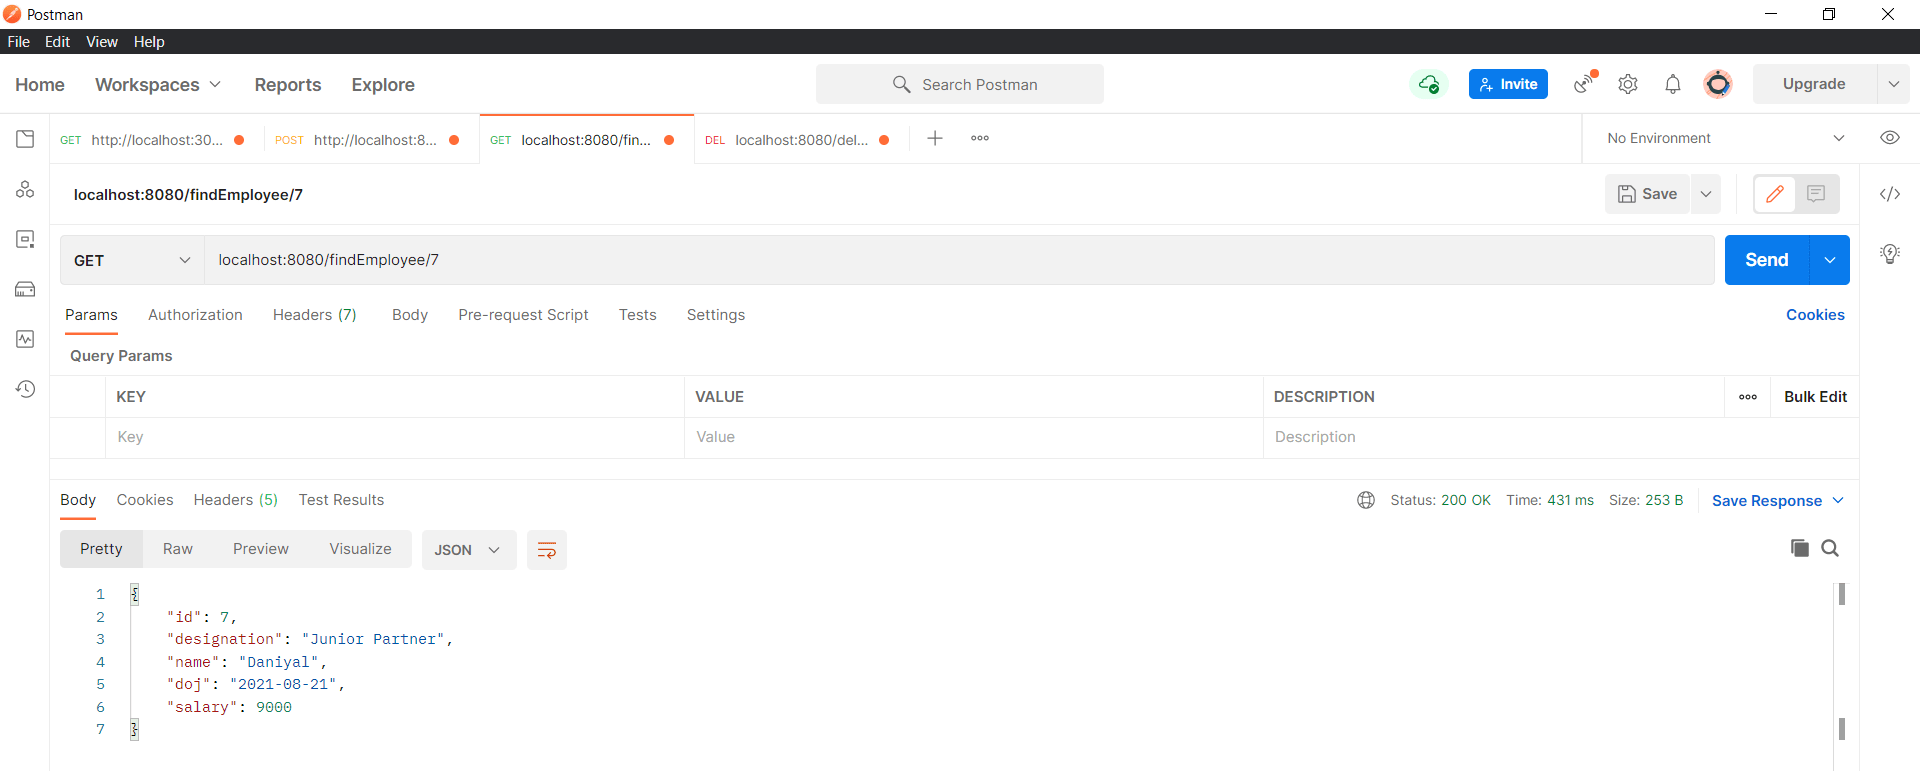
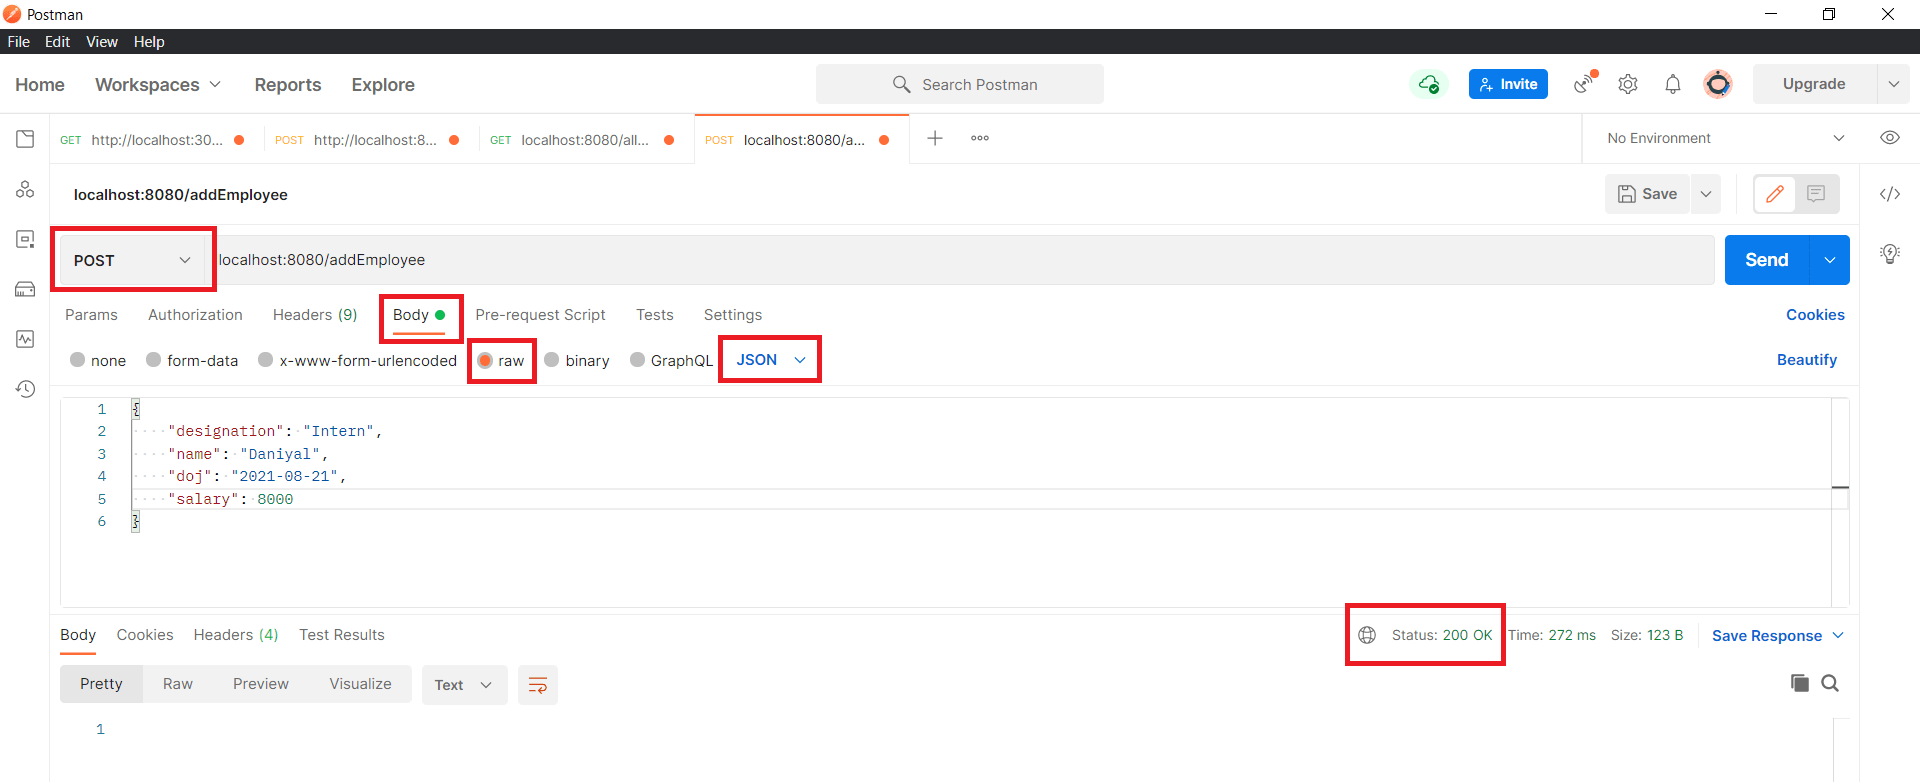
Now let’s open up the POSTMAN tool and start testing our API. Make sure that your SpringBoot project is up and running.
GET – Fetching all Employees
POST – Find Single Employee by Id
POST – Adding a new Employee
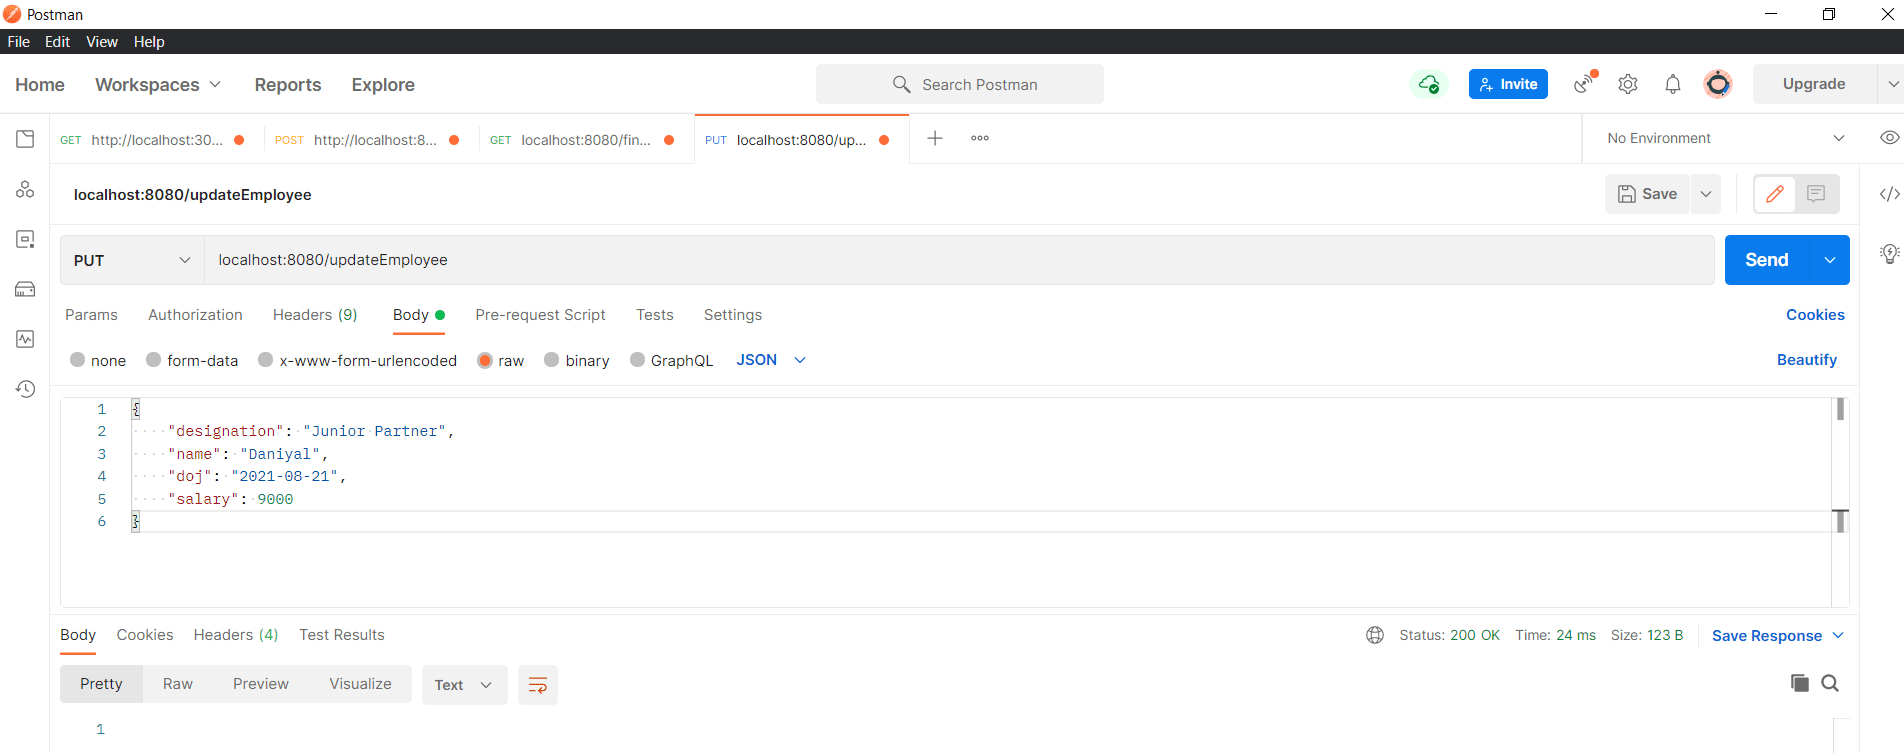
PUT – Updating an Employee
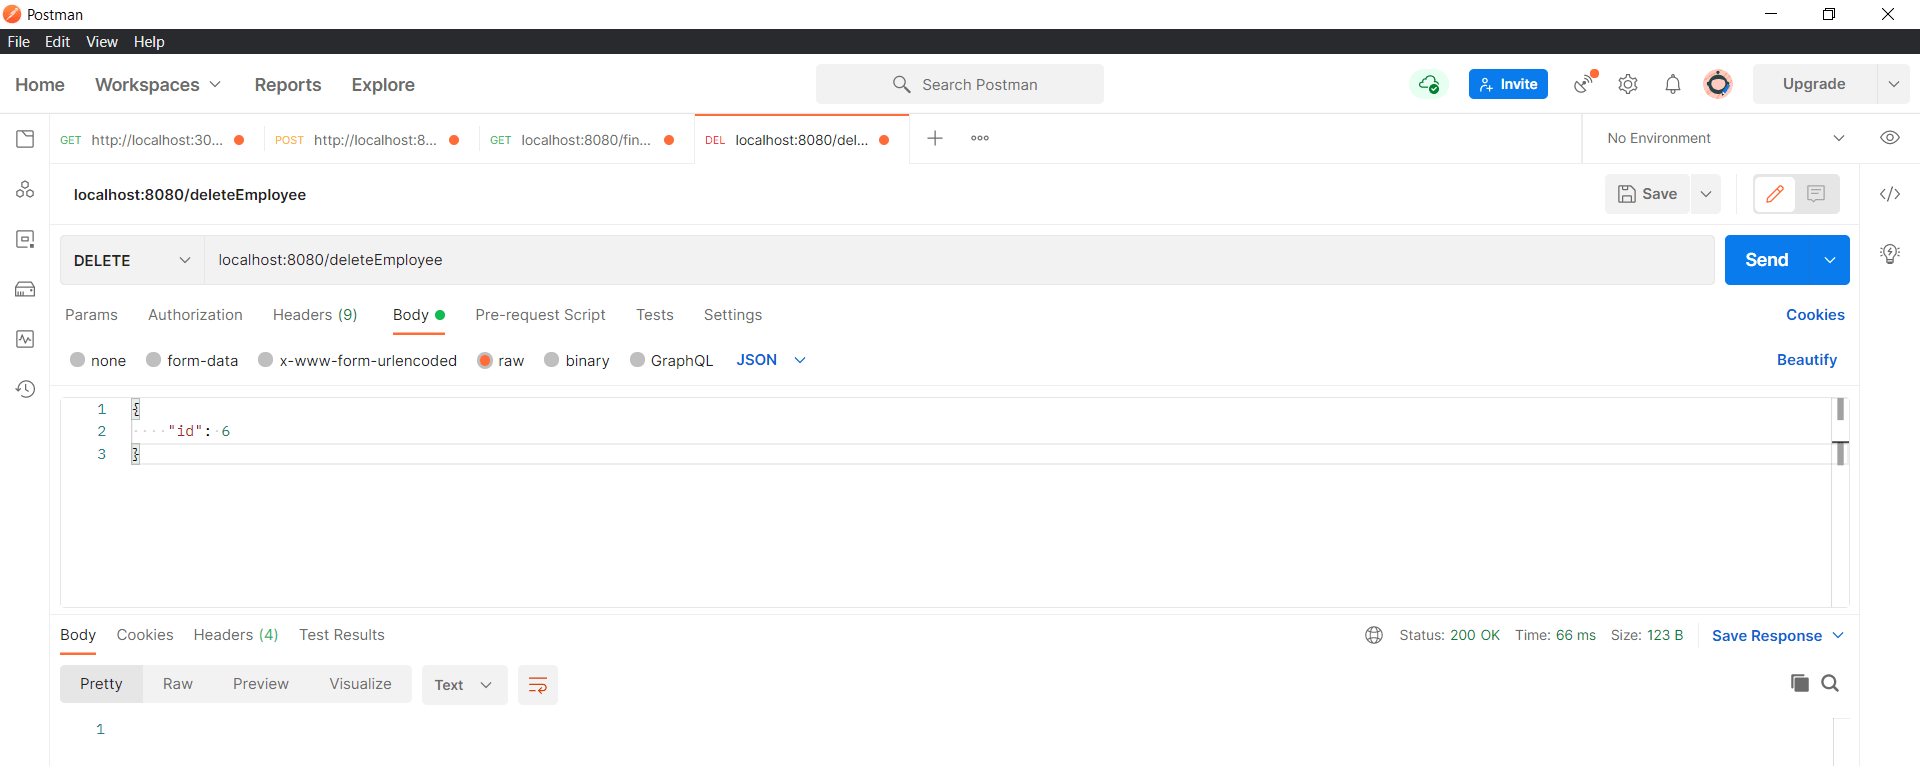
DELETE – Deleting an Employee
AND THAT’S A WRAP!
We have successfully developed and consumed a CRUD API using Java SpringBoot and MySQL Database. Hope that clears all the confusion (if any) and motivates you into trying it out yourself. If you found this article helpful, please give it a like and leave a comment at the bottom.
Have a great one!
Recent Comments
Categories
- Angular
- AWS
- Backend Development
- Big Data
- Cloud
- Database
- Deployment
- DevOps
- Docker
- Frontend Development
- GitHub
- Google Cloud Platform
- Installations
- Java
- JavaScript
- Linux
- MySQL
- Networking
- NodeJS
- Operating System
- Python
- Python Flask
- Report
- Security
- Server
- SpringBoot
- Subdomain
- TypeScript
- Uncategorized
- VSCode
- Webhosting
- WordPress
Search
Recent Post
Understanding Mutex, Semaphores, and the Producer-Consumer Problem
- 13 October, 2024
- 10 min read
Process scheduling algorithm – FIFO SJF RR
- 14 September, 2024
- 8 min read
How to Implement Multithreading in C Language
- 8 September, 2024
- 9 min read
