
As you should know, security is a major criterion for any Operating System. In Linux, we can create multiple users and thus need to be assigned permissions accordingly. Hence in this article, we will see how to add users, groups and assign permissions in Linux.
Prerequisite
- Must have Linux OS or its Virtual Machine (YouTube Tutorial)
- Basic Linux commands hands-on. (Check here)
Table of Content
- View all Users
- Creating a new User
- Setting User Password
- Adding User to sudoer list
- Switch Users in Linux
- Deleting a User
- View all Groups
- Creating a Group
- Adding User to a Group
- Removing User from Group
- Deleting a Group
- Types of Permission in Linux
- Understanding Linux Permissions annotation
- Changing Permissions in Linux
- How to Change the Owner of a File
- How to Edit Group Ownership
- How to Change Directory Ownership
- How to Use Recursive Chown
Add Users, Groups and Assign Permissions in Linux
A. Users in Linux
You can think of a User as a single personal account. Just like in Windows or Mac. There are 2 types of users:
- Root User (One which has administrative rights overall)
- Regular User (Limited privileges. We assign them rights manually)
1. How to view all Users in Linux
To simply view a list of all the created Users in your Linux Operating System, execute the following command:
cat /etc/passwd
2. How to create a User in Linux
To create a new user in Linux, type the following command in the Terminal. Make sure you are using “sudo” command before executing anything. See the command shown below:
sudo adduser testuser
The above command will ask for a ‘New Password’ for the newly created user. It will continue to ask you a few random information about the user. Just keep on pressing enter to skip them.
3. How to set User Password in Linux
After creating a user, we need to give it a password. For that, execute the following command:
sudo passwd testuser
The above command will ask you to enter a new password. It will then ask you to re-enter the same password, after which you will be done.
4. How to switch between users in Linux
Once the user has been created, in order to login into that user, execute the following command:
su -l testuser
This command will be followed by you entering your username and password to log in.
5. How to add Users to Sudoers list
What is a sudoers list? It’s a list where we can mention any Linux user, such as the one we created.
Adding a user to the sudoers list would allow us to give that user, admin access while executing certain tasks. In simple words, you can execute commands while adding ‘sudo’ before it and it will run that command as if it’s run by an admin.
The user we created (testuser) is not listed in the sudoers list by default. Therefore, to add it to the list, execute the following command:
Note: The below command is only for DEB-based Linux distributions.
					usermod -aG sudo testuser

reboot
- -a flag ensures that the user is added to the group without removing them from any other groups.
- -G flag specifies the group to which you want to add the user.
After a quick restart, your user would then be listed in the sudoers list.
6. How to delete a user in Linux
To simply delete a user in Linux, execute the following command:
sudo userdel testuser
B. Groups in Linux
Groups are basically a collection of Users in Linux. It’s convenient because rights and privileges given to a Group would apply to all its users. Basic privileges in Linux are read, write and execute.
1. How to view all Groups in Linux
To simply view a list of all the created Groups in your Linux Operating System, execute the following command:
cat /etc/group
2. How to create a Group in Linux
To create a group with the name “testgroup” enter the following command:
sudo groupadd testgroup
3. How to add a User to a Group in Linux
Now that we have a user and a group, it’s time to assign or add that user to that group. For that, execute the following command:
sudo usermod -aG testgroup testuser
The above command simply adds or assigns the testuser to the testgroup.
- -a flag ensures that the user is added to the group without removing them from any other groups.
- -G flag specifies the group to which you want to add the user.
4. How to remove a User from a Group in Linux
In order to remove a user from a group, enter the following Linux command:
sudo gpasswd -d testuser testgroup
5. How to delete a Group in Linux
Let’s delete the previously created group with this command:
sudo groupdel testgroup
C. Assign Permissions in Linux
1. Types of permissions in Linux
Linux supports multi-user environments. Meaning we can have multiple users with various privileges and permissions to access files and directories.
The admin can simply assign these permissions to the Groups, and all the users within it would have those same permissions.
The basic permissions in Linux are:
- Read: Where the users are allowed to open and view the content of a directory or a file. Represented by r.
- Write: Where the user would have the right to open and change the content of the file. They can add, remove or rename the files and directories. Represented by w.
- Execute: This permission is applicable on executable files, such as a bash file (.sh). The user with this permission is allowed to run a file or script. Represented by w.
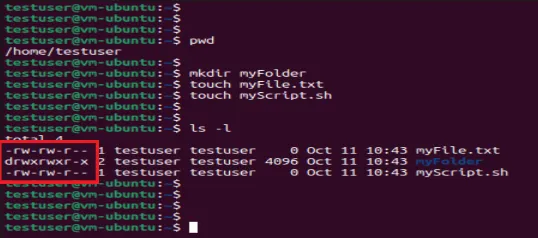
To check what rights the current user has for a particular directory or file, execute the following command where the file is located.
ls -l
Note: Check this article to get hands-on practice with Basic Linux Commands.
2. Understanding Linux Permission annotation
To understand the permissions, look at this quick reference:
- ‘r’ = read.
- ‘w’ = write.
- ‘x’ = execute.
- ‘-’ = no permission.
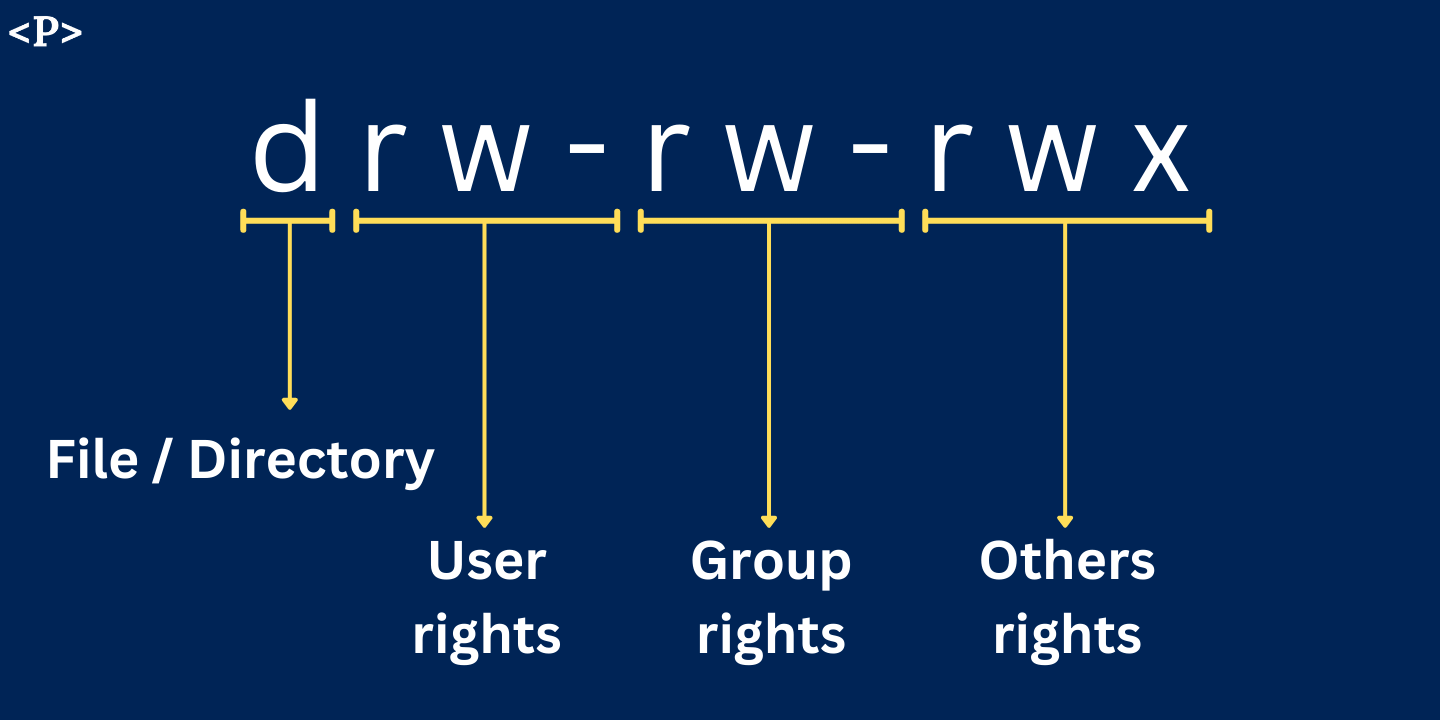
The above command would show all the rights in this format. The first letter ‘d’ shows the type of item. If it’s ‘ d’, it’s a directory. If it’s a ‘-’ then it’s a file.
Then it shows the rights for all the 3 categories.
- The first part shows that user ‘testuser’ has read and write permission to that directory but not to execute it.
- While the 2nd part shows that the group that the user belongs to has the same rights.
- The 3rd part shows other users have rights to read, write, and execute as well.
The others are users which have access to the file or directory, but they were not the creator of it. Nor do they belong to a group that has access to that file/directory.
3. Changing Permissions in Linux
To change the current permission of a user or group, we would be using chmod command.
chmod is an acronym for change mode. There are a few annotations involved when using this command. And you can modify permissions in these 2 methods of annotation.
Alphabetical annotations:
- ‘u’ indicates file owner (User).
- ‘g’ indicates groups.
- ‘o’ indicates others.
- ‘a’ indicates all users as owner, group, and others.
Numerical annotations:
- ‘0’ represents no permission.
- ‘1’ represents execute permission.
- ‘2’ represents write permission.
- ‘3’ represents execute and write.
- ‘4’ represents read permission.
- ‘5’ represents read and execute.
- ‘6’ represents read and write.
- ‘7’ represents read, write and execute permissions.
Let’s look at a few chmod examples in Linux.
The current permissions for myFile.txt as shown in the image above is -rw-rw-r–. Let’s change that.
4. How to add executable rights to a file in Linux
chmod o+x myFile.txt
In the above command, we are giving execution permission to Other Users for the myFile.txt file. The permission would now look like –rw–rw-r-x
Causes the system to shut down or reboot cleanly. May require superuser privileges, so just use sudo before the commands
5. How to remove write permissions from a file in Linux
chmod g-w myFile.txt
The above command will remove write permission from the group. The permission would now look like: -rw-r- -r-x
6. How to add executable and write permissions to a file in Linux
chmod g+wx myFile.txt
The above command will give write and execute permissions to the group. The permission would now look like -rw-rwxr-x
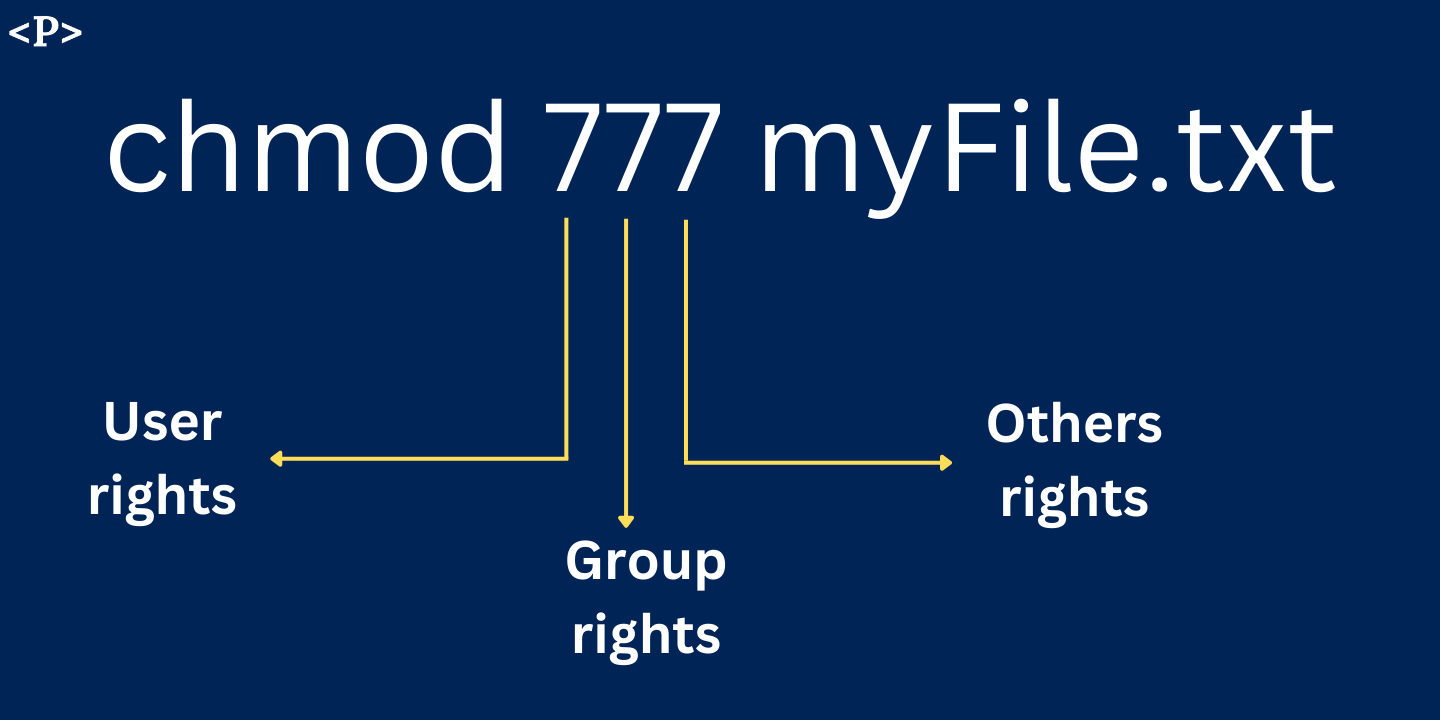
The 2nd way of changing permissions in Linux is through numeric annotations. And is more commonly used in both ways.
7. How to enable all permissions of a file in Linux
chmod 777 myFile.txt
The above command is going to give all permissions to Users, Groups, and Other users. The permission would now look like -rwxrwxrwx
chmod 745 myFile.txt
- The above command will give all permissions to the user.
- It will give only read permission to the group.
- It will give read and execute permission to the other users.
The Permission would now look like this: -rwxr- -r-x
D. Change Owner in Linux
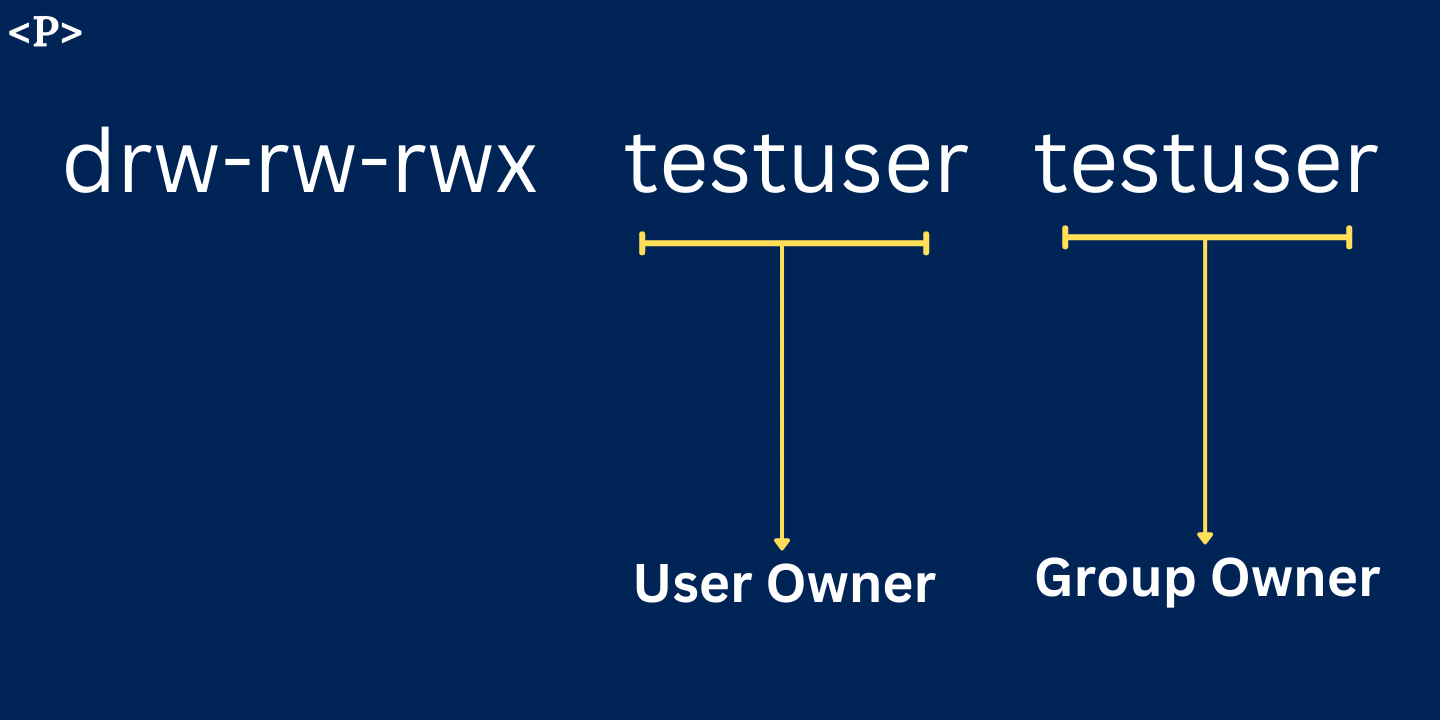
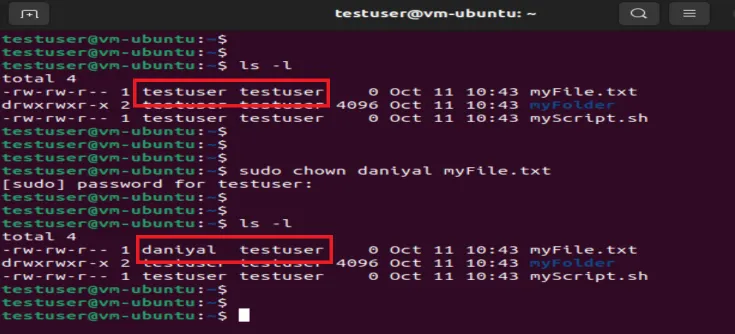
For a given file or directory you can change the owner. For that, we use the chown command, which stands for ‘change owner’. To see the current owners of a file or directory we use the following command:
ls -l
Let’s see some examples of chown in Linux.
2. How to Edit Group Ownership
chown :root myFile.txt
Just like we changed the User ownership, we can change the group ownership as well. The above command changes the Group of myFile.txt from testuser to root.
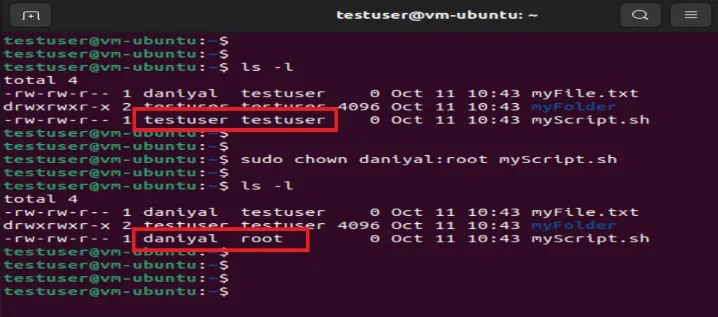
chown daniyal:root myFile.txt
The above command changes the User and the Group ownership of myFile.txt in a single command.
Separated by a colon (:), the left side is for changing User ownership to daniyal. The right side is for changing the Group ownership to root. Look at the image below for reference.
3. How to Change Directory Ownership
To change the ownership of a directory, we use the exact same command as before but target that particular directory. The Linux command for that is:
chown daniyal:root myFolder
Note: Changing the ownership of a directory DOES NOT change the ownership of the files inside of that directory. For that, you need to either go and change them individually or use recursive command. The recursive command is shown in the next clause.
4. How to Use Recursive Chown
The recursive method is useful when you want to change the owner of a directory, along with all the files and sub-directory within it.
The command is exactly the same as the previous one, with the addition of the –R flag. Let’s see the example.
chown -R daniyal:root myFolder
The above command will not only change the owner of myFolder but also all the files and sub-directories inside it.
And that’s a wrap!
These commands will only work on a LINUX terminal. And a common way to run Linux with Windows is to start a Virtual Machine using VMware.
I hope this article helped understand How to add Users, Groups and Assign Permissions in Linux. You may also want to check out Basic Linux commands hands on. Please like this article and leave your reviews in the comment section below.
Have a great one!
Recent Comments
Categories
- Angular
- AWS
- Backend Development
- Big Data
- Cloud
- Database
- Deployment
- DevOps
- Docker
- Frontend Development
- GitHub
- Google Cloud Platform
- Installations
- Java
- JavaScript
- Linux
- MySQL
- Networking
- NodeJS
- Operating System
- Python
- Python Flask
- Report
- Security
- Server
- SpringBoot
- Subdomain
- TypeScript
- Uncategorized
- VSCode
- Webhosting
- WordPress
Search
Recent Post
Understanding Mutex, Semaphores, and the Producer-Consumer Problem
- 13 October, 2024
- 10 min read
Process scheduling algorithm – FIFO SJF RR
- 14 September, 2024
- 8 min read
How to Implement Multithreading in C Language
- 8 September, 2024
- 9 min read



One reply on “How to add Users, Groups and Assign Permissions in Linux”
very informative
thank you
Comments are closed.